Automatically PEP8 & Format Your Python Code


Even if you don't intend anybody else to read your code, there's still a very good chance that somebody will have to stare at your code and 
figure out what it does: That person is probably going to be you,
twelve months from now[1].
or as Zen of Python says "Readability Counts".

PEP8 Style Guide:

Since code is read more than it is written, it is very important to make sure that the code is readable. Python has coding convetions(PEP8 style guide) to maintain consistency in code and thereby making it more readable.

There are lot of tools (like pep8, flake8, pylint) to check if Your code is in compliance with PEP8. Today most of the IDE/text editors have plugins which check for these errors and report it on the fly. If You are writing code from scratch, You can make sure that You are following coding conventions.

However once in a while You have to read/bug-fix other people's code who don't follow these conventions(or You might even stumble across Your old piece of code). Once You are accustomed to style guide, it will be uneasy to read inconsistent code. Here is a badly formatted Python file opened in Emacs editor(with flymake & flake8 configured)


Custom Style Guide:

If You don't like any of PEP8 rules, You can set Your own style guide for Your project. Most developers find limiting line length to 79 characters annoying. So they set their own line limit. You can even configure PEP8 checkers to take You own guidelines and check the code according to it.

Auto PEP8:

Formatting code to PEP8 style is boring & time consuming process. So instead of manually formatting code, You can use autopep8 package which automatically formats Python code to conform to the PEP 8 style guide.

To install the package run
$ pip install autopep8
If You have a file foo.py as show above, You can run
$ autopep8 --in-place --aggressive --aggressive foo.py
which neatly formats the file like this


Emacs Integration:

As emacs is extremely configurable editor, with just couple of lines of lisp, we can integrate autopep8 to emacs. Just find where autopep8 is installed; write a function which runs autopep8 on current buffer; bind a key to that function; set a hook, so that when ever You save a file, it will be automatically run the function.

This works reasonably well. But I do recommend using Elpy for Python developemnt in emacs. I have just sent a pull request to integrate autopep8 with elpy.

Formatting:

PEP8 formatters like autopep8, pep8ify will remove only lint errors. But they can't beautify code. 
little = more[3:   5]

x = {'a': 37, 'b': 42,
'c': 927}
Above code remains same after pep8ifying also. But the code doesn't look good yet. You can use formatters like yapf, which will format the code even if the code is PEP8 compliant. 
Above code will be formatted to 
little = more[3:5]

x = {'a': 37, 'b': 42, 'c': 927}
Some times this even destroys Your manual formatting. For example 
BAZ = {
[1, 2, 3, 4],
[5, 6, 7, 8],
[9, 10, 11, 12]
}
will be converted to 
BAZ = {[1, 2, 3, 4], [5, 6, 7, 8], [9, 10, 11, 12]}
But You can tell it to ignore some parts.
BAZ = {
[1, 2, 3, 4],
[5, 6, 7, 8],
[9, 10, 11, 12]
} # yapf: disable

Beyond PEP8:

As we have learnt to auto PEP8 code, it is the time to look beyond PEP8. There is a good talk by Raymond Hettinger on that - Beyond PEP8, Best practices for beautiful intelligible code.

Let Machines take care of PEP8 & Let Humans look Beyond PEP8.

References:

[1] Code is read much more often than it is written, so plan accordingly.
Python - PEP8 style guide.
Autopep8 - formats Python code to conform to the PEP 8.
PEP8ify - modifies python source code to conform to PEP8.
Elpy, the Emacs Lisp Python Environment.


Read more articles about Python!
Read more articles about Emacs!

Whats So Good About Django Traceback?

When You are working on django project, if You make any errors, it will throw a simple traceback on the terminal where you started server.


If you go to browser, you will find a rich traceback like this.


Most Python developers, discover django-extensions within a few weeks after they start working with Django and start using Werkzeug debugger. Werkzeug has lot of advantages when compared to default Django traceback. I also used it for a while. For the same error Werkzeug throws traceback like this.


One thing I really like about Django traceback is, the distinction between user code and the internal Django code. Most of the time, developers were looking for the bug in their code instead of looking for a bug in Django. So, Django makes it easier to skip over the frames that doesn't matter and focus on the one which matters most.


It also shows local vars in that frame. With this You instantly look at the variables to find out why error has occured(see this Django Ticket #11834: for more discussion about this).

These two features make it very easy to track down most common errors.


Read more articles about Python!

The Intelligence Behind Python Slices

When getting items from a list, if no index is supplied or an invalid index is given, Python throws error.

In [4]: alpha =  ['a', 'b', 'c', 'd', 'e', 'f']

In [5]: alpha[21]
---------------------------------------------------------------------------
IndexError                                Traceback (most recent call last)
<ipython-input-5-3b7fb56a1ede> in <module>()
----> 1 alpha[21]

IndexError: list index out of range

In [6]: alpha[]
  File "<ipython-input-6-a17d5cfb2c2f>", line 1
    alpha[]
          ^
SyntaxError: invalid syntax

When slicing a list, if start/stop/step values are not supplied or invalid values are provided, Python figures out appropriate values and returns relevant items or an empty list depending on the values.

In [170]: alpha
Out[170]: ['a', 'b', 'c', 'd', 'e', 'f']

In [172]: alpha[:]
Out[172]: ['a', 'b', 'c', 'd', 'e', 'f']

In [173]: alpha[::]
Out[173]: ['a', 'b', 'c', 'd', 'e', 'f']

In [174]: alpha[:-1:]
Out[174]: ['a', 'b', 'c', 'd', 'e']

In [175]: alpha[:2:-1]
Out[175]: ['f', 'e', 'd']

In [176]: alpha[:100000000000000000000000000000000000000000000000]
Out[176]: ['a', 'b', 'c', 'd', 'e', 'f']

In [177]: alpha[::1000000000]
Out[177]: ['a']

In [178]: alpha[::-1]
Out[178]: ['f', 'e', 'd', 'c', 'b', 'a']

There is something interesting happening with python slicing. Lets see how python slicing works and what happens behind the scenes.

Slicing Is NOT Indexing:

Wiki Python has this amazing picture which clearly distinguishes indexing and slicing.

python-slicing

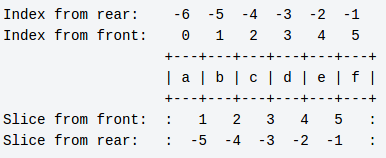
It is a list with 6 elements in it. To understand slicing better, consider that list as a set of six boxes placed together. Each box has an alphabet in it.

Indexing is like dealing with the contents of box. You can check contents of any box. But You can't check contents of multiple boxes at once. You can even replace contents of the box. But You can't place 2 balls in 1 box or replace 2 balls at a time.

In [122]: alpha = ['a', 'b', 'c', 'd', 'e', 'f']

In [123]: alpha
Out[123]: ['a', 'b', 'c', 'd', 'e', 'f']

In [124]: alpha[0]
Out[124]: 'a'

In [127]: alpha[0] = 'A'

In [128]: alpha
Out[128]: ['A', 'b', 'c', 'd', 'e', 'f']

In [129]: alpha[0, 1]
---------------------------------------------------------------------------
TypeError                                 Traceback (most recent call last)
<ipython-input-129-c7eb16585371> in <module>()
----> 1 alpha[0,1]

TypeError: list indices must be integers, not tuple

Slicing is like dealing with boxes itself. You can pickup first box and place it on another table. To pickup the box all You need to know is the position of beginning & ending of the box.

You can even pickup first 3 boxes or last 2 boxes or all boxes between 1 & 4. So, You can pick any set of boxes if You know beginning & ending. This positions are called start & stop positions.

The interesting thing is that You can replace multiple boxes at once. Also You can place multiple boxes where ever You like.

In [130]: alpha[0:1]
Out[130]: ['A']

In [131]: alpha[0:1] = 'a'

In [132]: alpha
Out[132]: ['a', 'b', 'c', 'd', 'e', 'f']

In [133]: alpha[0:2] = ['A', 'B']

In [134]: alpha
Out[134]: ['A', 'B', 'c', 'd', 'e', 'f']

In [135]: alpha[2:2] = ['x', 'xx']

In [136]: alpha
Out[136]: ['A', 'B', 'x', 'xx', 'c', 'd', 'e', 'f']

Slicing With Step:

Till now You have picked boxes continuously. But some times You need to pickup discretely. For example You can pickup every second box. You can even pickup every third box from the end. This value is called step size. This represents the gap between Your successive pickups. The step size should be positive if You are picking boxes from the beginning to end and vice versa.

In [137]: alpha = ['a', 'b', 'c', 'd', 'e', 'f']

In [142]: alpha[1:5:2]
Out[142]: ['b', 'd']

In [143]: alpha[-1:-5:-2]
Out[143]: ['f', 'd']

In [144]: alpha[1:5:-2]
Out[144]: []

In [145]: alpha[-1:-5:2]
Out[145]: []

How Python Figures Out Missing Parameters:

When slicing if You leave out any parameter, Python tries to figure it out automatically.

If You check source code of CPython, You will find a function called PySlice_GetIndicesEx which figures out indices to a slice for any given parameters. Here is the logical equivalent code in Python.

This function takes a Python object & optional parameters for slicing and returns start, stop, step & slice length for the requested slice.

def py_slice_get_indices_ex(obj, start=None, stop=None, step=None):

    length = len(obj)

    if step is None:
        step = 1
    if step == 0:
        raise Exception("Step cannot be zero.")

    if start is None:
        start = 0 if step > 0 else length - 1
    else:
        if start < 0:
            start += length
        if start < 0:
            start = 0 if step > 0 else -1
        if start >= length:
            start = length if step > 0 else length - 1

    if stop is None:
        stop = length if step > 0 else -1
    else:
        if stop < 0:
            stop += length
        if stop < 0:
            stop = 0 if step > 0 else -1
        if stop >= length:
            stop = length if step > 0 else length - 1

    if (step < 0 and stop >= start) or (step > 0 and start >= stop):
        slice_length = 0
    elif step < 0:
        slice_length = (stop - start + 1)/(step) + 1
    else:
        slice_length = (stop - start - 1)/(step) + 1

    return (start, stop, step, slice_length)

This is the intelligence that is present behind slices. Since Python has inbuilt function called slice, You can pass some parameters & check how smartly it calculates missing parameters.

In [21]: alpha = ['a', 'b', 'c', 'd', 'e', 'f']

In [22]: s = slice(None, None, None)

In [23]: s
Out[23]: slice(None, None, None)

In [24]: s.indices(len(alpha))
Out[24]: (0, 6, 1)

In [25]: range(*s.indices(len(alpha)))
Out[25]: [0, 1, 2, 3, 4, 5]

In [26]: s = slice(None, None, -1)

In [27]: range(*s.indices(len(alpha)))
Out[27]: [5, 4, 3, 2, 1, 0]

In [28]: s = slice(None, 3, -1)

In [29]: range(*s.indices(len(alpha)))
Out[29]: [5, 4]

This is how Python is able to figure out missing parameters from slices.

I started digging this after attending a talk by Anand B. Pillai on python gotchas. Thanks to Anand B. Pillai & Krace Kumar for conducting BangPypers meetup & encouraging to checkout Python source code.

References:

Wiki Python: https://wiki.python.org/moin/

CPython repo: https://github.com/python/cpython

Slice on SO: http://stackoverflow.com/questions/509211/explain-pythons-slice-notation

Docs for slice: https://docs.python.org/3.4/library/functions.html#slice

Python/C API for slice: https://docs.python.org/3.4/c-api/slice.html

Django Tips & Tricks #3 - Dynamic Initial Values In Forms

Django form fields accept initial argument. So You can set a default value for a field.

In [1]: from django import forms

In [2]: class SampleForm(forms.Form):
   ...:     name = forms.CharField(max_length=10, initial='avil page')
   ...:

In [3]: f = SampleForm()

In [4]: f.as_p()
Out[4]: u'<p>Name: <input maxlength="10" name="name" type="text" value="avil page" /></p>'


Sometimes it is required to override init method in forms and set field initial arguments.

In [11]: from django import forms

In [12]: class AdvancedForm(forms.Form):
   ....:
   ....:    def __init__(self, *args, **kwargs):
   ....:        super().__init__(*args, **kwargs)
   ....:        self.fields['name'].initial =  'override'
   ....:
   ....:        name=forms.CharField(max_length=10)
   ....:

In [13]: f2 = AdvancedForm()

In [14]: f2.as_p()
Out[14]: '<p>Name: <input maxlength="10" name="name" type="text" value="override" /></p>'


Now let's pass some initial data to form and see what happens.

In [11]: from django import forms

In [12]: class AdvancedForm(forms.Form):
   ....:
   ....:    def __init__(self, *args, **kwargs):
   ....:        super().__init__(*args, **kwargs)
   ....:        self.fields['name'].initial = 'override'  # don't try this at home
   ....:
   ....:        name=forms.CharField(max_length=10)
   ....:

In [19]: f3 = AdvancedForm(initial={'name': 'precedence'})

In [20]: f3.as_p()
Out[20]: '<p>Name: <input maxlength="10" name="name" type="text" value="precedence" /></p>'

If You look at the value of input field, it's is NOT the overrided. It still has form initial value!

If You look into source code of django forms to find what is happening, You will find this.

data = self.field.bound_data(
       self.data,
       self.form.initial.get(self.name, self.field.initial)  # precedence matters!!!!
)

So form's initial value has precedence over fields initial values.

So You have to override form's initial value instead of fields's initial value to make it work as expected.

In [21]: from django import forms

In [22]: class AdvancedForm(forms.Form):
   ....:
   ....:    def __init__(self, *args, **kwargs):
   ....:        super().__init__(*args, **kwargs)
   ....:        self.initial['name'] = 'override'  # aha!!!!
   ....:
   ....:        name=forms.CharField(max_length=10)
   ....:

In [23]: f4 = AdvancedForm(initial={'name': 'precedence'})

In [24]: f4.as_p()
Out[24]: '<p>Name: <input maxlength="10" name="name" type="text" value="override" /></p>'

Read official docs about django forms.

Read more articles about Python!

WD My Cloud NAS Setup On Linux

Introduction

I recently bought a WD My Cloud NAS1 device to store my personal data. I wanted to set it up on my Ubuntu machine. For WD My Cloud, there is no official support for Ubuntu or any other Linux distros. But setting up it is quite easy.

NAS Setup

Make sure You have connected power adapter & LAN cables to it. If You open Your router config, You will see WD My cloud in client list. Make note of its IP address. If You want, You can assign a static IP also in the router settings.

Next step is to install NFS client package. NFS(Network File System) allows a system to share directories and files with others over a network. By using NFS, users and programs can access files on remote systems almost as if they were local files. So, update your packages & install nfs-common package.

$ sudo apt-get update
$ sudo apt-get install nfs-common

Now we can list folders which are available to mount using showmount command.

$ showmount -e <ip-address>

Create an empty folder to mount any of the folder you wanted and mount it.

$ sudo mount -o rw,soft,intr,nfsvers=3 <ip>:<folder-to-mount> <path-to-mount>

Now You can start moving data into/out of WD My Cloud.

If You want to mount it automatically on boot, add following line to /etc/fstab file.

<ip>:<folder-to-mount> <path-to-mount> nfs rw,soft,intr,nfsvers=3 0 0

Conclusion

Even though there is no official support for Ubuntu, WD My Cloud works pretty well with Ubuntu and other Linux distros.

Install Oh-My-Zsh On Ubuntu!

I crashed my  OS & I had to re install  all  things again. This  is  just  to  keep a track on how  to install zsh.

For oh-my-zsh to work, You need to install zsh & git core first. To do that
apt-get install zsh
apt-get install git-core
Now, You can install it by
curl -L http://install.ohmyz.sh | sh
Next, change your shell to zsh
chsh -s `which zsh`
and then restart your system.
sudo shutdown -r 0

How To Make Better Use Of Any Emacs Package?

Elpy is an Emacs package that brings powerful Python editing to Emacs. While going through elpy issues, I came across an interesting thread, where someone asked this


This lead to this post. This post gives a brief introduction on getting familiar with any Emacs package & start hacking it quickly.


Getting Started:

Most Emacs packages provide a Readme file & some of them have good documentation too. Also there is emacswiki where some other hacks will be available.

That will be help You to get started with any package. You can start using default functions/key bindings.

If we take elpy as a case study, it has Readme file which shows how to install elpy. It also has a good documentation about elpy & some of its important features.


Getting Under The Hood:

Now lets see some interesting stuff which Emacs packages are capable of but read me file or documentation wont contain.

One useful package I recommend for this purpose is helm-descbindings which shows key bindings of all available modes. You can also filter among them.

Here You will come to know about few useful functions an Emacs package is capable of doing.

In the case of elpy, You can see something like this.


But You cannot find all key bindings here as some of them might be shadowed (or taken away) by other packages.

To specify a key binding, Emacs packages use a define-key function. So if You open source code of the package and search for define-key, you will see all key bindings there.

If you search for define-key in elpy.el You will come across this


Now You know a few functions & their key bindings which are not present in the documentation.

If there are any key bindings that are not useful You can unbind them.
For example elpy has "C-c C-p" binded to (elpy-flymake-previous-error) which I won't use much. So I can unbind it

    (define-key elpy-mode-map (kbd "C-c C-p") nil)
This sets "C-c C-p" to nil.

Digging Deeper:

So far we have seen what an Emacs package is capable of doing. Now, lets start tweaking it a little bit.

The first thing You can do is start using interactive functions right away. Functions in Emacs package which has interactive form are callable commands. You can invoke them using M-x and function name. You will find a lot of them here.

If you want to find all interactive commands in an emacs package, You have to search through source code & find them. Instead if you have helm (If You are not using Helm, I highly recommend You to start using it.) installed, if you type M-x & few letters of the package name, it will narrow down all the interactive functions of that package.

Elpy has a lot of interactive commands, You can see a few of them here.


Now You can start bindings keys to any of the functions that You like. Previously We have unbinded a key. Now lets bind it to some function.

    (global-set-key (kbd "C-c C-p") 'elpy-set-project-root)


Getting (in)sane With Lisp:

So far we have just used Emacs package as it is. If You know a bit of lisp, You can start tweaking existing functions or You can write Your own functions. This mostly depends on how You want to use & customize a package. You can do a lot of fun stuff. Enjoy lisping :)


BangPypers Talks - Emacs As Python IDE!

BangPypers is the Bangalore Python Usergroup. It is one of the largest and oldest Python user groups in India. On 3rd Saturday of every month there will be meetup. This month(Feb 2014) took place at IBM, Domlur. I gave a talk about setting up Emacs as Python IDE.

When  I started using Emacs, I spent a lot of time to configure & make it an IDE. Recently I came across elpy(emacs lisp python enviroment) &  liked it a lot. With just couple of lines You can turn emacs into Python IDE. So I stressed a lot about elpy during the talk.

I talked about other important packages I used & other things that can be done with emacs.


Meetup Report

Slides

Bangalore Django User Group - Beginners Workshop

During BangPypers december dev sprint Few weeks back, Krace & Siva asked me if I can take a Django workshop. I agreed. They have worked on logistics & scheduled for February at IBM, Domlur.

I reached there by 9.30 AM. 26 people attended the session. Due to some problems we started a bit late than what we have planned. Krace, Siva & Ankur assisted a lot during the session.

We planned to cover the basics of Django & CRUD operations by building a simple app. We covered basics & simple create view. Due to time constraint we were unable to cover the remaining.