Build & Distribute a Python C Extension Module

Introduction

Python is a great language for prototyping and building applications. Python is an interpreted language, and it is not compiled. This means that the code is not optimized for the machine it is running on. This is where C comes in.

C is a compiled language, and it is much faster than Python. So, if you want to write a Python module that is fast, you can write it in C and compile it. This is called a C extension module. In this article, we will see how to build and distribute a Python C extension module using wheels.

Building a C extension module

Let's start by creating a simple C extension module called maths. In this, we will create a square function that takes a number and returns its square.

First, create a directory called maths and create a file called maths.c inside it. This is where we will write our C code.

#include <Python.h>


int square(int num) {
    return num * num;
}


static PyObject *py_square(PyObject *self, PyObject *args) {
  int n_num, result;
  if (!PyArg_ParseTuple(args, "i", &n_num)) {
    return NULL;
  }
  result = square(n_num);

  return Py_BuildValue("i", result);
}


static PyMethodDef mathsMethods[] = {
  {"square", py_square, METH_VARARGS, "Function for calculating square in C"},
  {NULL, NULL, 0, NULL}
};


static struct PyModuleDef maths = {
  PyModuleDef_HEAD_INIT,
  "maths",
  "Custom maths module",
  -1,
  mathsMethods
};


PyMODINIT_FUNC PyInit_maths(void)
{
    return PyModule_Create(&maths);
}

We need to create a setup.py file to build our module. This file tells Python how to build our module.

from setuptools import setup, Extension

setup(
    name="maths",
    version="0.1",
    ext_modules=[Extension("maths", ["maths.c"])]
)

Now, we can build our module by running python setup.py build. This will create a build directory with a lib directory inside it. This lib directory contains our compiled module. We can import this module in Python and use it.

>>> import maths
>>> maths.square(5)
25

Instead of testing our module by importing it in Python, we can also test it by running python setup.py test. This will run the tests in the test directory. We can create a test directory and create a file called test_maths.py inside it. This is where we will write our tests.

import unittest

import maths

class TestMaths(unittest.TestCase):
    def test_square(self):
        self.assertEqual(maths.square(5), 25)

Distributing a C extension module

Now that we have built our module, we can distribute it. We can distribute it as a source distribution or a binary distribution. A source distribution is a zip file that contains the source code of our module. We can distribute our module as a source distribution by running python setup.py sdist. This will create a dist directory with a zip file inside it. This zip file contains our source code.

However, source distribution of C extension modules is not recommended. This is because the user needs to have a C compiler installed on their machine to build the module. Most users just want to pip install the module and use it. So, we need to distribute our module as a binary distribution.

We can use cibuildwheel package to build wheels across all platforms. We can install it by running pip install cibuildwheel.

To build a wheel for a specific platform and a specific architecture, we can run cibuildwheel --platform <platform> --architecture <architecture>. For example, to build a wheel for Linux x86_64, we can run cibuildwheel --platform linux --architecture x86_64. This will create a wheelhouse directory with a wheel file inside it. This wheel file contains our compiled module.

cibuildwheel runs on most CI servers. With proper workflows, we can easily get wheels for all platforms and architectures. We can then upload these wheels to PyPI and users can easily install these wheels.

Conclusion

In this article, we saw how to build and distribute a Python C extension module using wheels. We saw how to build a C extension module and how to distribute it as a binary distribution. We also saw how to use cibuildwheel to build wheels across all platforms and architectures.

Speed Up AMD64(Intel) VMs on ARM(M1 Mac) Host

Introduction

From 2020, Apple has transitioned from Intel to ARM based Apple Silicon M1. If we run uname -mp on these devices, we can see the CPU architecture details.

$ uname -mp
arm64 arm

Let's run the same command on a device using Intel x86 processor.

$ uname -mp
x86_64 x86_64

Many popular docker images1 doesn't have ARM64 support yet. When setting up a dev environment in M1 Mac, there are high chances that we stumble on these containers if we are using plain docker or ARM64 VM. So, there is a need to spin up x86_64 VMs.

In this article, lets see how the performance affects when running a cross architecture containers and how to speed it up.

Setup

Lima2 can run foreign architecture(x6_64) VMs on Mac. Let's install lima, start a AMD64 VM & ARM64 VM and install k3s3 in them. k3s will run multiple process in the background and let's see how resource consumption varies in these VMs.

$ brew install lima

$ limactl start linux_arm64
$ limactl start linux_amd64

When starting a VM, we can edit arch parameter in the configuration. Once VM starts, we can see the details by running limactl list.

$ limactl list
NAME                ARCH
linux_amd64         x86_64
linux_arm64         aarch64

Lets login to each VM & install k3s.

$ limactl shell linux_arm64

$ curl -sfL https://get.k3s.io | sh -
$ limactl shell linux_amd64

$ curl -sfL https://get.k3s.io | sh -

If we look at resource consumption on the host machine, x86_84 VM is using way more resources than ARM64 VM. This is because of the emulation layer that is running on top of the VM.

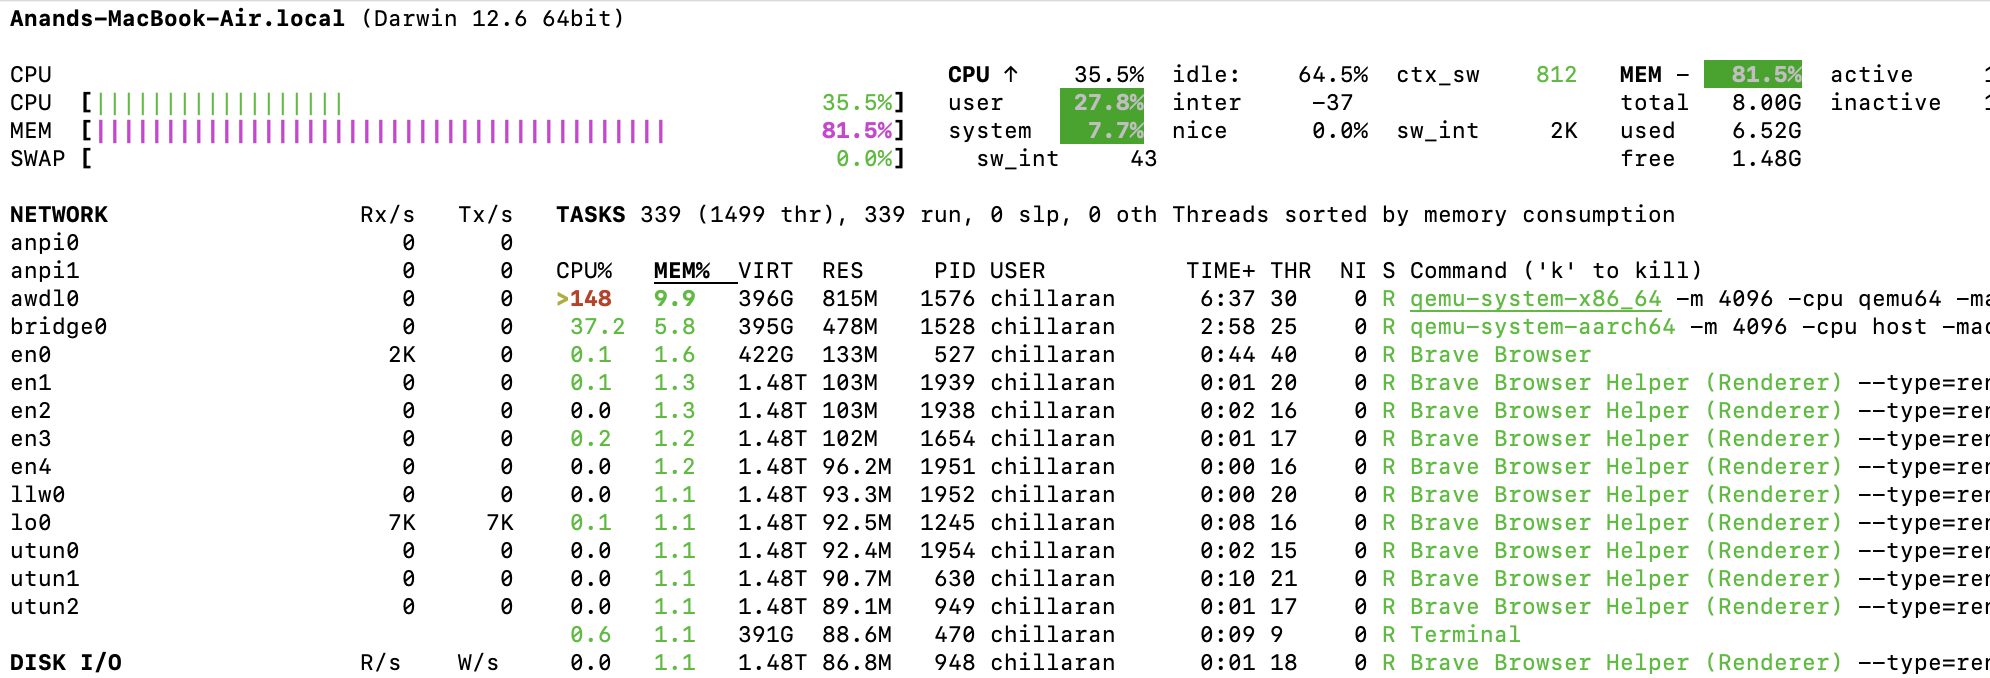
We can login to individual VMs, run top to see the load average as well.

Fast Mode

lima provides fast-mode option for cross architecture VMs which will speed up the performance.

For that, we need to log in to VMs and install emulators.

$ sudo systemctl start containerd
$ sudo nerdctl run --privileged --rm tonistiigi/binfmt --install all

After that we can restart the VMs and monitor the resource consumption. On an average, we can see that the resource consumption is reduced by 50%.

Conclusion

In this article, we saw how to run cross architecture VMs on M1 Mac and how to speed up the performance. We can use this technique to run cross architecture containers on Linux as well.

Local Kubernetes Cluster with K3s on MacBook M1


Update: This article is outdated. I wrote an updated article on setting up k8s anywhere with single command.


Introduction

Kubernetes(k8s)1 is an open-source system for managing large scale containerized applications. K3s2 is lightweight K8s in a single binary file. However, K3s won't work directly on Macbook as it needs systemd/OpenRC.

$ curl -sfL https://get.k3s.io | sh -

[ERROR]  Can not find systemd or openrc to use as a process supervisor for k3s

To setup k8s/k3s on Mac, we need to setup a Linux layer on top of Mac. An easy way to spin up Linux VMs on Macbook M1(Apple Silicon) is to use multipass3. In this article, lets see how to setup K3s on Mac using multipass

K3s Setup

Install multipass with brew by running the following command.

$ brew install --cask multipass

Once it is installed, spin up a new VM by specifying memory and disk space.

$ multipass launch --name k3s --mem 4G --disk 40G

Once VM is launched, we can see VM details.

$ multipass info k3s
Name:           k3s
State:          Running
IPv4:           192.168.64.4
                10.42.0.0
                10.42.0.1
Release:        Ubuntu 22.04.1 LTS
Image hash:     78b5ca0da456 (Ubuntu 22.04 LTS)
Load:           1.34 2.10 1.70
Disk usage:     3.7G out of 38.6G
Memory usage:   1.2G out of 3.8G
Mounts:         /Users/chillaranand/test/k8s => ~/k8s
                    UID map: 503:default
                    GID map: 20:default

We can even mount Mac directories on the VM.

$ multipass mount ~/test/k8s k3s:~/k8s

This will be useful when we are making changes on host directories and want to apply changes on the cluster which is inside VM.

Now, we can install k3s by running the install script inside the VM.

$ multipass shell k3s

ubuntu@k3s:~$ curl -sfL https://get.k3s.io | sh -

This will setup a k3s cluster on the VM. We can use kubectl and deploy applications on this cluster.

By default, k3s config file will be located at /etc/rancher/k3s/k3s.yaml. With this config file, we can use Lens4 to manage k8s cluster.

Lets find out IP of the VM & k8s token so that we can spin up a new VM and add it to this cluster.

# get token & ip of k3s
$ multipass exec k3s sudo cat /var/lib/rancher/k3s/server/node-token
$ multipass info k3s | grep -i ip
$ multipass launch --name k3s-worker --mem 2G --disk 20G

$ multipass shell k3s-worker

ubuntu@k3s-worker:~$ curl -sfL https://get.k3s.io | K3S_URL=https://192.168.64.4:6443 K3S_TOKEN="hs48af...947fh4::server:3tfkwjd...4jed73" sh -

We can verify if the node is added correctly from k3s VM.

ubuntu@k3s:~$ kubectl get nodes
NAME         STATUS   ROLES                  AGE     VERSION
k3s          Ready    control-plane,master   15h     v1.24.6+k3s1
k3s-worker   Ready    <none>                 7m15s   v1.24.6+k3s1

Once we are done with experimenting k3s, we can delete the VMs.

$ multipass delete k3s k3s-worker
$ multipass purge

Conclusion

multipass is a great tool to spin up Linux VMs on Mac with single command. K3s is better tool to setup k8s cluster locally for development and testing.

Even though we have mentioned this tutorial is meant for Mac M1, it should work fine on any Linux distribution as well.

How To Root Xiamo Redmi 9 Prime Without TWRP

Introduction

Rooting1 an android device voids warranty but gives a great control over the device. For most of the popular devices, TWRP2 recovery is available. Once a device bootloader is unlocked, we can install TWRP recovery. After that we can flash Magisk to gain root access.

For some devices like Redmi 9 Prime(codename: lancelot), TWRP recovery is not available officially. There are couple of unofficial images but they are not working as expected and are causing bootloop.

In this article, lets see how to root lancelot device.

Rooting Lancelot

First ensure that the device bootloader is unlocked and your system has adb & fastboot installed. To root without TWRP, we need to obtain patched boot.img & vbmeta.img and flash them in fastboot mode.

First we need to download the stock ROM of the device to extract boot.img file. We can go to manufacturers site and download the same stock ROM3 that is running on the device. Once the ROM is downloaded, we can unzip it. There we can find boot.img file.

We need to patch this file. To patch this, download magisk app on the device. Click on install and select the boot.img file to patch. After a few minutes, it will generate a patched boot file.

We can download this file to system by running the following command.

$ adb pull -p /storage/emulated/0/Download/magisk_patched-25200_cU1ws.img .

Now we need to download patched vbmeta file. This is available in XDA4 forum. Click this link to download it.

Once we have both patched files, we can reboot the device in fastboot mode by using the following commands.

$ adb devices

$ adb reboot bootloader

When the device is in fastboot mode, run the following commands to root it.

$ fastboot --disable-verity --disable-verification flash vbmeta vbmeta_redmi9.img

$ fastboot flash boot magisk_patched-25200_cU1ws.img

$ fastboot reboot

Once the deivce is rebooted, we can install root checker app and verify that the device is rooted successfully.

Final Thoughts

When we buy a Mac or PC(Linux/Windows), it is rooted by default. For Linux/Mac, we can run programs as sudo. For windows, we can just run a program as an administrator. There are no extra steps to root/jailbreak these devices.

But most mobile companies make rooting hard and only tech savy users can root the device. It would be great if mobile phones are rooted by default.

Integrating Frappe Health with SNOMED CT

Introduction

Frappe Health1 is an open-source Healthcare Information System(HIS), to efficiently manage clinics, hospitals, and other healthcare organizations. Frappe Health is built on the Frappe Framework2, a low code highly customizable framework.

Frappe Health provides support for integrating various medical coding standards3. In the patient encounter doctype, doctors can search and add pre-configured medical codes.

In this article, let’s see how to integrate Frappe Health with SNOMED CT.

SNOMED CT Integration

SNOMED CT4 is a comprehensive collection of medical terms which helps consistent data exchange between systems. It can also cross-map to other standards like ICD-10, LOINC, etc.

Since SNOMED CT is a huge dataset, it takes a lot of effort to import the entire dataset into Frappe Health. It also provides REST API to query SNOMED terms. Also, if your healthcare organization is focusing on only a specific domain, it doesn’t make sense to import the entire dataset.

In such scenarios, it is better to map only the required diagnosis, symptoms, and other clinical objects.

Frappe Health has a Diagnosis doctype where practitioners can enter diagnosis. We can add an additional field called Snomed Code to link diagnosis to relevant SNOMED code.

Frappe framework provides server script5 to dynamically run python script on any document event. We can write a simple python script to fetch relevant SNOMED code using SNOMED REST API. This script can be executed whenever the clinical object gets modified.

Here is a simple python server script that adds relevant snomed codes to diagnosis.

diagnosis = doc.diagnosis

url = "https://browser.ihtsdotools.org/snowstorm/snomed-ct/browser/MAIN/descriptions?&limit=50&term=" + diagnosis + "&conceptActive=true&lang=english&skipTo=0&returnLimit=100"
data = frappe.make_get_request(url)
code = data['items'][0]['concept']['id']
description = data['items'][0]['concept']['fsn']['term']

mc = frappe.get_doc({
    'doctype': 'Medical Code',
    'code': code,
    'medical_code_standard': 'SNOMED',
    'description': description,
})
try:
    mc.insert()
except:
    pass

doc.medical_code = medical_code.name

After saving this script, if we go ahead and create or modify any diagnosis, it will automatically add relevant Snomed code to the diagnosis as shown below.

The server script makes sure all the diagnosis objects are codified automatically without any manual effort.

Since Frappe Framework & Frappe Health are low code, extremely customizable, we are able to integrate it with SNOMED in just a few minutes. Similarly, we can codify other clinical objects like Symptoms, Procedures, Medications, etc.

Mastering DICOM - #3 Setup Modality Worklist SCP

Introduction

In the earlier article, we have learnt how to setup DICOM for digging deeper into DICOM protocol. In this article, let us learn how to setup a modality worklist(WML) SCP. Modalities can send C-FIND queries to this SCP and retrieve worklist information

Using Orthanc Worklist Plugin

Orthanc server has worklist plugin1 which will serve worklist files that are stored in a particular directory. Let us download sample worklist files from Orthanc repository and keep in "WorklistDatabase" directory.

Generate default configuration by running the following command.

$ ./Orthanc --config=config.json

In the orthanc configuration file, enable worklist plugin, specify the worklist database directory so that Orthanc can locate relevant worklist files, add required modalities and restart the server.

  "Plugins" : [
    "libModalityWorklists.dylib"
  ],

  "Worklists" : {
    "Enable": true,
    "Database": "./WorklistsDatabase",
    "FilterIssuerAet": false,
    "LimitAnswers": 0
  },

  "DicomModalities" : {
      "PYNETDICOM" : ["PYNETDICOM", "127.0.0.1", 4243],
      "FINDSCU" : ["FINDSCU", "127.0.0.1", 4244]
  }

Once the plugin is enabled, we can use findscu to send C-FIND query.

$ findscu -W -k "ScheduledProcedureStepSequence" 127.0.0.1 4242

This will retrieve all worklist files from the server.

Using wlmscpfs

dcmtk 2 is a collection of utilities for DICOM standard. It has wlmscpfs application which implements basic Service Class Provider(SCP). We can start the service by running the following command.

wlmscpfs --debug --data-files-path WorklistsDatabase 4242

Once the service is started modalities can send C-FIND query to this service.

Conclusion

We have seen how to setup MWL SCP using Orthanc & wmlscpfs. Now that we have PACS & WML SCP up and running, in the next article lets see how to dig deeper in to the dicom standard.

Twilio Integration With Frappe Framework

Frappe1 is a low code framework for rapidly developing web applications. Twilio2 is a SAAS platform for SMS, Video etc with APIs.

In this post, lets see how to setup Twilio Integration with Frappe.

Sending SMS

Frappe has inbuilt SMS manager3 where users can confgiure SMS gateway and send SMS to mobiles directly.

To send out messages/SMS with Twilio, we just need to configure Twilio API keys in SMS settings.

First, create an account in Twilio and collect the following information from the account.

  • Twilio account SID

  • Gateway URL

  • Auth Token

  • "From" Phone number

These details need to be added to SMS settings in the following format.

For authorization parameter, we need to enter base64 encoded value of account_sid:auth_token.

Once these values are set, we can go to SMS Center and send out dummy messages to ensure all settings are configured properly.

Twilio App

If we want to manage incoming/outgoing voice calls or send messages via WhatsApp, we need to install twilio-integration4 app. We can install the app on our site by running the following commands.

bench get-app https://github.com/frappe/twilio-integration.git
bench --site example.com install-app twilio_integration

Once the app is installed, we can go to Twilio Settings and configure the keys as shown below.

After that we can setup Voice Call Settings to manage incoming/outgoing calls.

To send messages via Whatsapp, we can set the channel as Whatsapp in Notification doctype.

This is how we can send SMS, Whatsapp messages & manage calls via Twilio using Frappe Framework.

Why DMART is not in FNO category?

FNO Segment

There are 4000+ companies1 that are traded in NSE/BSE. Of these, 198 stocks are included in FNO segement2. For these stocks, Futures & Options(FNO) contracts will be available and these stocks won't have any fixed ciruit limits.

FNO Reviews

On 11th April 2018, SEBI released a circular(SEBI/HO/MRD/DP/CIR/P/2018/67) on a framework3 for reviewing stocks in derivatives segement. Based on this framework, a stock has to meet the below criteria be added in FNO segement.

  • The stock shall be chosen from amongst the top 500 stocks in terms of average daily market capitalization and average daily traded value in the previous six months on a rolling basis.

  • The stock’s median quarter-sigma order size over the last six months, on a rolling basis, shall not be less than ₹25 Lakh.

  • The market wide position limit(MWPL) in the stock shall not be less than ₹500 crore on a rolling basis.

  • Average daily delivery value in the cash market shallnot be less than ₹10 crore in the previous six months on a rolling basis.

If a stock is in FNO category and fails to meet this criteria, it will be removed from FNO segment.

In 2021 alone, SEBI released 6 circulars thrugh which 32 new stocks are added in the FNO segment.

DMART

DMART has met the above FNO criteria long back. Even after it has met the criteria, there were more than 6 reviews456 and suprisingly DMART was not added to the FNO segement.

There is a long discussion on Zerodha TradingQ&A forum7 on why DMART was not added to FNO category but no one could give any explaination.

After that, I have sent an email to SEBI & NSE seeking clarification for the same. It has been more than 6 months and they haven't responded yet. I have reached out to few people in the trading community privately to get clarification on the same. But nobody I know has any clue on this.

I am still looking for an answer. If you can shed some light, please send out a message to me. I would like to have a quick chat with you regarding the same.

Hoping to solve the mystery soon.

Using Frappe Framework As REST API Generator

Introduction

When a company plans to build a mobile application and/or a web application, they need to create REST APIs to store data. This is a common requirement for CRUD applications.

In the Python ecosystem, there are several projects like Django Rest Framework, Flask-RESTful, FastApi which does the heavy lifting of implementing REST APIs. In other ecosystems, there are similar projects/frameworks for this job.

REST API Generators

By using the above mentioned frameworks, developers can build REST APIs at a faster rate. Still, developers have to develop and maintain code for these APIs.

To avoid even this work, there are REST API generators like postgrest1, prest which can instantly generate REST APIs by inspecting database schema. With these, developers just have to design the DB schema and these tools take care of generating APIs without writing a single line of code.

In this post, let us see how Frappe framework can be used as a REST API generator and what are the advantages of using Frappe.

Frappe Framework

Frappe framework is meta data driven low code, web framework written in Python and Javascript.

Web UI

Frappe framework provides web UI to create models(called doctypes in Frappe) and it provides REST API2 for all the models out of the box.

There is no need to write manual SQL queries to manage schema. With some training even non-developers can even manage models in Frappe.

Roles & Permissions

With traditional API generators, managing roles & permissions involves additional development and maintenance costs. Frappes comes with an authentication system and it has support for role based permissions out of the box. From the web UI, users can manage roles & permissions.

Hooks

Even though REST API generators give API out of the box, there will be scenarios where custom business logic needs to be hooked in for various events. In such scenarios, developers end up using an alternate framework/tool to manage hooks and business logic.

Frappe provides server scripts by which arbitrary python code can be executed dynamically based on model events. There is no need to set up another framework for these things.

Utilities

Frappe framework comes with a lot of utilities like Job Queues, Schedulers, Admin interface, socket.io etc. As the project grows and the need evolves, Frappe has all the common utilities that are required for a web application development.

Conclusion

When a company wants to build a solution to a problem, it should focus most of the time in solving that problem instead of wasting their time on building CRUD interfaces or REST APIs.

Frappe framework was designed to rapidly build web applications with low code. If you need a REST API generator and some additional functionality for the REST APIs, Frappe framework fits the bill and reduces a lot of development time.

Adding Fuzzy Search To Frappe Framework

Introduction

As software developers, we use fuzzy search a lot especially when using Emacs or any other editors/IDEs. For example to search a file called patient_history.js, in the editor, we can just type pah and editor will narrow it down.

This is quite handy as we can open any file with just few characters.

FF is a low code, open source, web framework in Python and Javascript. All sites built with FF will have a global search bar(aka awesome bar) as shown below. Here, we can search for doctypes, reports, pages etc.

To open Patient History, we have to type almost the entire text in search bar. If we type pah like we have typed in the editor, it won't show any results.

Instead, we can add fuzzy search here so that we can search for any item with just a frew key strokes.

Fuzzy Search

There are many third party packages which implement fuzzy search in programming languages. However we can't use any of these fuzzy search packages directly. These editors internally use a scoring algorithm to rank the results and display results based on score.

It internally considers many factors mentioned below for scoring.

  • Matched letters

  • CamelCase letters

  • snake_case letters

  • Consecutive matching letters

We can come up with a scoring mechanism for these factors and based on the matches, we can rank the results. I have implemented a custom fuzzy search alogirthm based on the above factors but it was slow and results were not good in some cases.

Then I stumbled up this fts_fuzzy_match implementation. This is a reverse engineered implementation of sublime text fuzzy search and it has a detailed scoring mechanism as well. It assigns negative ranking to mismatched letters and bonus points for consecutive matches.

This works well and is as effective as most IDEs search. Now that there is a solid fuzzy search, all we need to do is hook this up in FF.

FF internally has a fuzzy search function and we can directly hook it up here as shown here.

After that, we can search for anything in just few key strokes. For example to open patient history, we can just type pah and it will show results like this.

Conclusion

Fuzzy search in editors/IDEs is quite handy and when we bring to other places like FF or any other search bar, it improves search experience a lot.