Using Frappe Framework As An Integration Engine

Introduction

In healthcare orgainsations, data exchange between systems is complicated and has interopolabilty issues. Integration engines are widely used in healthcare industry for bi-directional data transfer.

In this article, let us look at the advantages of using interface engines and how Frappe Framework can be used as an interface engine.

Integration Engines

In a traditional agile development approach, building a new interface might take weeks/months. With an integration engine, a new interface can be replicated in a matter of hours with little or no scripting at all.

Creating a REST API, listening to a webhook, transforming a data between channels, broadcasting a message, sending/receiving HL7 messages or any other commonly performed task can be implemented in integration engine without much effort.

Due to this integration engines like Mirth Connect are widely used in healthcare.

The above diagram shows usage of integration engine in a healthcare orgainsation.

Frappe Framework

Frappe Framework is a low code web application framework with batteries included. Even though Frappe is lablled as a framework, it can be used as an integration engine as well.

It provides REST APIs out of the box for all the models(called doctypes in Frappe). Users can create custom APIs using server scripts and it has support for webhooks as well.

Users can schedule custom cron jobs, setup emails, enable data transformations and other tasks without much coding.

One feature Frappe Framework lacks when compared to integration engines is sending/receiving HL7 messages on ad-hoc ports. This feature is not available out of the box. Users need to develop a custom app or use any 3rd party app for it.

Frappe Healthcare is an HIS(Healthcare Information System) built on top of Frappe/ERPNext. If a hospital is using Frappe Healthcare, then there won't be a need to use integration engine as Frappe framework can take care of most of these things.

Conclusion

In healthcare, integration engines are used extensively to tackle data exchange between systems. Due to its low-code development and batteries included approach, even though Frappe is a web application framework, it can be used as an integration engine as well.

On Resuming Writing Challenge

Photo by Kaboompics on Pexels

In 2018, I decided to write at least one blog post per month throughout the year. Even though I tried to write posts every month, I couldn't publish anything in few months.

In 2019, I went a step ahead and made a legal(?) agreement with a friend. I paid him 1,00,000 rupees and told him that he could keep the money as a reward if I failed to write a blog post every month.

This agreement kept me on my toes. I didn't miss writing a single month in 2019. I stayed awake on the last days of the month to finish and publish the post before midnight.

In 2020, I took up the challenge again and I was able to write at least one post every month.

In 2021, I didn't take up the challenge. I wrote just three posts in the entire year.

In the two years when I took the challenge, even though I wrote a few mediocre articles, I wrote a few good articles. In the other two years when I didn't take the challenge, my writing quality and quantity declined.

Due to this, I decided to take up the writing challenge again this year.

Instead of limiting the 1,00,000 reward to my friend, I decided to extend it to all the readers.

The first person who calls out that there is no new blog post in a month will get the 1,00,000 reward. The next three people will get a small gift as a token of appreciation.

I will try my best to write at least one post every month. Let's wait till the end of the year and see how it goes.

A Typo Got Me $100 Bug Bounty

Introduction

On a lazy evening, while on a call with a friend, I made a typo while entering the url. Instead of typing http://app-00421.on-aptible.com, I typed http://app-00412.on-aptible.com1.

In this article, lets see how this typing mistake got me a bug bounty.

Vulnerability

A bug bounty program2 is a deal offered by companies by which individuals can receive recognition and compensation for reporting bugs, security exploits and vulnerabilities.

Aptible provides HIPAA3 compliant PAAS platform so that healthcare companies can deploy their apps without compliance hassle.

After deploying an application on aptible, users can create an endpoint for public access. For this purpose, atpible generates domain names in sequential order.

Due to this, a set of publicly exposed servers will have incremental domain names. A lot of companies use these sequentially generated domain names for staging & testing purposes. In general, many companies don't bother about implementing security best practices on non-production servers.

When I was trying to access a demo site at http://app-00421.on-aptible.com, I made a typo and visited http://app-00412.on-aptible.com. This site was a staging site of some other company without any authentication. The company's source code, AWS keys and a lot of sensitive information was publicly accessible.

I quickly emailed that company regarding this issue and they took their site offline. As per Aptible disclosure policy4, this bug is out of scope. Howev er, I sent an email to their team regarding the severity of the issue. Since sequential domain names are generating additional target surface for attackers, I suggested to move to random urls.

For this disclosure, they have provided a bounty of 100$ and Aptible decided to move away from sequential domain names.

MacBook Productivity Tools For Developers

Introduction

When using Mac, there are few utilities which come in handy for day to day operations and also aid in productivity.

Here are some of the useful but lesser know utilities for mac.


Alfred

Alfred

Alfred is a productivity app for Mac which helps you to search and launch apps, files, bookmarks, and more. You can also search the web and do calculations.


Bandwidth+

Bandwidth+ tracks network usage on Mac. If there are multiple networks, it gives detailed information about the network consumed on all the networks.


CheatSheet

Ever wondered what are the keybindings when using any application? With CheatSheet, we can just hold key bit longer, and it will show all the available shortcuts in the application.


Debokee Tools

Wondering which network your Mac connected to? If you use multiple wireless networks, then Debokee Tools can show the connected wireless network name directly in the menu bar.


Espanso

Espanso is a text expanding tool that improves productivity across the system. We can set up shortcuts for frequently typed things like email, phone number etc., so that we don't have to type them again and again.


Flycut

Flycut is a simple clipboard manager, stores history. When you want to copy/paste frequently, this comes in handy.


Grand Perspective

If Mac is running low on disk space, Grand Perspective shows a graphical view of the disk usage. It will be much easier to pinpoint large files that are consuming the disk and then clean them up.


Hotkey

Hotkey is a simple app that allows you to set up global shortcuts for frequently used actions. It can be used to open applications, folders, websites, and more.


Karabiner-Elements

Karabiner Elements allows users to customize keyboard via simple modifications, complex modifications, function key modifications etc.

We can use space bar as space and control as well with a simple modification rule.


Stats

Stats is a simple app that shows the CPU, memory, disk, and network usage in the menu bar. It also shows the temperature of the CPU.


Conclusion

These are some useful utilities for day to day usage. In the upcoming articles, lets learn about useful command line utilities that improve productivity on a daily basis.

Mastering DICOM - #2 Setup Orthanc DICOM Server

This is a series of articles on mastering Dicom. In the earlier article, we have learnt how PACS/DICOM simplifies the clinical work flow.

In this article, lets setup a dicom server so that we have a server to play around with Dicom files.

Orthanc Server

There are several Dicom servers like Orthanc, Dicoogle etc. Orthanc is a lightweight open source dicom server and is widely used by many Health care organisations.

Sébastien Jodogne, original author of Orthanc maintains docker images. We can use these images to run Orthanc server locally.

Ensure docker is installed on the machine and then run the following command to start Orthanc server.

$ docker run -p 4242:4242 -p 8042:8042 --rm \
    jodogne/orthanc-python

Once the server is started, we can visit http://localhost:8042 and explore Orthanc server.

Heroku Deployment

Heroku is PAAS platform which supports docker deployments. Lets deploy Orthac server to Heroku for testing.

By default, Orthanc server runs on 8042 port as defined in the config file. Heroku dynamically assigns port for the deployed process.

We can write a shell script which will read port number from environment variable, replace it in Orthanc configuration file and then start Orthanc server.

#! /bin/sh

set -x

echo $PORT

sed 's/ : 8042/ : '$PORT'/g' -i /etc/orthanc/orthanc.json

Orthanc /etc/orthanc/

We can use this shell script as entry point in docker as follows.

FROM jodogne/orthanc-python

EXPOSE $PORT

WORKDIR /app
ADD . /app

ENTRYPOINT [ "./run.sh" ]

We can create a new app in heroku and we can deploy this container.

$ heroku apps:create orthanc-demo

$ heroku container:push web
$ heroku container:release web

Once the deployment is completed, we can access our app from the endpoint provided by heroku. Here is a orthanc demo server running on heroku.

Conclusion

In this article, we have learnt how to setup Orthanc server and deployed it to Heroku. In the next article, let dig deeper into dicom protocol by upload/accessing dicom files to the server.

Minimum Viable Testing - Get Maximum Stability With Minimum Effort

Introduction

Even though Test Driven Development(TDD)1 saves time & money in the long run, there are many excuses why developers don't test the software. In this article, lets look at Minimum Viable Testing(aka Risk-Based Testing)2 and how it helps to achieve maximum stability with minimum effort.

Minimum Viable Testing

Pareto principle states that 80% of consequences come from 20% of the causes. In software proucts, 80% of the users use 20% of the features. A bug in these 20% features is likely to cause higher impact than the rest. It makes sense to prioritize testing of these features than the rest.

Assessing the importance of a feature or risk of a bug depends on the product that we are testing. For example, in a project a paid feature gets more importance than free feature.

In TDD, we start with writing tests and then writing code. Compared to TDD, MVT consumes less time. When it comes to testing, there are unit tests, integration tests, snapshot tests, ui tests and so on.

When getting started with testing, it is important to have integration tests in place to make sure if something is working. Also the cost of integration tests is much cheaper compared to unit tests.

Most of the SAAS products have a web/mobile application and an API server to handle requests for the front end applications. Having UI tests for the applications and integration tests for APIs for the most crucial functionality should cover the ground. This will make sure any new code that is being pushed doesnt break the core functionality.

Conclusion

Even though RBT helps with building a test suite quicker that TDD, it should be seen as an alternate option to TDD. We should see RBT as a starting point for testing from which we can take next step towards achieving full stability for the product.

Find Performance Issues In Web Apps with Sentry

Introduction

Earlier, we have seen couple of articles here on finding performance issues1 and how to go about optimizing them2. In this article, lets see how to use Sentry Performance to find bottlenecks in Python web applications.

The Pitfalls

A common pitfall while identifying performance issues is to do profiling in development environment. Performance in development environment will be quite different from production environment due to difference in system requirements, database size, network latency etc.

In some cases, performance issues could be happening only for certain users and in specific scenarios.

Replicating production performance on development machine will be costly. To avoid these, we can use APM tool to monitor performance in production.

Sentry Performance

Sentry is widely used Open source error tracking tool. Recently, it has introduced Performance to track performance also. Sentry doesn't need any agent running on the host machine to track performance. Enabling performance monitoring is just a single line change in Sentry3 setup.

import sentry_sdk


sentry_sdk.init(
    dsn="dummy_dsn",
    # Trace half the requests
    traces_sample_rate=0.5,
)

Tracing performance will have additional overhead4 on the web application response time. Depending on the traffic, server capacity, acceptable overhead, we can decide what percentage of the requests we need to trace.

Once performance is enabled, we can head over to Sentry web application and see traces for the transactions along with operation breakdown as shown below.

At a glance, we can see percentage of time spent across each component which will pinpoint where the performance problem lies.

If the app server is taking most of the time, we can explore the spans in detail to pinpoint the exact line where it is taking most time. If database is taking most of the time, we can look out for the number of queries it is running and slowest queries to pinpoint the problem.

Sentry also provides option to set alerts when there are performance. For example, when the response time for a duration are less than a limit for a specified duration, Sentry can alert developers via email, slack or any other integration channels.

Conclusion

There are paid APM tools like New Relic, AppDynamics which requires an agent to be installed on the server. As mentioned in earlier articles, there are open source packages like django-silk to monitor performance. It will take time to set up these tools and pinpoint the issue.

Sentry is the only agentless APM tool5 available for Python applications. Setting up Sentry performance is quite easy and performance issues can be pinpointed without much hassle.

Make Python Docker Builds Slim & Fast

Introduction

When using Docker, if the build is taking time or the build image is huge, it will waste system resources as well as our time. In this article, let's see how to reduce build time as well as image size when using Docker for Python projects.

Project

Let us take a hello world application written in flask.

import flask


app = flask.Flask(__name__)


@app.route('/')
def home():
    return 'hello world - v1.0.0'

Let's create a requirements.txt file to list out python packages required for the project.

flask==1.1.2
pandas==1.1.2

Pandas binary wheel size is ~10MB. It is included in requirements to see how python packages affect docker image size.

Here is our Dockerfile to run the flask application.

FROM python:3.7

ADD . /app

WORKDIR /app

RUN python -m pip install -r requirements.txt

EXPOSE 5000

ENTRYPOINT [ "python" ]

CMD [ "-m" "flask" "run" ]

Let's use the following commands to measure the image size & build time with/without cache.

$ docker build . -t flask:0.0 --pull --no-cache
[+] Building 45.3s (9/9) FINISHED

$ touch app.py  # modify app.py file

$ docker build . -t flask:0.1
[+] Building 15.3s (9/9) FINISHED

$ docker images | grep flask
flask               0.1     06d3e985f12e    1.01GB

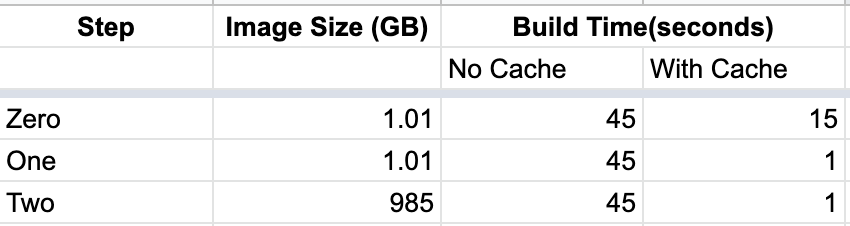
With the current docker, here are the results.

1. Install requirements first

FROM python:3.7

WORKDIR /app

ADD ./requirements.txt /app/requirements.txt

RUN python -m pip install -r requirements.txt

ADD . /app

EXPOSE 5000

ENTRYPOINT [ "python" ]

CMD [ "-m" "flask" "run" ]

Let us modify the docker file to install requirements first and then add code to the docker image.

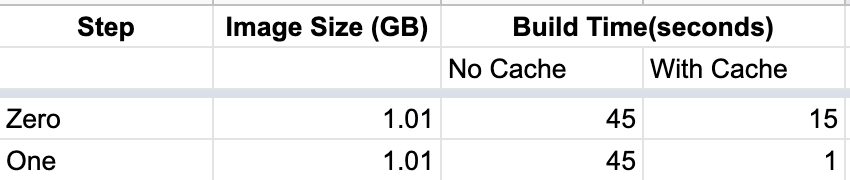
Now, build without cache took almost the same time. With cache, the build is completed in a second. Since docker caches step by step, it has cached python package installation step and thereby reducing the build time.
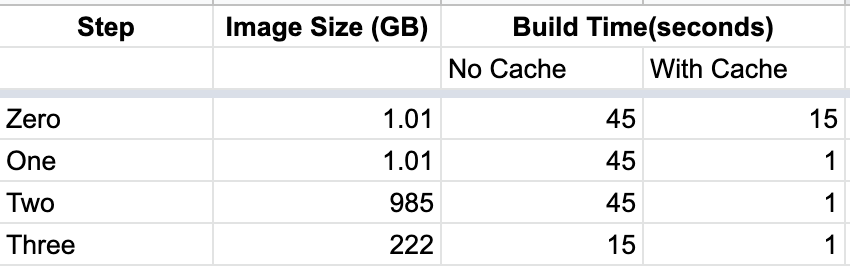
2. Disable Cache

FROM python:3.7

WORKDIR /app

ADD ./requirements.txt /app/requirements.txt

RUN python -m pip install -r requirements.txt --no-cache

ADD . /app

EXPOSE 5000

ENTRYPOINT [ "python" ]

CMD [ "-m" "flask" "run" ]

By default, pip will cache the downloaded packages. Since we don't need a cache inside docker, let's disable pip cache by passing --no-cache argument.

This reduced the docker image size by ~20MB. In real-world projects, where there are a good number of dependencies, the overall image size will be reduced a lot.

3. Use slim variant

Till now, we have been using defacto Python variant. It has a large number of common debian packages. There is a slim variant that doesn't contain all these common packages4. Since we don't need all these debian packages, let's use slim variant.

FROM python:3.7-slim

...

This reduced the docker image size by ~750 MB without affecting the build time.

4. Build from source

Python packages can be installed via wheels (.whl files) for a faster and smoother installation. We can also install them via source code. If we look at Pandas project files on PyPi1, it provides both wheels as well as tar zip source files. Pip will prefer wheels over source code the installation process will be much smoother.

To reduce Docker image size, we can build from source instead of using the wheel. This will increase build time as the python package will take some time to compile while building.


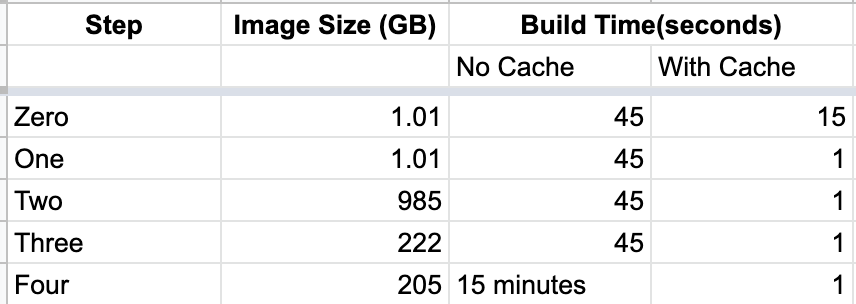
Here build size is reduced by ~20MB but the build has increased to 15 minutes.
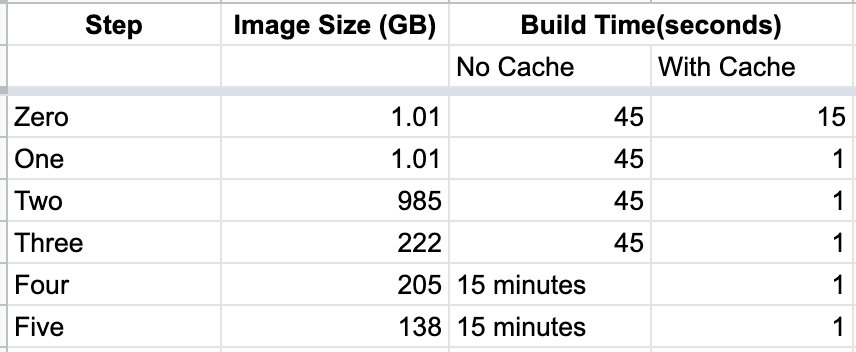
5. Use Alpine

Earlier we have used, python slim variant the base image. However, there is Alpine variant which is much smaller than slim. One caveat with using alpine is Python wheels won't work with this image2.

We have to build all packages from source. For example, packages like TensorFlow provide only wheels for installation. To install this on Alpine, we have to install from the source which will take additional effort to figure out dependencies and install.

Using Alpine will reduce the image size by ~70 MB but it is not recomended to use Alpine as wheels won't work with this image.

All the docker files used in the article are available on github3.

Conclusion

We have started with a docker build of 1.01 GB and reduced it to 0.13 GB. We have also optimized build times using the docker caching mechanism. We can use appropriate steps to optimize build for size or speed or both.

How To Deploy Mirth Connect To Kubernetes

Introduction

NextGen Connect(previously Mirth Connect) is widely used integration engine for information exchange in health-care domain. In this article, let us see how to deploy Mirth Connect to a Kubernetes cluster.

Deployment To k8s

From version 3.8, NextGen has started providing official docker images for Connect1. By default, Connect docker exposes 8080, 8443 ports. We can start a Connect instance locally, by running the following command.

$docker run -p 8080:8080 -p 8443:8443 nextgenhealthcare/connect

We can use this docker image and create a k8s deployment to start a container.

---
apiVersion: apps/v1beta1
kind: Deployment
metadata:
  name: mirth-connect
  namespace: default
spec:
  template:
    spec:
      containers:
      - name: mirth-connect
        image: docker.io/nextgenhealthcare/connect
        ports:
        - name: http
          containerPort: 8080
        - name: https
          containerPort: 8443
        - name: hl7-test
          containerPort: 9001
        env:
          - name: DATABASE
            value: postgres
          - name: DATABASE_URL
            value: jdbc:postgresql://avilpage.com:5432/mirth_db

This deployment file can be applied on a cluster using kubectl.

$ kubectl apply -f connect-deployment.yaml

To access this container, we can create a service to expose this deployment to public.

---
apiVersion: v1
kind: Service
metadata:
  name: mirth-connect
  annotations:
    service.beta.kubernetes.io/aws-load-balancer-ssl-cert: arn:aws:acm:ap-south-1:foo
    service.beta.kubernetes.io/aws-load-balancer-ssl-ports: "443"
    external-dns.alpha.kubernetes.io/hostname: connect.avilpage.com
spec:
  type: LoadBalancer
  selector:
    app: mirth-connect
  ports:
    - name: http
      port: 80
      targetPort: 8080
      protocol: TCP
    - name: https
      port: 443
      targetPort: 8443
      protocol: TCP
    - name: hl7-test
      port: 9001
      targetPort: 9001
      protocol: TCP

This will create a load balancer in AWS through which we can access mirth connect instance. If an ingress controller is present in the cluster, we can use it directly instead of using a seperate load balancer for this service.

Once Mirth Connect is up & running, we might have to create HL7 channels running on various ports. In the above configuration files, we have exposed 9001 HL7 port for testing of channel. Once we configure Mirth Channels, we need to expose appropriate ports in deployment as well as service similiar to this.

Conclusion

Earlier, there were no official docker images for Mirth Connect and it was bit diffucult to dockerize Mirth Connect and deploy it. With the release of official Docker images, deploying Mirth Connect to k8s or any other container orchestration platform has become much easier.

Serial Bluetooth Terminal With Python Asyncio

Introduction

PySerial package provides a tool called miniterm1, which provides a terminal to interact with any serial ports.

However miniterm sends each and every character as we type instead of sending entire message at once. In addition to this, it doesn't provide any timestamps on the messages transferred.

In this article, lets write a simple terminal to address the above issues.

Bluetooth Receiver

pyserial-asyncio2 package provides Async I/O interface for communicating with serial ports. We can write a simple function to read and print all the messages being received on a serial port as follows.

import sys
import asyncio
import datetime as dt

import serial_asyncio


async def receive(reader):
    while True:
        data = await reader.readuntil(b'\n')
        now = str(dt.datetime.now())
        print(f'{now} Rx <== {data.strip().decode()}')


async def main(port, baudrate):
    reader, _ = await serial_asyncio.open_serial_connection(url=port, baudrate=baudrate)
    receiver = receive(reader)
    await asyncio.wait([receiver])


port = sys.argv[1]
baudrate = sys.argv[2]

loop = asyncio.get_event_loop()
loop.run_until_complete(main(port, baudrate))
loop.close()

Now we can connect a phone's bluetooth to a laptop bluetooth. From phone we can send messages to laptop using bluetooth terminal app like Serial bluetooth terminal4.

Here a screenshot of messages being send from an Android device.

We can listen to these messages on laptop via serial port by running the following command.

$ python receiver.py /dev/cu.Bluetooth-Incoming-Port 9600
2020-08-31 10:44:50.995281 Rx <== ping from android
2020-08-31 10:44:57.702866 Rx <== test message

Bluetooth Sender

Now lets write a sender to send messages typed on the terminal to the bluetooth.

To read input from terminal, we need to use aioconsole 3. It provides async input equivalent function to read input typed on the terminal.

import sys
import asyncio
import datetime as dt

import serial_asyncio
import aioconsole


async def send(writer):
    stdin, stdout = await aioconsole.get_standard_streams()
    async for line in stdin:
        data = line.strip()
        if not data:
            continue
        now = str(dt.datetime.now())
        print(f'{now} Tx ==> {data.decode()}')
        writer.write(line)


async def main(port, baudrate):
    _, writer = await serial_asyncio.open_serial_connection(url=port, baudrate=baudrate)
    sender = send(writer)
    await asyncio.wait([sender])


port = sys.argv[1]
baudrate = sys.argv[2]

loop = asyncio.get_event_loop()
loop.run_until_complete(main(port, baudrate))
loop.close()

We can run the program with the following command and send messages to phone's bluetooth.

$ python sender.py /dev/cu.Bluetooth-Incoming-Port 9600

ping from mac
2020-08-31 10:46:52.222676 Tx ==> ping from mac
2020-08-31 10:46:58.423492 Tx ==> test message

Here a screenshot of messages received on Android device.

Conclusion

If we combine the above two programmes, we get a simple bluetooth client to interact with any bluetooth via serial interface. Here is the complete code 5 for the client.

In the next article, lets see how to interact with Bluetooth LE devices.