Set Default Date For Date Hierarchy In Django Admin

Introduction

When we monitor daily events from django admin, most of the time we are interested in events related to today. Django admin provides date based drill down navigation page via ModelAdmin.date_hierarchy1 option. With this, we can navigate to any date to filter out events related to that date.

One problem with this drill down navigation is, we have to navigate to todays date every time we open a model in admin. Since we are interested in todays events most of the time, setting todays date as default filtered date will solve the problem.

Set Default Date For Date Hierarchy

Let us create an admin page to show all the users who logged in today. Since User model is already registered in admin by default, let us create a proxy model to register it again.

from django.contrib.auth.models import User


class DjangoUser(User):
    class Meta:
        proxy = True

Lets register this model in admin to show logged in users details along with date hierarchy.

from django.contrib import admin


@admin.register(DjangoUser)
class MetaUserAdmin(admin.ModelAdmin):
    list_display = ('username', 'is_active', 'last_login')
    date_hierarchy = 'last_login'

If we open DjangoUser model in admin page, it will show drill down navigation bar like this.

Now, if we drill down to a particular date, django adds additional query params to the admin url. For example, if we visit 2020-06-26 date, corresponding query params are /?last_login__day=26&last_login__month=6&last_login__year=2020.

We can override changelist view and set default params to todays date if there are no query params. If there are query params then render the original response.

@admin.register(DjangoUser)
class MetaUserAdmin(admin.ModelAdmin):
    list_display = ('username', 'is_active', 'last_login')
    date_hierarchy = 'last_login'

    def changelist_view(self, request, extra_context=None):
        if request.GET:
            return super().changelist_view(request, extra_context=extra_context)

        date = now().date()
        params = ['day', 'month', 'year']
        field_keys = ['{}__{}'.format(self.date_hierarchy, i) for i in params]
        field_values = [getattr(date, i) for i in params]
        query_params = dict(zip(field_keys, field_values))
        url = '{}?{}'.format(request.path, urlencode(query_params))
        return redirect(url)

Now if we open the same admin page, it will redirect to todays date by default.

Conclusion

In this article, we have seen how to set a default date for date_hierarchy in admin page. We can also achieve similar filtering by settiing default values for search_filter or list_filter which will filter items related to any specific date.

How Dart, Flutter Stateful Hot Reload Work? - Part 1

This will be a series of articles on exploring the internals of Dart & Flutter stateful hot reload. In the first article, lets write a simple dart program to see stateful hot reload in action. Then lets delve into details on what is happening.

Stateful Hot Reload

import 'dart:async';

int total = 0;

void adder(_) {
  int delta = 2;
  total += delta;

  print("Total is $total. Adding $delta");
}

void main() {
  Timer.periodic(Duration(seconds: 2), adder);
}

In the above program1, we are using a Timer.periodic2 to create a timer which calls adder function every 2 seconds.

We can run this program from command line using

$ dart --observe hot_reload.dart
Observatory listening on http://127.0.0.1:8181/d42KmW4LknU=/
Total is 2. Adding 2
Total is 4. Adding 2
Total is 6. Adding 2
Total is 8. Adding 2
...

This will start executing the program and will provide a link to observatory3, a tool to profile/debug Dart applications.

As the program is executing, lets open the program in an editor, change delta from 2 to 3.

  # change this
  # int delta = 2;

  # change to
  int delta = 3;

If we restart the program, it will start executing from the beginning and it will lose the state of the program.

$ dart --observe hot_reload.dart
Observatory listening on http://127.0.0.1:8181/eoP2lpC2ZWw=/
Total is 3. Adding 3
Total is 6. Adding 3
Total is 9. Adding 3

Instead of restart, we can open the observatory link in browser, open main isolate and click on Reload Source button.

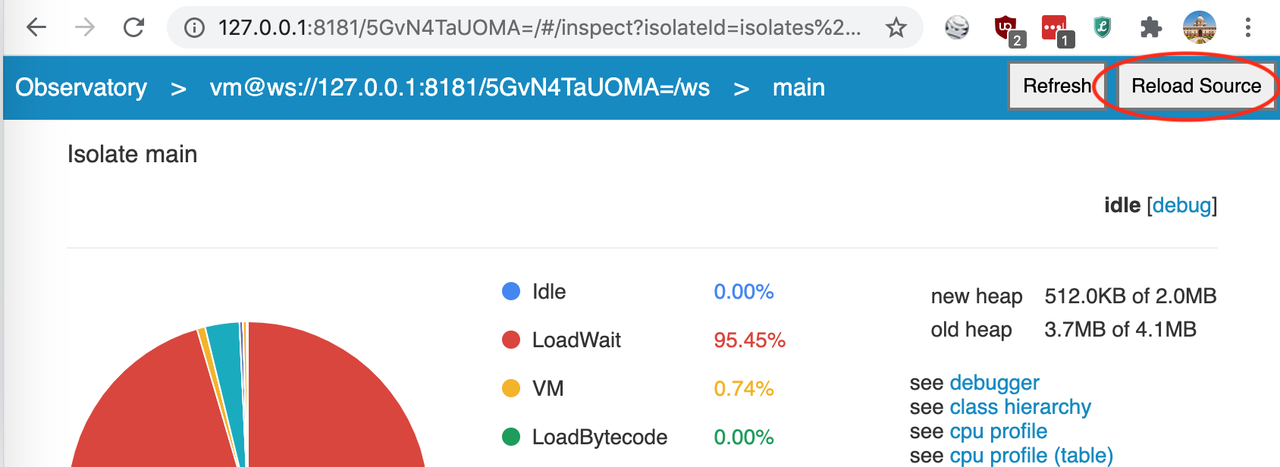
As we can see from the below output, it did a stateful hot reload and state of the program is preserved instead of starting from the beginning.

$ dart --observe hot_reload.dart
Observatory listening on http://127.0.0.1:8181/n_GSAKsyr5s=/
Total is 2. Adding 2
Total is 4. Adding 2
Total is 6. Adding 2
Total is 8. Adding 2
Total is 11. Adding 3 # after hot reload
Total is 14. Adding 3
Total is 17. Adding 3
Total is 20. Adding 3

During a hot reload, Dart VM will apply changes to a live program4. If the source code of a method is changed, VM will replace the methods with the new updated methods. Next time, when the program looks up for a particular method, it will find the updated method and use it.

Conclusion

In this article, we have seen how hot reload works by writing a simple program in Dart. In the upcoming articles, lets dive into the Dart VM internals, Flutter architecture and other nitty gritties of hot reload.

Tips On Improving kubectl Productivity

kubectl is CLI tool to control Kubernetes clusters. As we start using kubectl to interact with mutliple clusters, we end up running lengthy commands and even running multiple commands for simple tasks like running a shell in a container.

In this article, lets learn few tips to improve our productivity when using kubectl.

Aliases

Aliases in general improve the productivity when using a shell.

kubectl provides shortcuts for commands. For example,

# instead of running full command
$ kubectl get services

# we can use short hand version
$ kubectl get svc

It also provides completion for commands.

# enable completion for zsh
$ source <(kubectl completion zsh)

# type `kubectl ` and hit `<TAB>` will show possible options
$ kubectl
annotate       attach         cluster-info
api-resources  auth           completion
api-versions   autoscale      config
apply          certificate    convert

# type `kubectl g`, and hit `<TAB>` will show possible options
$ kubectl get

Even though completions are helpful, setting up up aliases for most commanly used commands will save a lot of time.

alias k='kubectl'

alias kdp='kubectl describe pod'
alias kgp='kubectl get pods'
alias kgpa='kubectl get pods --all-namespaces'
alias ket='kubectl exec -it'
alias wkgp='watch -n1 kubectl getp pods'

alias kga='kubectl get all'
alias kgaa='kubectl get all --all-namespaces'

alias kaf='kubectl apply -f'

alias kcgc='kubectl config get-contexts'
alias kccc='kubectl config current-context'

If you don't write your own aliases, there is kubectl-aliases which provides exhuastive list of aliases. We can source this file in rc file and start using them.

Use Functions

Even though aliases help us to run lengthy commands with an alias, there are times where we have to run multiple commands to get things done for a single task.

For example, to view kubenetes dashboard, we have to get the token, start proxy server and then open the url in browser. We can write a simple function as shown below to do all of that.

kp() {
    kubectl -n kubernetes-dashboard describe secret $(kubectl -n kubernetes-dashboard get secret | grep admin-user | awk '{print $1}') | grep 'token:' | awk '{print $2}' | pbcopy
    open http://localhost:8001/api/v1/namespaces/kubernetes-dashboard/services/https:kubernetes-dashboard:/proxy/
    kubectl proxy
}

Now from the shell, when we run kp, it function will copy the token to clipboard, open kubernetes dashboard in browser and will start the proxy server.

Use Labels

To describe a pod or tail logs from a pod, we can use pod names.

$ kubectl get pods
NAME                             READY   STATUS
hello-world-79d794c659-tpfv2     1/1     Running


$ kubectl describe pod hello-world-79d794c659-tpfv2

$ kubectl logs -f pod/hello-world-79d794c659-tpfv2

When the app gets updated, the name of pod also updates. If your shell has auto completion feature, it will autocomplete to previous name.

So, instead of using pod name, we can use pod labels as mentioned below.

$ kubectl describe pod -l=hello-world

$ kubectl logs -f -l=pod/hello-world

We run the command once and next time shell will show autocomplete and we can use that directly.

Kubectl Tools

k8s has a good ecosystem and the following packages are aimed to make certain k8s tasks easier.

kubectl-debug - Debug pod by a new container with all troubleshooting tools pre-installed.

kube-forwarder - Easy to use port forwarding manager.

stern - Multi pod and container log tailing.

kubectx - Quick way to switch between clusters and namespaces.

kubebox - Terminal and Web console for Kubernetes.

k9s - Interactive terminal UI.

kui - Hybrid CLI/UI tool for k8s.

click - Interactive controller for k8s.

lens - Stand alone corss platform k8s IDE.

Conclusion

In this article we have seen some useful methods as well as some tools to improve productivity with kubectl. If you spend a lot of time interacting with kubernetes cluster, it is important to notice your workflows and find better tools or ways to improve productivity.

Continuous Deployment To Kubernetes With Skaffold

In this article, let us see how to set up a continuous deployment pipeline to Kubernetes in CircleCI using Skaffold.

Prerequisites

You should have a kubernetes cluster in a cloud environment or in your local machine. Check your cluster status with the following commands.

$ kubectl cluster-info
$ kubectl config get-contexts

You should know how to manually deploy your application to kubernetes.

# push latest docker image to container registry
$ docker push chillaranand/library

# deploy latest image to k8s
$ kubectl apply -f app/deployment.yaml
$ kubectl apply -f app/service.yaml

Skaffold

Skaffold is a CLI tool to facilitate continuous development and deployment workflows for Kubernetes applications.

Skaffold binaries are available for all platforms. Download the binary file for your OS and move it to bin folder.

$ curl -Lo skaffold https://storage.googleapis.com/skaffold/releases/latest/skaffold-darwin-amd64
$ chmod +x skaffold
$ sudo mv skaffold /usr/local/bin

Inside your project root, run init command to generate a config file. If your project has k8s manifests, it will detect them and include it in the configuration file.

$ skaffold init
Configuration skaffold.yaml was written

$ cat skaffold.yaml
apiVersion: skaffold/v2beta1
kind: Config
metadata:
  name: library
build:
  artifacts:
  - image: docker.io/chillaranand/library
deploy:
  kubectl:
    manifests:
    - kubernetes/deployment.yaml
    - kubernetes/service.yaml

To deploy latest changes to your cluster, run

$ skaffold run

This will build the docker image, push to registry and will apply the manifests in the clusters. Now, k8s will pull the latest image from the registry and create a new deployment.

CircleCI Workflow

version: 2.1

orbs:
  aws-cli: circleci/aws-cli@0.1.19
  kubernetes: circleci/kubernetes@0.11.0

commands:
  kubernetes-deploy:

    steps:
      - setup_remote_docker

      - aws-cli/setup:
          profile-name: default

      - kubernetes/install-kubectl:
          kubectl-version: v1.15.10

      - checkout

      - run:
          name: container registry log in
          command: |
            sudo $(aws ecr get-login --region ap-south-1 --no-include-email)

      - run:
          name: install skaffold
          command: |
            curl -Lo skaffold https://storage.googleapis.com/skaffold/releases/latest/skaffold-linux-amd64
            chmod +x skaffold
            sudo mv skaffold /usr/local/bin

      - run:
          name: update kube config to connect to the required cluster
          command: |
            aws eks --region ap-south-1 update-kubeconfig --name demo-cluster

      - run:
          name: deploy to k8s
          command: |
            skaffold run

CircleCI orbs are shareable packages to speed up CI setup. Here we are using aws-cli, kubernetes orbs to easily install/setup them inside the CI environment.

Since CircleCI builds run in a docker container, to run docker commands inside container, we have to specify setup_remote_docker key so that a separate environment is created for it.

Remaining steps are self explainatory.

Conclusion

Here we have seen how to set up CD to kubernetes in CircleCI. If we want to set up this another CI like Jenkins or Travis, instead of using orbs, we have to use system package mangers like apt-get to install them. All others steps will remain same.

Work From Home Tips For Non-remote Workers

Remote-first and remote-friendly companies have a different work culture & communication process compared to non-remote companies. Due to COVID-191 world wide pandemic, majority of workers who didn't had prior remote experience are WFH(working from home). This article is intended to provide some helpful tips for such people.

Work Desk

It is important to have a dedicated room or at least a desk for work. This creates a virtual boundary between your office work and personal work. Otherwise, you will end up working from bed, dining tables, kitchen etc which will result in body pains due to bad postures.

Get Ready

Image Credit: raywenderlich 2

Start your daily routine as if you are going to office. It is easy to stop caring about personal grooming and attire when WFH. Your attire can influence your focus and productivity.

If you find getting ready is hard, schedule video calls for all meetings with your colleagues. This might give some additional motivation for you to get ready early in the morning. When the work time, go to your work desk and start working.

Self Discipline

Schedule your work time. Whenever possible try to stick to office working hours. Without proper schedule, you will either end up under working or over working as your personal work and office work gets mixed up.

Take regular breaks during work hours. Without any distractions, it is easy to get lost in the pixels for longer durations. Taking short breaks for a quick walk and getting a fresh air outside will freshen up.

With unlimited access to kitchen and snacks, it is hard to avoid binge eating at home. But atleast avoid binge eating during office hours.

Exercise. Since WFH involves only sitting in a chair through out the day, staying physically active is challenging especially during this pandemic. Exercise few minutes every morning, help yourself in the kitchen by making a meal or doing dishes, clean your house etc., should help in staying physically active.

Seek Help

WFH can be lonely at times as the social interactions are quite less. Schedule 1 to 1 meetings or virtual coffe meetings with your colleagues to increase social interactions. Discuss WFH problems with your colleagues, friends and remote communities to see how they are tacking those problems.

How To Reduce Python Package Footprint?

PyPi1 hosts over 210K+ projects and the average size of Python package is less than 1MB. However some of the most used packages in scientific computing like NumPy, SciPy has large footprint as they bundle shared libraries2 along with the package.

Build From Source

If a project needs to be deployed in AWS Lambda, the total size of deployment package should be less than 250MB3.

$ pip install numpy

$ du -hs ~/.virtualenvs/py37/lib/python3.7/site-packages/numpy/
 85M    /Users/avilpage/.virtualenvs/all3/lib/python3.7/site-packages/numpy/

Just numpy occupies 85MB space on Mac machine. If we include a couple of other packages like scipy & pandas, overall size of the package crosses 250MB.

An easy way reduce the size of python packages is to build from source instead of use pre-compiled wheels.

$ CLFAGS='-g0 -Wl -I/usr/include:/usr/local/include -L/usr/lib:/usr/local/lib' pip install numpy --global-option=build_ext

$ du -hs ~/.virtualenvs/py37/lib/python3.7/site-packages/numpy/
 23M    /Users/avilpage/.virtualenvs/all3/lib/python3.7/site-packages/numpy/

We can see the footprint has reduced by ~70% when using sdist instead of wheel. This4 article provides more details about these CFLAG optimization when installing a package from source.

Shared Packages

When using a laptop with low storage for multiple projects with conflicting dependencies, a seperate virtual environment is needed for each project. This will lead to installing same version of the package in multiple places which increases the footprint.

To avoid this, we can create a shared virtual environment which has most commonly used packages and share it across all the enviroments. For example, we can create a shared virtual enviroment with all the packages required for scientific computing.

For each project, we can create a virtual enviroment and share all packages of the common enviroment. If any project requires a specific version of the package, the same package can be install in project enviroment.

$ cat common-requirements.txt  # shared across all enviroments
numpy==1.18.1
pandas==1.0.1
scipy==1.4.1

$ cat project1-requirements.txt  # project1 requirements
numpy==1.18.1
pandas==1.0.0
scipy==1.4.1

$ cat project2-requirements.txt  # project2 enviroments
numpy==1.17
pandas==1.0.0
scipy==1.4.1

After creating a virtual enviroment for a project, we can create a .pth file with the path of site-packages of common virtual enviroment so that all those packages are readily available in the new project.

$ echo '/users/avilpage/.virtualenvs/common/lib/python3.7/site-packages' >
 ~/.virtualenvs/project1/lib/python3.7/site-packages/common.pth

Then we can install the project requirements which will install only missing packages.

$ pip install -r project1-requirements.txt

Global Store

The above shared packages solution has couple issues.

  1. User has to manually create and track shared packages for each Python version and needs to bootstrap it in every project.
  2. When there is an incompatible version of package in multiple projects, user will end up with duplicate installations of the same version.

To solve this5, we can have a global store of packages in a single location segregated by python and package version. Whenever a user tries to install a package, check if the package is in global store. If not install it in global store. If present, just link the package to virtualenvs.

For example, numpy1.17 for Python 3.7 and numpy1.18 for Python 3.6 can be stored in the global store as follows.

$ python3.6 -m pip install --target ~/.mpip/numpy/3.6_1.18 numpy

$ python3.7 -m pip install --target ~/.mpip/numpy/3.7_1.17 numpy

# in project venv
echo '~/.mpip/numpy/3.7_1.17' > PATH_TO_ENV/lib/python3.7/site-packages/numpy.pth

With this, we can ensure one version of the package is stored in the disk only once. I have created a simple package manager called mpip6 as a POC to test this and it seems to work as expected.

These are couple of ways to reduce to footprint of Python packages in a single environment as well as muliple enviroments.

Disabling Atomic Transactions In Django Test Cases

TestCase is the most used class for writing tests in Django. To make tests faster, it wraps all the tests in 2 nested atomic blocks.

In this article, we will see where these atomic blocks create problems and find ways to disable it.

Select for update

Django provides select_for_update() method on model managers which returns a queryset that will lock rows till the end of transaction.

def update_book(pk, name):
    with transaction.atomic():
        book = Book.objects.select_for_update().get(pk=pk)
        book.name = name
        book.save()

When writing test case for a piece of code that uses select_for_update, Django recomends not to use TestCase as it might not raise TransactionManagementError.

Threads

Let us take a view which uses threads to get data from database.

def get_books(*args):
    queryset = Book.objects.all()
    serializer = BookSerializer(queryset, many=True)
    response = serializer.data
    return response

class BookViewSet(ViewSet):

    def list(self, request):
        with ThreadPoolExecutor() as executor:
            future = executor.submit(get_books, ())
            return_value = future.result()
        return Response(return_value)

A test which writes some data to db and then calls this API will fail to fetch the data.

class LibraryPaidUserTestCase(TestCase):
    def test_get_books(self):
        Book.objects.create(name='test book')

        self.client = APIClient()
        url = reverse('books-list')
        response = self.client.post(url, data=data)
        assert response.json()

Threads in the view create a new connection to the database and they don't see the created test data as the transaction is not yet commited.

Transaction Test Case

To handle above 2 scenarios or other scenarios where database transaction behaviour needs to be tested, Django recommends to use TransactionTestCase instead of TestCase.

from django.test import TransactionTestCase

Class LibraryPaidUserTestCase(TransactionTestCase):
    def test_get_books(self):
        ...

With TransactionTestCase, db will be in auto commit mode and threads will be able to fetch the data commited earlier.

Consider a scenario, where there are other utility classes which are subclassed from TestCase.

class LibraryTestCase(TestCase):
    ...

class LibraryUserTestCase(LibraryTestCase):
    ...

class LibraryPaidUserTestCase(LibraryTestCase):
    ...

If we subclass LibraryTestCase with TransactionTestCase, it will slow down the entire test suite as all the tests run in autocommit mode.

If we subclass LibraryUserTestCase with TransactionTestCase, we will miss the functionality in LibraryTestCase. To prevent this, we can override the custom methods to call TransactionTestCase.

If we look at the source code of TestCase, it has 4 methods to handle atomic transactions. We can override them to prevent creation of atomic transactions.

class LibraryPaidUserTestCase(LibraryTestCase):
    @classmethod
    def setUpClass(cls):
        super(TestCase, cls).setUpClass()

    @classmethod
    def tearDownClass(cls):
        super(TestCase, cls).tearDownClass()

    def _fixture_setup(self):
        return super(TestCase, self)._fixture_setup()

    def _fixture_teardown(self):
        return super(TestCase, self)._fixture_teardown()

We can also create a mixin with the above methods and subclass it wherever this functionality is needed.

Conclusion

Django wraps tests in TestCase inside atomic transactions to speed up the run time. When we are testing for db transaction behaviours, we have to disable this using appropriate methods.

Mastering DICOM - #1 Clinical Workflows 101

Introduction

In hospitals, PACS simplifies the clinical workflow by reducing physical and time barriers. A typical radiology workflow looks like this.

Credit: Wikipedia

A patient as per doctor's request will visit a radiology center to undergo CT/MRI/X-RAY. Data captured from modality(medical imaging equipments like CT/MRI machine) will be sent to QA for verfication and then sent to PACS for archiving.

After this when patient visits doctor, doctor can see this study on his workstation(which has DICOM viewer) by entering patient details.

In this series of articles, we will how to achieve this seamless transfer of medical data digitally with DICOM.

DICOM standard

DICOM modalities create files in DICOM format. This file has dicom header which contains meta data and dicom data set which has modality info(equipment information, equipment configuration etc), patient information(name, sex etc) and the image data.

Storing and retreiving DICOM files from PACS servers is generally achieved through DIMSE DICOM for desktop applications and DICOMWeb for web applications.

All the machines which transfer/receive DICOM data must follow DICOM standard. With this all the DICOM machines which are in a network can store and retrieve DICOM files from PACS.

When writing software to handle DICOM data, there are third party packages to handle most of the these things for us.

Conclusion

In this article, we have learnt the clinical radiology workflow and how DICOM standard is useful in digitally transferring data between DICOM modalities.

In the next article, we will dig into DICOM file formats and learn about the structure of DICOM data.

Verifying TLS Certificate Chain With OpenSSL

Introduction

To communicate securely over the internet, HTTPS (HTTP over TLS) is used. A key component of HTTPS is Certificate authority (CA), which by issuing digital certificates acts as a trusted 3rd party between server(eg: google.com) and others(eg: mobiles, laptops).

In this article, we will learn how to obtain certificates from a server and manually verify them on a laptop to establish a chain of trust.

Chain of Trust

TLS certificate chain typically consists of server certificate which is signed by intermediate certificate of CA which is inturn signed with CA root certificate.

Using OpenSSL, we can gather the server and intermediate certificates sent by a server using the following command.

$ openssl s_client -showcerts -connect avilpage.com:443

CONNECTED(00000006)
depth=2 C = US, O = DigiCert Inc, OU = www.digicert.com, CN = DigiCert High Assurance EV Root CA
verify return:1
depth=1 C = US, O = DigiCert Inc, OU = www.digicert.com, CN = DigiCert SHA2 High Assurance Server CA
verify return:1
depth=0 C = US, ST = California, L = San Francisco, O = "GitHub, Inc.", CN = www.github.com
verify return:1
---
Certificate chain
 0 s:/C=US/ST=California/L=San Francisco/O=GitHub, Inc./CN=www.github.com
   i:/C=US/O=DigiCert Inc/OU=www.digicert.com/CN=DigiCert SHA2 High Assurance Server CA
-----BEGIN CERTIFICATE-----
MIIHMTCCBhmgAwIBAgIQDf56dauo4GsS0tOc8
MQswCQYDVQQGEwJVUzEVMBMGA1UEChMMRGlna
0wGjIChBWUMo0oHjqvbsezt3tkBigAVBRQHvF
aTrrJ67dru040my
-----END CERTIFICATE-----
 1 s:/C=US/O=DigiCert Inc/OU=www.digicert.com/CN=DigiCert SHA2 High Assurance Server CA
   i:/C=US/O=DigiCert Inc/OU=www.digicert.com/CN=DigiCert High Assurance EV Root CA
-----BEGIN CERTIFICATE-----
MIIEsTCCA5mgAwIBAgIQBOHnpNxc8vNtwCtC
MQswCQYDVQQGEwJVUzEVMBMGA1UEChMMRGln
0wGjIChBWUMo0oHjqvbsezt3tkBigAVBRQHv
cPUeybQ=
-----END CERTIFICATE-----

    Verify return code: 0 (ok)

This command internally verfies if the certificate chain is valid. The output contains the server certificate and the intermediate certificate along with their issuer and subject. Copy both the certificates into server.pem and intermediate.pem files.

We can decode these pem files and see the information in these certificates using

$ openssl x509 -noout -text -in server.crt

Certificate:
    Data:
        Version: 3 (0x2)
    Signature Algorithm: sha256WithRSAEncryption
    ----

We can also get only the subject and issuer of the certificate with

$ openssl x509 -noout -subject -noout -issuer -in server.pem

subject= CN=www.github.com
issuer= CN=DigiCert SHA2 High Assurance Server CA

$ openssl x509 -noout -subject -noout -issuer -in intermediate.pem

subject= CN=DigiCert SHA2 High Assurance Server CA
issuer= CN=DigiCert High Assurance EV Root CA

Now that we have both server and intermediate certificates at hand, we need to look for the relevant root certificate (in this case DigiCert High Assurance EV Root CA) in our system to verify these.

If you are using a Linux machine, all the root certificate will readily available in .pem format in /etc/ssl/certs directory.

If you are using a Mac, open Keychain Access, search and export the relevant root certificate in .pem format.

We have all the 3 certificates in the chain of trust and we can validate them with

$ openssl verify -verbose -CAfile root.pem -untrusted intermediate.pem server.pem
server.pem: OK

If there is some issue with validation OpenSSL will throw an error with relevant information.

Conclusion

In this article, we learnt how to get certificates from the server and validate them with the root certificate using OpenSSL.

Writing & Editing Code With Code - Part 1

In Python community, metaprogramming is often used in conjunction with metaclasses. In this article, we will learn about metaprogramming, where programs have the ability to treat other programs as data.

Metaprogramming

When we start writing programs that write programs, it opens up a lot of possibilities. For example, here is a metaprogramme that generates a program to print numbers from 1 to 100.

with open('num.py', 'w') as fh:
    for i in range(100):
        fh.write('print({})'.format(i))

This 3 lines of program generates a hundred line of program which produces the desired output on executing it.

This is a trivial example and is not of much use. Let us see practical examples where metaprogramming is used in Django for admin, ORM, inspectdb and other places.

Metaprogramming In Django

Django provides a management command called inspectdb which generates Python code based on SQL schema of the database.

$ ./manage.py inspectdb

from django.db import models

class Book(models.Model):
    name = models.CharField(max_length=100)
    slug = models.SlugField(max_length=100)
    ...

In django admin, models can be registered like this.

from django.contrib import admin

from book.models import Book


admin.site.register(Book)

Eventhough, we have not written any HTML, Django will generate entire CRUD interface for the model in the admin. Django Admin interface is a kind of metaprogramme which inspects a model and generates a CRUD interface.

Django ORM generates SQL statements for given ORM statements in Python.

In [1]: User.objects.last()
SELECT "auth_user"."id",
       "auth_user"."password",
       "auth_user"."last_login",
       "auth_user"."is_superuser",
       "auth_user"."username",
       "auth_user"."first_name",
       "auth_user"."last_name",
       "auth_user"."email",
       "auth_user"."is_staff",
       "auth_user"."is_active",
       "auth_user"."date_joined"
  FROM "auth_user"
 ORDER BY "auth_user"."id" DESC
 LIMIT 1


Execution time: 0.050304s [Database: default]

Out[1]: <User: anand>

Some frameworks/libraries use metaprogramming to solve problems realted to generating, modifying and transforming code.

We can also use these techniques in everyday programming. Here are some use cases.

  1. Generate REST API automatically.
  2. Automatically generate unit test cases based on a template.
  3. Generate integration tests automatically from the network traffic.

These are a some of the things related to web development where we can use metaprogramming techniques to generate/modify code. We will learn more about this in the next part of the article.