Setup Kubernetes Anywhere with Single Command


Introduction

In an earlier article, we have seen how to set up Kubernetes on M1 Mac. That involved spinning up a VM and installing Kubernetes1 on it. In this article, we will see how to set up Kubernetes directly on Docker so that we can use the same set-up on any operating system.

Prerequisites

Ensure you have Docker installed on your system. If you are on a Mac or Windows, you can install Docker Desktop2.

k3s/k3d

k3s3 is a lightweight Kubernetes distribution by Rancher. It is a single binary that can be run on any Linux machine. But it doesn't work on Mac or Windows.

k3d4 is a wrapper around k3s that allows you to run k3s on Docker. It is a great option for running Kubernetes on your local machine.

Installation

k3d can be installed using the following command:

$ brew install k3d  # mac
$ chocolatey install k3d  # windows
$ curl -s https://raw.githubusercontent.com/k3d-io/k3d/main/install.sh | bash # linux

Once it is installed, we can create a cluster using the following command:

$ k3d cluster create demo

This will launch a cluster with a single node. We can also setup a multi-node cluster using the following command:

$ k3d cluster create demo --servers 3 --agents 2

We can verify the cluster is up and running using the following command:

$ kubectl get nodes

We can also use GUI tools like Lens to manage and navigate the cluster. In the above video we have used Lens to create a Jenkins deployment as well.

Conclusion

In this article, we have seen how to set up Kubernetes on Docker. This is a great option for running Kubernetes on your local machine. We can also use this to run production setup for small applications.

Using Conda/Mamba with Python Pip on M1 Mac

Introduction

From 2020, all Apple MacBooks are powered by Apple Silicone(M1) chips. This chip uses Aarch64 architecture which is different from x86 architecture which was used by Intel chips earlier.

Python is a cross-platform language. It can run on any platform. However, Python packages are compiled for specific platforms. For example, a package compiled for x86 will not work on Aarch64 platform. Also, many Python packages are not yet available for ARM64/Aarch64 platform.

M1 Mac and Python

If we want to run a python package on M1 Mac which doesn't have ARM64 support, we need to use an emulator(or a cross-architecture Docker image). This will significantly slow down the application.

An alternate solution is to build packages for ARM64 platform. Building binary packages from the source code requires a lot of time and effort. Also, we need to build the package for each Python version.

Instead of building from source, we can use Conda/Mamba to install Python packages as well as other system packages. Conda/Mamba will automatically install the correct binary for the package.

For example, python-confluent-kafka3 package doesn't have Linux aarch64 support. To run it on aarch64 platform, we have to build from source which takes a lot of time. Instead, we can simply install it using Conda/Mamba with a single command.

$ conda install -c conda-forge python-confluent-kafka

Similar to pip, Conda can also install all the packages mentioned in a file like requirements.txt.

$ conda install --file requirements.txt

Conclusion

In data science ecosystem, Conda1/Mamba2 are widely used as package managers. In web development ecosystem, they are not as widely used as pip.

Conda/Mamba is a great cross-platform system package manager, and it doesn't have all the Python packages available on PyPi. However, we can use it along with pip for easy package management on M1 Macbook.

Hot Module Reload In Python With Reloadium

Introduction

Hot module reloading is a feature that allows you to reload a module without restarting the whole application. This is very useful when we are developing/debugging an application, and we want to see the changes instantaneously.

Reloadium

Reloadium1 is an advanced hot reloading library for python.

Instead of writing an article, I thought it would be much easier to show a live demo of Reloadium. In the below video, we can see how reloadium greatly improves developer experience.


Currently, reloadium can be used as a standalone tool. We can install it from PyPi and run any arbitrary python script with reloadium.

$ pip install reloadium
$ reloadium run myscript.py

Alternatively, it is available as a plugin for PyCharm as shown in the above video. VS Code support is also in the works.

Reloadium is capable of profiling too. Without writing a single line of code, we can profile Python code. But that's a topic for another article.

Conclusion

I have been using Reloadium from a few months, and it has become an essential part of my development workflow. These days I always run all the scripts or apps in debug mode with reloadium directly.

Best Pay After Placement Courses In India

Introduction

In India, huge number of students are graduating every year. Most of them are not able to get a job right after graduation. In order to get a job in IT industry, students need to have some technical skills.

There are thousands of institutes in India that are providing paid technical courses. Depending on the course, the fees can be anywhere between 5,000 to 5 lakhs. The percentage of students who are getting a job after doing these courses is extremely low. In addition to that quite a few students are not able to afford fees to join these courses.

Pay After Placement Courses

To combat this problem, some institutes are providing pay after placement(PAP) courses. In these courses, students will pay the fees only after getting a job with a desired package. This is a win-win situation for both the students and the institutes. This is a far better option than paying the fees upfront and not getting a job. These courses are also called as income share agreement(ISA) courses.

Here is a list of top pay after placement courses in India for front end developers, back end developers, full stack developers, data scientists, machine learning engineers, and data engineers.

Site-Rank Institute Fee(Approx INR)
134,988 Sharpener Tech 68,000
59,928 AccioJob 177,000
321,989 Placewit 0 (Upto 10L)
37,294 Masai School 350,000
1,482,058 Digikul 234,000
1,554,412 10xAcademy 295,000
295,708 Function Up 295,000
84,513 AlmaBetter Not known


Conclusion

Most of these courses have an entrance test that candidates have to clear before joining the course. However taking these courses is far better than paying the fees upfront and not getting a job. If you are interested in any of these courses, you can apply for the entrance test and join the course.

Pipe tail output into column

column command-line utility formats its input into multiple columns and aligns it nicely. It is useful for formatting output of csv files, or other commands.

$ cat users.csv
id,user,active
1,John Doe,true
2,Will Smith,false

$ column -s, -t < users.csv
id  user        active
1   John Doe    true
2   Will Smith  false

tail command-line utility prints the last 10 lines of a file. It can be used with -f option to follow the file as it grows.

$ tail -f users.csv
id,user,active
1,John Doe,true
2,Will Smith,false

To format the output of tail -f command, we can't use column command directly. column command can't produce output until it receives all the input. It needs all the input beforehand to calculate the column widths.

$ tail -f users.csv | column -s, -t

So, the above command won't work.

As the goal is to follow the output of the file, we can use watch command for this. watch command executes a command periodically, and displays its output.

$ watch -n 1 "tail -n 20 users.csv | column -s, -t"

This command will fetch the last 20 lines of the file, pipe it to column command, and display the output. It will repeat the command every 1 second.

As the file grows beyond 20 lines, the headers will be truncated. To preserve the headers, we can use head command in addition to tail command.

$ watch -n 1 "(head -n1 && tail -n20) < users.csv| column -s, -t"

This command will print the first line of the file, and then the last 20 lines of the file. The output will be piped to column command, and displayed.

Here is a screenshot of the output of a demo csv.

pipe tail output to column

This makes it easy to watch the output of a file as it grows.

Change Kafka Log Directory & Format It

Problem Statement

On my local Mac, I was using Kafka to pass messages between various applications. Due to some reason, when I tried to start Kafka recently, it was failing to start and here are the relevant error logs.

[2022-12-23 11:57:06,217] WARN [Controller 1] writeNoOpRecord: failed with unknown server exception RuntimeException at epoch 139 in 5198 us.  Renouncing leadership and reverting to the last committed offset 927938. (org.apache.kafka.controller.QuorumController)

[2022-12-23 11:57:06,536] ERROR [Controller 1] registerBroker: unable to start processing because of NotControllerException. (org.apache.kafka.controller.QuorumController)

[2022-12-23 12:23:35,834] ERROR [RaftManager nodeId=1] Had an error during log cleaning (org.apache.kafka.raft.KafkaRaftClient)
org.apache.kafka.common.errors.OffsetOutOfRangeException: Cannot increment the log start offset to 927939 of partition __cluster_metadata-0 since it is larger than the high watermark 926507
[2022-12-23 12:23:36,035] WARN [Controller 1] writeNoOpRecord: failed with unknown server exception RuntimeException at epoch 294 in 137 us.  Renouncing leadership and reverting to the last committed offset 927938. (org.apache.kafka.controller.QuorumController)
java.lang.RuntimeException: Cant create a new in-memory snapshot at epoch 926507 because there is already a snapshot with epoch 927938

[2022-12-23 12:23:36,252] ERROR Exiting Kafka due to fatal exception during startup. (kafka.Kafka$)

Debugging

I tried to figure out the exact root cause. After multiple failed attempts, I decided to change the log directory temporarily and go ahead for now.

Solution

I create a new temporary directory and set the log directory to that.

$ mkdir /tmp/kafka-logs

# inside server.properties
log.dirs=/tmp/kafka-logs

When I started the Kafka server, it failed.

$ kafka-server-start server.properties

[2022-12-23 12:30:50,018] ERROR Exiting Kafka due to fatal exception (kafka.Kafka$)
org.apache.kafka.common.KafkaException: No `meta.properties` found in /tmp/ (have you run `kafka-storage.sh` to format the directory?)

I ran the kafka-storage script to format the directory. First, we need to get the cluster-id. Since we already know the old kafa-logs directory, we can get the cluster-id from there.

$ cat ~/homebrew/var/lib/kraft-combined-logs/meta.properties 
#
#Thu Oct 20 11:48:12 IST 2022
cluster.id=5MB5lq-XT-6JzQqJeIuhWQ
node.id=1
version=1      

Now, we can format the new directory.

$ kafka-storage format --config server.properties --cluster-id 5MB5lq-XT-6JzQqJeIuhWQ

Formatting /tmp/kafka-logs/ with metadata.version 3.3-IV3.

After changing log directory, Kafka has started working.

$ kafka-start-server /path/to/server.properties

Since I have changed log directory all older messages are lost. Since I am doing this on my local machine, it is fine. Need to revisit it to debug further.

Hands-on RabbitMQ Tutorial

A short hands-on guide to get started with RabbitMQ for people who are in a hurry.

What is RabbitMQ?

RabbitMQ

Image Credit: CloudAMQP

RabbitMQ1 is an open-source message broker software that implements the Advanced Message Queuing Protocol (AMQP). With RabbitMQ, producer and consumer applications can communicate asynchronously, and they will be completely decoupled.

RabbitMQ Terminology

Producer: A producer is a client that publishes messages to the RabbitMQ broker. Producers write data to exchanges.

Consumer: A consumer is a client that subscribes to queues and processes the messages. Consumers read data from queues.

Queue: A queue is a buffer that stores messages. A queue is bound to an exchange and receives messages from it.

Exchange: An exchange is a message routing agent that receives messages from producers and routes them to queues.

Binding: A binding is a link between an exchange and a queue. It is created with a routing key. The producer sends messages to the exchange with a routing key. The exchange routes the message to the queues that are bound with a matching routing key.

RabbitMQ Setup

We can use the official RabbitMQ docker image to run RabbitMQ locally. We can run the following command to start a RabbitMQ container:

$ docker run --rm --name=rabbitmq -p 15672:15672 -p 5672:5672 rabbitmq:3-management

This image has rabbitmq management plugin enabled. We can access the management UI at http://localhost:15672. The default username and password are both guest.

It also has rabbitmqadmin command line tool installed, which can manage RabbitMQ.

Passing Messages from UI

We can use the management UI to send and receive messages. We can create a new queue and exchange from the Queues section.

RabbitMQ Queue

Once a queue is created, we can publish and consume messages from that queue.

RabbitMQ Publish

Passing Messages from CLI

Instead of using web UI, we can use rabbitmqadmin CLI tool2 to send and receive messages. Let's create a topic exchange and a queue.

$ docker exec rabbitmq rabbitmqadmin declare exchange type=direct name=orders
# => exchange declared
$ docker exec rabbitmq rabbitmqadmin declare queue name=orders
# => queue declared

Let's publish a message to the exchange:

$ docker exec rabbitmq rabbitmqadmin publish routing_key=orders payload='dummy message'
# => Message published

To receive messages from the queue, we can use the following command:

$ docker exec rabbitmq rabbitmqadmin get queue=orders

RabbitMQ CLI

Passing Messages from REST API

We can also use REST API to send and receive messages. Let's create a new exchange and queue:

$ curl -u guest:guest -X PUT -H "content-type:application/json" -d '{"type":"direct"}' http://localhost:15672/api/exchanges/%2f/orders
$ curl -u guest:guest -X PUT -H "content-type:application/json" -d '{"type":"topic", "durable": true}' http://localhost:15672/api/queues/%2f/orders

We can publish a message to the exchange:

$ curl -u guest:guest -X POST -H "content-type:application/json" -d '{"routing_key":"orders","payload":"dummy message","payload_encoding":"string", "properties": {} }' http://localhost:15672/api/exchanges/%2f/orders/publish

To receive messages from the queue, we can use the following command:

$ curl -u guest:guest -X GET http://localhost:15672/api/queues/%2f/orders/get

Conclusion

In this post, we have seen how to get started with RabbitMQ. We have seen how to use the management UI, CLI and REST API to send and receive messages.

Hands-on Apache Kafka Tutorial

A short hands-on guide to get started with Apache Kafka for people who are in a hurry.

In this guide, we will learn what is Apache Kafka, how to install and run it. We will also learn how to create/modify a topic and produce/consume messages from it.

What is Apache Kafka?

Apache Kafka

Apache Kafka1 is a distributed event store and streaming-processing platform. It is used to build real-time data pipelines and streaming apps. It is horizontally scalable, fault-tolerant, and has high throughput.

Kafka Terminology

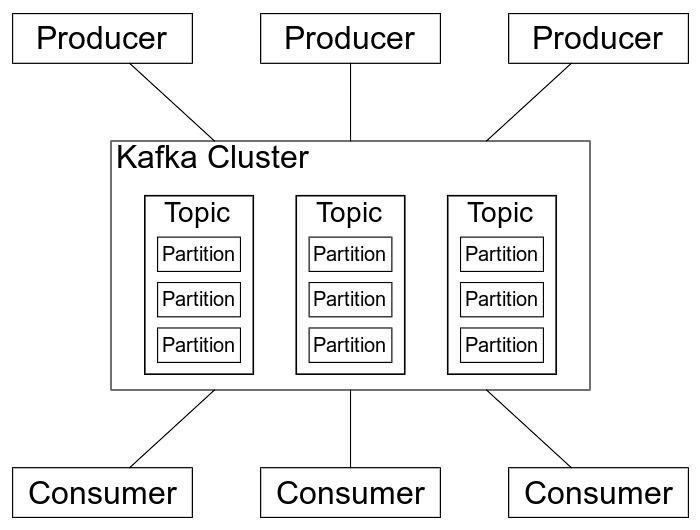
Topic: A topic is a category or feed name to which records are published/consumed. It is configured with a set of key-value pairs called topic configuration.

Producer: A producer is a client that publishes records to the Kafka cluster. Producers write data to topics and partitions.

Consumer: A consumer is a client that subscribes to topics and processes the records. Consumers read data from topics and partitions.

Consumer Group: A consumer group is a group of consumers that share a common purpose. Consumer groups enable a pool of processes to divide the work of consuming and processing records.

Broker: A broker is a server that hosts a set of topics/partitions. It receives data from producers and sends data to consumers.

ZooKeeper: ZooKeeper is used to store the cluster configuration and the state of the cluster. All Kafka brokers connect to ZooKeeper.

Kraft: Kraft(Apache Kafka Raft) is a consensus protocol that is used to manage the metadata of the Kafka cluster. It is introduced to remove dependency on ZooKeeper.

Installing Apache Kafka

We can use cp-all-in-one2 docker compose files to run Apache Kafka locally. This image contains all the components of Confluent Platform including Apache Kafka, Apache Zookeeper, Confluent Schema Registry, Confluent REST Proxy, Confluent Control Center, and others.

$ git clone https://github.com/confluentinc/cp-all-in-one
$ cd cp-all-in-one/cp-all-in-one
$ docker-compose up

Confluent Control Center is a web UI to manage and monitor Apache Kafka.

Kafka Control Center

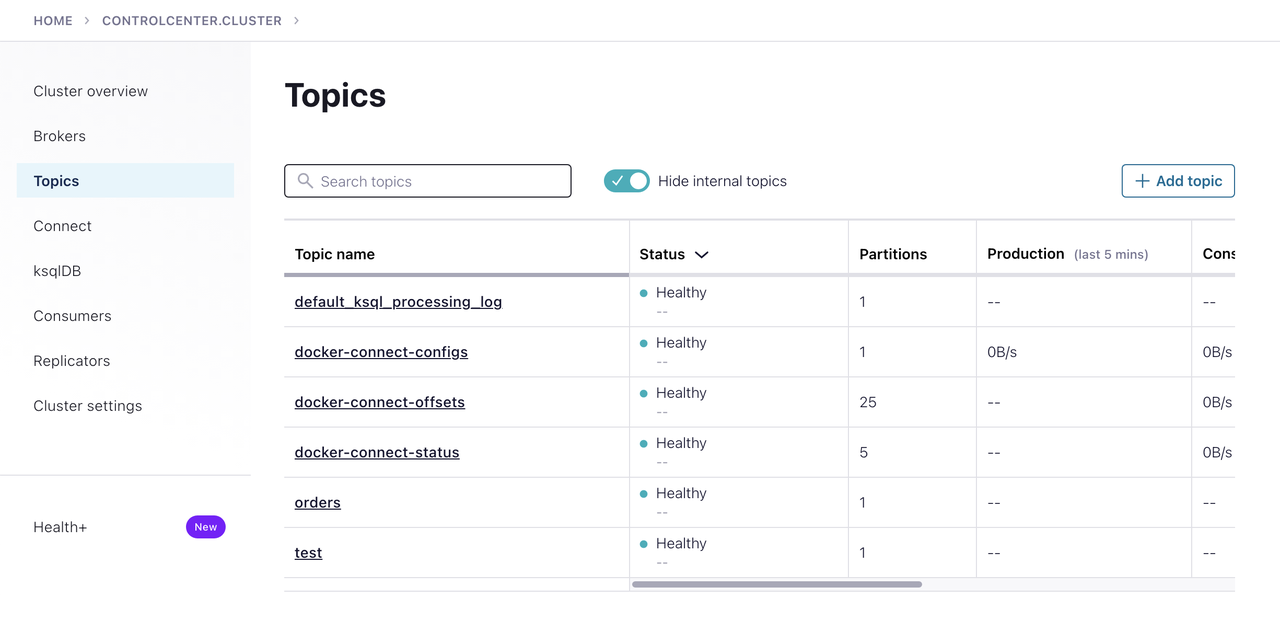
We can visit it http://localhost:9021 and monitor the cluster from this UI.

Producing and Consuming Messages

Kafka stores messages in topics. A topic is a category or feed name to which messages are published/consumed.

Let us create a topic called test with kafka-topics command.

$ docker-compose exec broker kafka-topics --bootstrap-server localhost:9092 --topic test --create 

This will create a topic called test with a single partition and a replication factor of 1. In multi-node cluster, we can use --replication-factor, --partitions to specify the number of replicas/partitions for the topic.

$ docker-compose exec broker kafka-topics --bootstrap-server localhost:9092 --topic test --partitions 3 --replication-factor 2 --create --if-not-exists

To produce messages to a topic named test, we can use kafka-console-producer and add messages to the topic:

$ docker-compose exec broker kafka-console-producer --broker-list localhost:9092 --topic test

>order received
>order updated
>order shipped
>order delivered
>{"status": "completed"}

To consume messages from the same topic:

$ docker-compose exec broker kafka-console-consumer --bootstrap-server localhost:9092 --topic test --from-beginning

order received
order updated
order shipped
order delivered
{"status": "completed"}

Since we have not defined schema for the messages, Kafka will store the messages as byte arrays. We can explicitly define the schema for the messages using Confluent Schema Registry if required.

We can list all the topics in cluster using kafka-topics:

$ docker-compose exec broker kafka-topics --bootstrap-server localhost:9092 --list

default_ksql_processing_log
docker-connect-configs
docker-connect-offsets
docker-connect-status
test

To show details of a topic:

$ docker-compose exec broker kafka-topics --bootstrap-server localhost:9092 --describe --topic test

Topic: test TopicId: 7CckqkXsQXCNY0MNHYRv2w PartitionCount: 1   ReplicationFactor: 1    Configs: 
    Topic: test Partition: 0    Leader: 1   Replicas: 1 Isr: 1  Offline:         

By default all messages are stored in the topic for 7 days. We can change this retention period using retention.ms configuration:

$ docker-compose exec broker kafka-topics --bootstrap-server localhost:9092 --alter --topic test --config retention.ms=10000

To see all the available consumer groups, we can use kafka-consumer-groups:

$ docker-compose exec broker kafka-consumer-groups --bootstrap-server localhost:9092 --list

Kafka Rest Proxy

Kafka Rest Proxy3 is a RESTful interface to Apache Kafka. It provides a RESTful interface to produce and consume messages, view the state of the cluster, and perform administrative actions without using the native Kafka protocol or clients.

To produce messages to a test topic with curl:

$ curl -X POST -H "Content-Type: application/vnd.kafka.json.v2+json" \
    --data '{"records":[{"value":{"status": "completed"}}]}' \
    "http://localhost:8082/topics/test"

To consume messages from the same topic:

$ curl -X GET -H "Accept: application/vnd.kafka.json.v2+json" \
    "http://localhost:8082/topics/test"

We can dynamically configure Kafka cluster settings as well.

To change log level of various components of Kafka cluster using Kafka Rest Proxy.

$ curl -X POST -H "Content-Type: application/vnd.kafka.v2+json" \
    --data '{"log4j.logger.kafka.server":"DEBUG"}' \
    "http://localhost:8082/config"

We can update the log level of various components of Kafka cluster and check the logs.

Conclusion

In this article, we have seen how to install Apache Kafka locally using Docker. We have also seen how to produce and consume messages using Kafka console commands and Kafka Rest Proxy.

Common Crawl on Laptop - Building Web Directory

This series of posts discuss processing of common crawl dataset on laptop.

  1. Extracting Subset of Common Crawl
  2. Building web directory (this post)

Introduction

In the earlier post, we have extracted all telugu web page urls to a csv file. In this post, let's explore these urls and build a web directory from it.

Explore Data

Let's see how many urls are present in the extracted subset of data.

$ wc -l telugu.csv
  852025 telugu.csv 

In the earlier post, we have installed duckdb and used it for processing parquet files. duckdb can execute SQL queries directly on csv file. Let's use it to explore the data stored in telugu.csv.

Let's see how many unique domains are present in the data.

$ duckdb -c """
    SELECT COUNT(DISTINCT url_host_name_reversed) as unique_sites
    FROM read_csv('telugu.csv', auto_detect = TRUE);
"""
┌──────────────┐
│ unique_sites │
├──────────────┤
│ 13632        │
└──────────────┘

There ~14k unique domains. Let's see page density across these domains.

$ duckdb -c """
SELECT count    AS page_count,
COUNT(*) AS sites
FROM (SELECT url_host_name_reversed, COUNT(*) AS count
FROM read_csv('te.csv', auto_detect = TRUE)
GROUP BY url_host_name_reversed) AS t
GROUP BY page_count
ORDER BY page_count;
"""
┌────────────┬───────┐
│ page_count │ sites │
├────────────┼───────┤
│ 16326  │
│ 21904  │
│ 3733   │
│ 4459   │
│ 5315

About ~75% of the sites have less than 5 pages. It is highly unlikely that these sites complete content is in Telugu language. After manually checking a few of these sites, I found that there are a lot of false positives.

In the earlier post, we have extracted all pages where there is Telugu language content. Let's filter out pages where Telugu is primary language.

$ duckdb -c """
  COPY (
    SELECT * FROM read_csv('cct.csv', auto_detect=true) 
    WHERE content_languages like 'tel%'
  ) TO 'te_primary.csv' (DELIMITER ',', HEADER TRUE);
"""
$ wc -l te_primary.csv
  573130 te_primary.csv
$ duckdb -c "SELECT COUNT(DISTINCT url_host_name_reversed) as unique_sites FROM read_csv('te_primary.csv', auto_detect = TRUE)"                           
┌──────────────┐
│ unique_sites │
├──────────────┤
│ 5666         │
└──────────────┘    

Let's see how page density per domain has changed.

$ duckdb -c """
SELECT count    AS page_count,
COUNT(*) AS sites
FROM (SELECT url_host_name_reversed, COUNT(*) AS count
FROM read_csv('te_primary.csv', auto_detect = TRUE)
GROUP BY url_host_name_reversed) AS t
GROUP BY page_count
ORDER BY page_count
;
"""
┌────────────┬───────┐
│ page_count │ sites │
├────────────┼───────┤
│ 12183  │
│ 2843   │
│ 3235   │
│ 4146   │
│ 598

Page density remains almost the same.

Let's filter out sites which have at least 5 pages in Telugu. This will eliminate a lot of false positives. Let's look at the most popular sites from the results.

   1   │ Rank,Domain,Open Page Rank
   225,support.google.com,8.55
   357,t.me,7.76
   476,chrome.google.com,7.49
   5163,support.mozilla.org,6.99
   6170,groups.google.com,6.94

A lot of unrelated domains are present here because there might be 10+ pages in telugu in these domains as well. But we don't need these.

Let's look at only home page(or translated home page) where primary content language is telugu.

$ duckdb -c """
  SELECT COUNT(distinct url) 
  FROM read_csv('te_primary.csv', auto_detect=true) 
  WHERE (url_path = '/' or url_path = '/te/') and url_query is null;
"""

Now the domain count has reduced to 6k. Let's export these domains to csv file.

To categorize these domains, Common-crawl doesn't yet provide any kind of categorisation. For now, we can use Open PageRank to sort these domains based on rank.

We can download top 10 million domains from Open PageRank3. Here is a simple python script to extract telugu domains from the list.

import pandas as pd

domains_file = 'domains.csv'
with open(domains_file, 'r') as f:
    telugu_domains = [line.strip() for line in f.readlines()]

telugu_domains = ['.'.join(reversed(domain.split('.'))) for domain in telugu_domains]

df = pd.read_csv('t10m.csv')
df = df[df['Domain'].isin(telugu_domains)]

df.to_csv('t10m_telugu.csv', index=False)

Now, we have list of all telugu domains sorted by rank. In the next post, we will use this list to categorize the domains.

Common Crawl On Laptop - Extracting Subset Of Data

This series of posts discuss processing of common crawl dataset on laptop.

  1. Extracting Subset of Common Crawl (this post)
  2. Building web directory

Introduction

Common Crawl(CC)1 is an open repository of web containing peta bytes of data since 2008. As the dataset is huge, most of the tutorials use AWS EMR/Athena to process the data.

In this post, let's learn how to extract a subset of data(entire telugu language web pages) and process it on our local machine.

Exploring Common Crawl

CC provides monthly data dumps in WARC format. Each crawl consists of about ~3 billion web pages with a compressed size of ~100 TB.

In addition to WARC files, CC provides index files as well as columnar index2 files so that users can easily search, filter and download the data.

Common Crawl Index

Each crawl index is spread over 300 files consisting of ~250 GB of data. For this post, let use the latest crawl which is CC-MAIN-2022-40.

The index files can be accessed from AWS S3 or https. We can use aws cli to list all the files along with the sizes.

$ aws s3 ls --recursive --human-readable --summarize s3://commoncrawl/cc-index/collections/CC-MAIN-2022-40
2022-10-08 16:07:59  621.9 MiB cc-index/collections/CC-MAIN-2022-40/indexes/cdx-00000.gz
2022-10-08 16:08:26  721.6 MiB cc-index/collections/CC-MAIN-2022-40/indexes/cdx-00001.gz
...
2022-10-08 16:42:39  146.6 MiB cc-index/collections/CC-MAIN-2022-40/indexes/cluster.idx
2022-10-08 16:42:33   30 Bytes cc-index/collections/CC-MAIN-2022-40/metadata.yaml

Total Objects: 302
   Total Size: 236.1 GiB

Let's download an index file to our local machine and see how the data is arranged. We can use aws cli to download the data from s3 bucket or use wget to download it from https endpoint.

# from s3
$ aws s3 cp s3://commoncrawl/cc-index/collections/CC-MAIN-2022-40/indexes/cdx-00000.gz .

# from https
$ wget https://data.commoncrawl.org/cc-index/collections/CC-MAIN-2022-40/indexes/cdx-00000.gz

Let's print top five lines of the file.

$ zcat < cdx-00000.gz | head -n 5
0,1,184,137)/1klikbet 20221005193707 {"url": "http://137.184.1.0/1klikbet/", "mime": "text/html", "mime-detected": "text/html", "status": "200", "digest": "XTKGORHKLZCHDBBOMYCYYIZVRPMXNRII", "length": "7065", "offset": "83437", "filename": "crawl-data/CC-MAIN-2022-40/segments/1664030337663.75/warc/CC-MAIN-20221005172112-20221005202112-00011.warc.gz", "charset": "UTF-8", "languages": "ind"}
0,1,184,137)/7meter 20221005192131 {"url": "http://137.184.1.0/7meter/", "mime": "text/html", "mime-detected": "text/html", "status": "200", "digest": "KUJAMRT6MXYR3RTWRJTIWJ5T2ZUB3EBH", "length": "7456", "offset": "142680", "filename": "crawl-data/CC-MAIN-2022-40/segments/1664030337663.75/warc/CC-MAIN-20221005172112-20221005202112-00182.warc.gz", "charset": "UTF-8", "languages": "ind"}
...

The last column of each line contains the language information. We can use these index files, and we can extract all the lines containing tel language code.

Columnar Index

We can also use columnar index to filter out telugu language web pages. Let's download a single file from the index.

# from s3
$ aws s3 cp s3://commoncrawl/cc-index/table/cc-main/warc/crawl=CC-MAIN-2022-40/subset=warc/part-00000-26160df0-1827-4787-a515-95ecaa2c9688.c000.gz.parquet .

# from https
$ wget https://data.commoncrawl.org/cc-index/table/cc-main/warc/crawl=CC-MAIN-2022-40/subset=warc/part-00000-26160df0-1827-4787-a515-95ecaa2c9688.c000.gz.parquet

We can use Python pandas to read the parquet file and filter out telugu language web pages. Columnar index has content_languages column which can be used to filter out telugu pages as shown below.

$ python -c """
import pandas as pd
filename = 'part-00000-26160df0-1827-4787-a515-95ecaa2c9688.c000.gz.parquet'
df = pd.read_parquet(filename)
df = df[df['content_languages'].str.startswith('tel', na=False)]
df.to_csv('telugu.csv')
"""

I have used Macbook M1 with local ISP(Internet Service Provider) to download and extract the index. It took around 7 minutes to download a single file and 2 minutes to extract the data. To process 300 index files, it takes ~2 days.

Let's see how we can speed it up.

Improving Performance

Faster Downloads

My Wi-Fi speed is ~4MBps when downloading the index file. To download faster, I have created t2.micro(free-tier) EC2 instance on AWS. In this machine, download speed is ~10MBps. We can use other instances, but I am trying to use only free resources. In this machine, single file download is taking ~3 minutes.

CC dataset is hosted in us-east-1 region. So, I have created a new t2.micro instance in us-east-1 region. This instance is taking <20 seconds to download a single file. We can download entire index in less than 2 hours.

Faster Performance

To extract data from index files, we have used Python pandas without specifying the engine. By default, it uses pyarrow which is a bit slow. To improve speed we can use fastparquet as engine which is ~5x faster than pyarrow.

import pandas as pd

filename = 'part-00000-26160df0-1827-4787-a515-95ecaa2c9688.c000.gz.parquet'
df = pd.read_parquet(filename, engine='fastparquet')

To get better performance, we can use duckdb. Duckdb is an in-process SQL OLAP DBMS and it can execute SQL queries directly on parquet files with parquet extension.

$ brew install duckdb

$ duckdb -c 'INSTALL parquet;'

We can write a simple SQL query to filter out the required rows.

$ duckdb -c """
LOAD parquet;
COPY (select * from PARQUET_SCAN('part-00000-26160df0-1827-4787-a515-95ecaa2c9688.c000.gz.parquet') where content_languages ilike '%tel%') TO 'telugu.csv' (DELIMITER ',', HEADER TRUE);
"""

Duckdb can execute SQL queries on remote files as well with httpfs extension.

$ duckdb -c 'INSTALL httpfs;'

$ duckdb -c """
    LOAD httpfs;
    LOAD parquet;

    COPY (select * from PARQUET_SCAN('s3://commoncrawl/cc-index/table/cc-main/warc/crawl=CC-MAIN-2022-40/subset=warc/part-00001-26160df0-1827-4787-a515-95ecaa2c9688.c000.gz.parquet') where content_languages ilike '%tel%') TO 'telugu.csv' (DELIMITER ',', HEADER TRUE);"""
"""

Duckdb can also read series of parquet files and treat them as a single table. We can use this feature to process all the index files in a single command.

$ duckdb -c """
    LOAD httpfs;
    LOAD parquet;

    SET s3_region='us-east-1';
    SET s3_access_key_id='s3_secret_access_key';
    SET s3_secret_access_key='s3_secret_access_key';

    COPY (select * from PARQUET_SCAN('s3://commoncrawl/cc-index/table/cc-main/warc/crawl=CC-MAIN-2022-40/subset=warc/*.parquet') where content_languages ilike '%tel%') TO 'telugu.csv' (DELIMITER ',', HEADER TRUE);
"""

Depending on the file size, duckdb takes 10-15 seconds to process a single file. Since we don't need all the columns for further data processing, we can limit columns to required 5 columns.

$ duckdb -c """
    COPY (select url, content_languages, warc_filename, warc_record_offset, warc_record_length from PARQUET_SCAN('s3://commoncrawl/cc-index/table/cc-main/warc/crawl=CC-MAIN-2022-40/subset=warc/*.parquet') where content_languages ilike '%tel%') TO 'telugu.csv' (DELIMITER ',', HEADER TRUE);
"""

By limiting columns3 there is another 65% improvement in performance. Now duckdb can process a file in 3 to 8 seconds depending on the size of the file. We can process entire index in ~20 minutes.

Conclusion

With a single command, we can extract a subset of index from CC in ~2 hours. So far we have processed all files in a single process. We can also parallelize the process using parallel to get faster results.

In the upcoming posts, let's see how we can fetch the data from WARC files using this index and do further data processing.