Setup Tailscale App Connector in 3 easy steps

Problem Statement

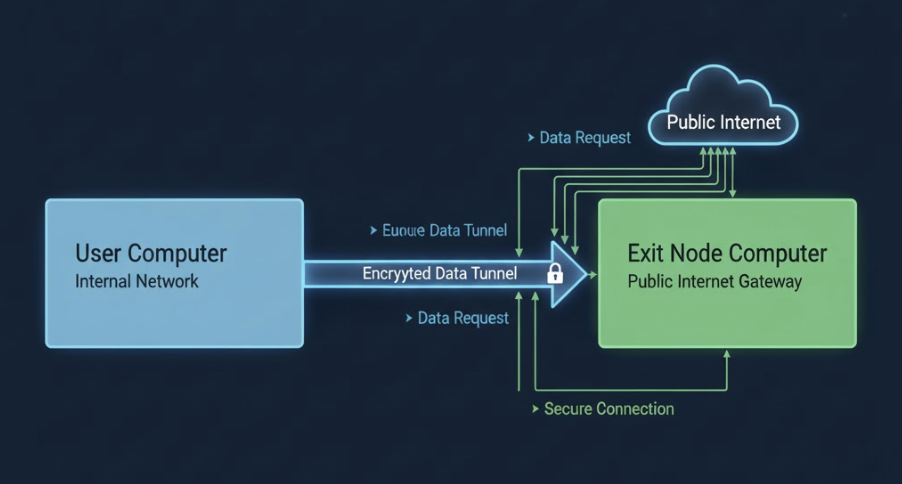
In the earlier post, we have seen how to route specific websites to an exit node using a SOCKS proxy & browser extension(or a PAC file).

With this approach, when we need to work on multiple computers, we need to setup the SOCKS proxy & browser extension individually.

Instead we can use Tailscale's App Connectors to route specific websites through selected nodes.

Tailscale docs are too complicated for this App connectors. Here is a simplified version of the steps.

Tailscale - App Connectors

Note: There is no need for publicly reachable IP address for the Tailscale node which is used as App Connector. (Thanks Chris Smith for pointing it out. Tailscale docs are misleading in this regard.)

  • In the Tailscale admin console, go to the "Access control" section & add tagOwners.
    "tagOwners": {
        "tag:home-connector": [
            "autogroup:member",
        ],
    },
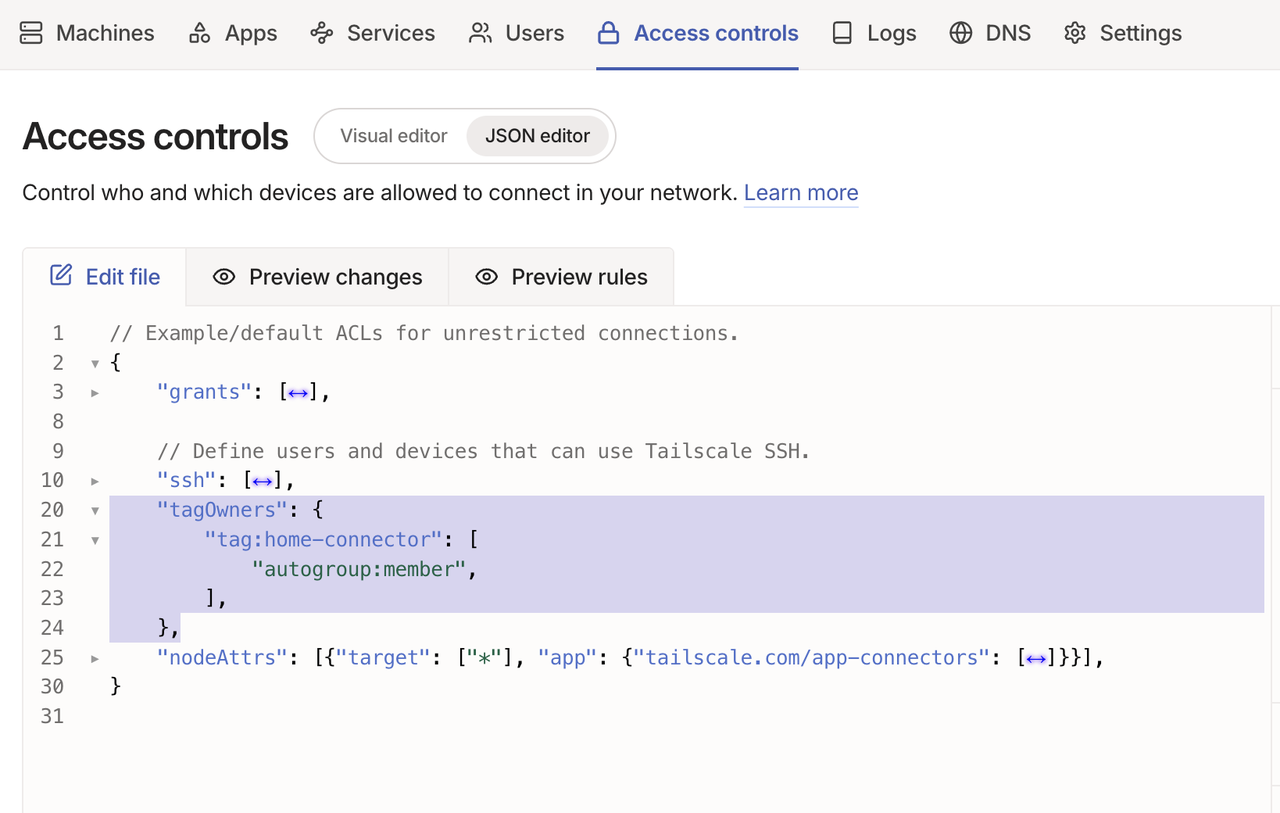
tailscale app connector acl

  • Use any Linux machine (it doesn't need static IP) to setup the App Connector. Install Tailscale on it. Advertise it as an app connector.
$ sudo tailscale up --advertise-tags=tag:home-connector --accept-routes

Enable IP forwarding on the machine. If your Linux system has a /etc/sysctl.d directory, run

echo 'net.ipv4.ip_forward = 1' | sudo tee -a /etc/sysctl.d/99-tailscale.conf
echo 'net.ipv6.conf.all.forwarding = 1' | sudo tee -a /etc/sysctl.d/99-tailscale.conf
sudo sysctl -p /etc/sysctl.d/99-tailscale.conf

Otherwise, run

echo 'net.ipv4.ip_forward = 1' | sudo tee -a /etc/sysctl.conf
echo 'net.ipv6.conf.all.forwarding = 1' | sudo tee -a /etc/sysctl.conf
sudo sysctl -p /etc/sysctl.conf
  • From the Tailscale admin console, create a new app connector.
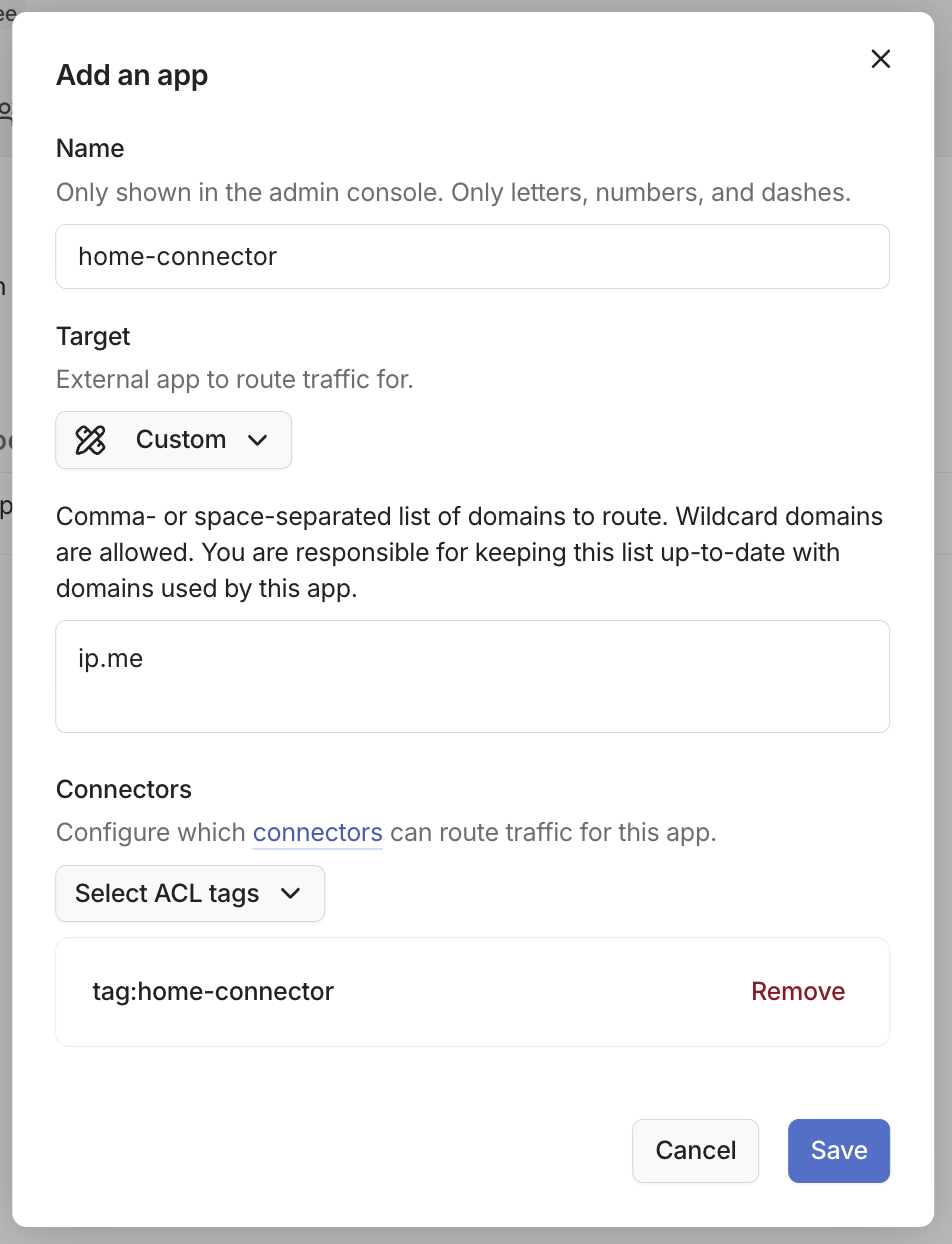
tailscale app connector

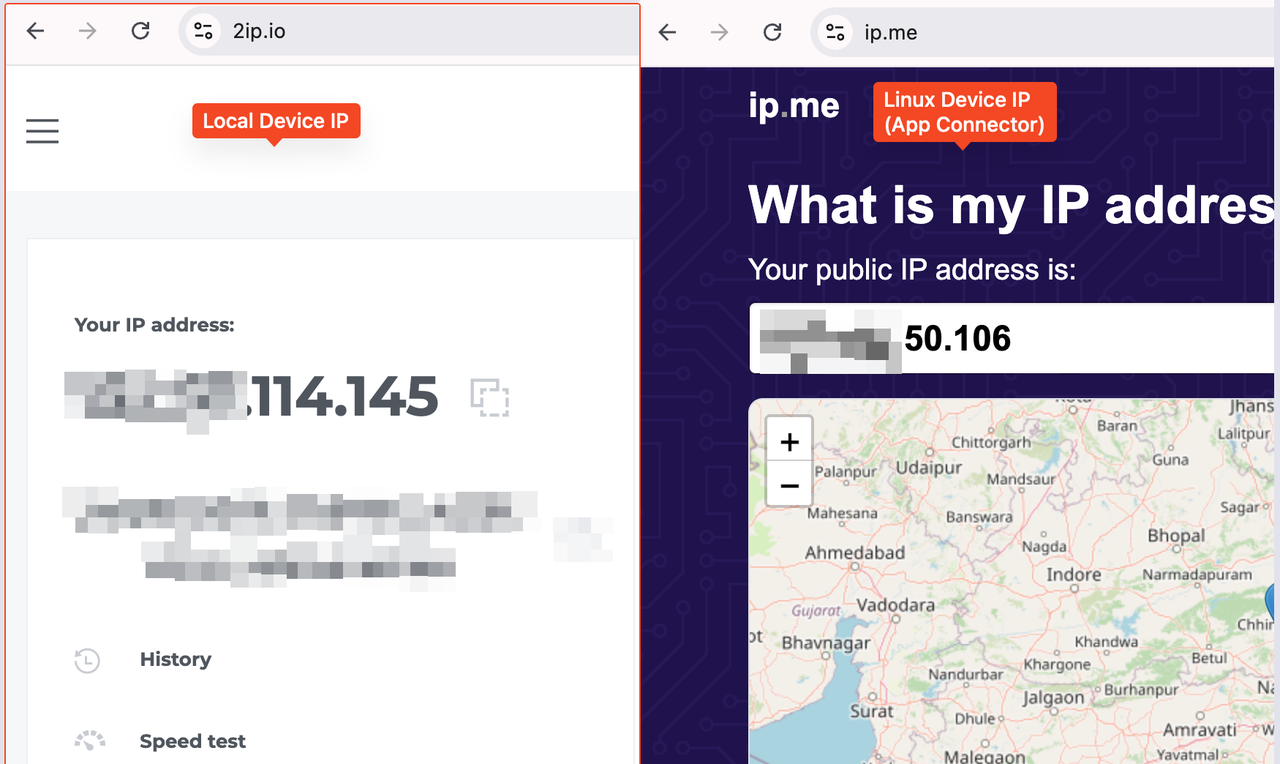
In the "Target" field, we can select any existing app or we can use custom target so that we can route our desired websites. For now, I am adding ip.me domain so that we can verify if the traffic is routed through the connector.

  • From the "Machines" page, select the device and approve the requested subnets.
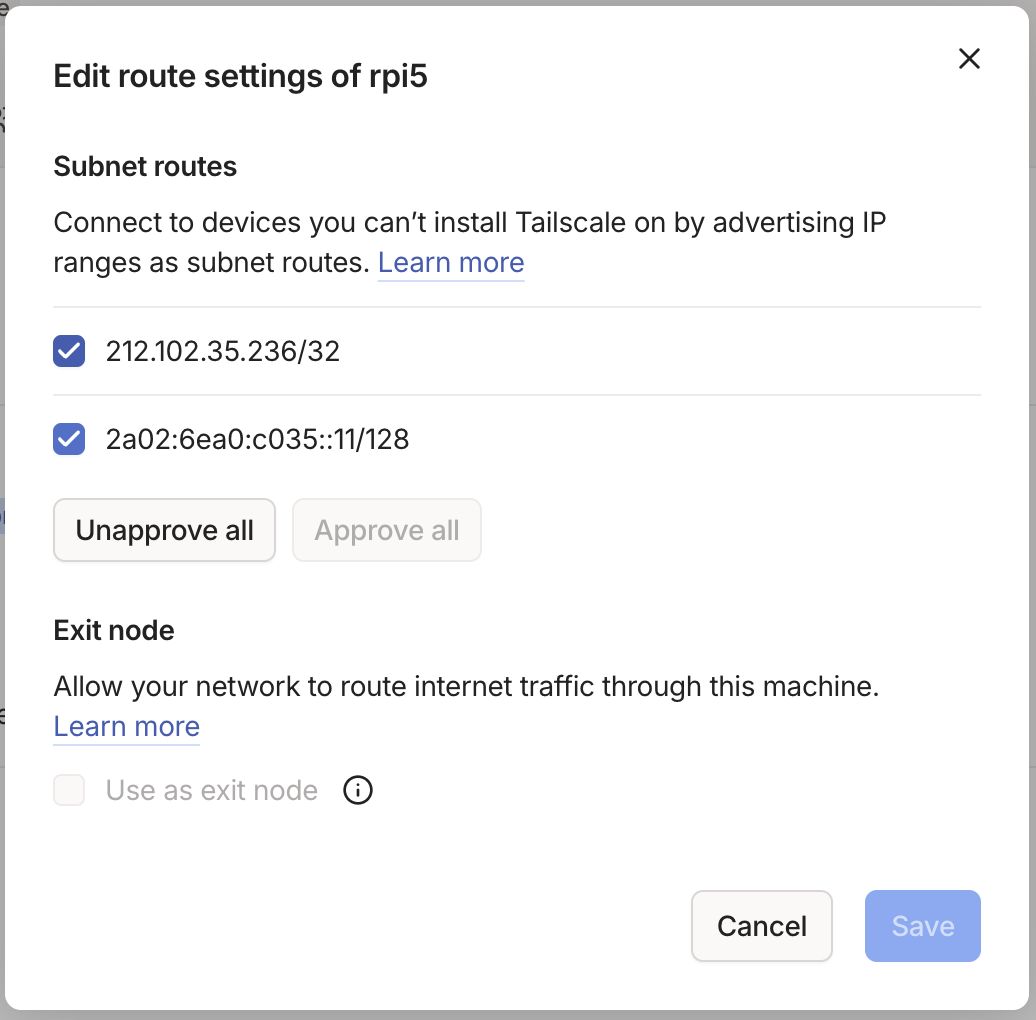
tailscale app connector subnet

From browser, lets visit 2ip.io to see our device ip address. Next, lets visit ip.me to ensure we are seeing the connector's IP as this domain will be served by app connector.
tailscale app connector verify

Conclusion

We can use App Connectors to route specific websites through a Tailscale node without needing to setup SOCKS proxy or browser extensions on each device.
TailScale - Use Exit Node for Specific Websites only

Problem

Tailscale1 provides zero-config mesh VPN built on top of Wiregaurd.

It provides an option to use an exit node for routing all traffic through it. But it can't route only specific domains through the exit node.

Tailscale Exit Node Option

Solution

Setup a SOCKS proxy using ssh command line tool.

ssh -D 1080 -f -C -q -N user@exit-node-ip

-D 1080 : Specifies the local port to listen on for SOCKS connections.

-f : Requests ssh to go to background just before command execution.

-C : Enables compression.

-q : Quiet mode.

-N : Do not execute remote commands.

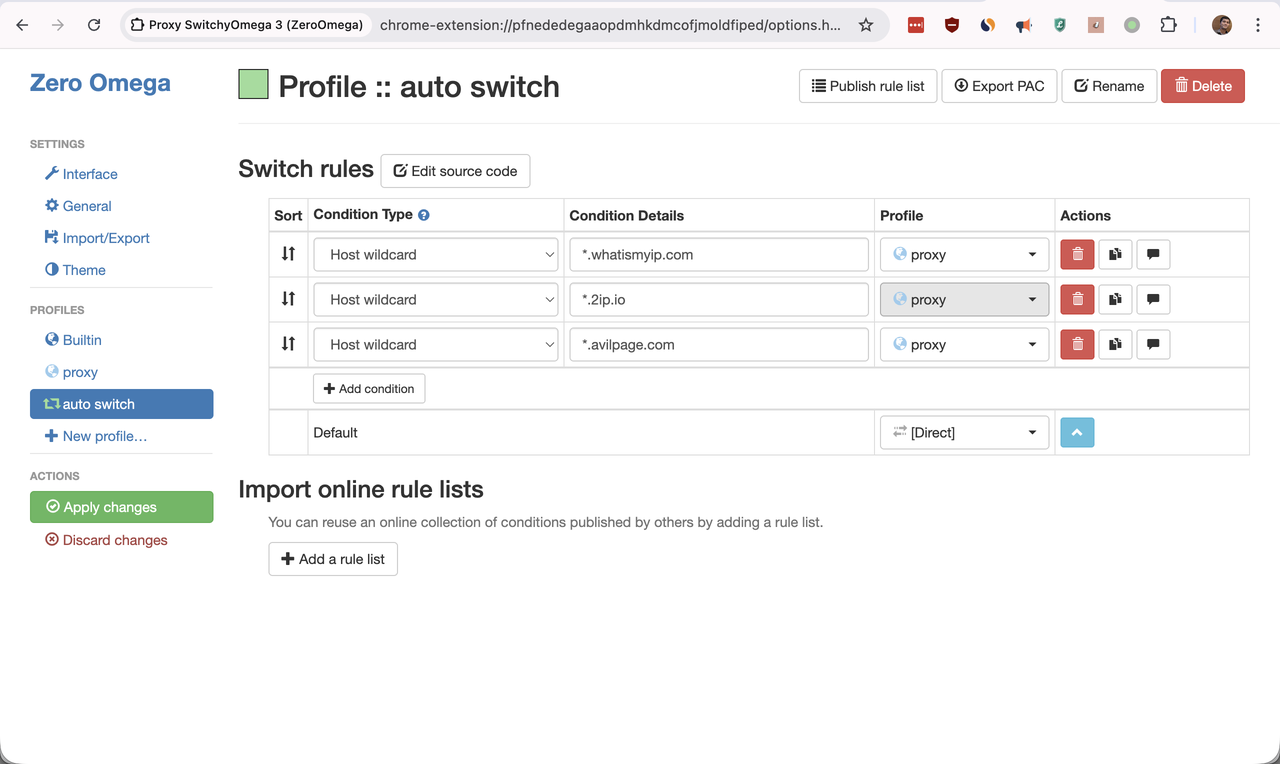
Once it is started, we can use ZeroOmega2 browser extension to route specific domains through the SOCKS proxy.

ZeroOmega Config

In the auto switch profile, we can setup specific domains which needs to be directed to the proxy. For all other domains, it will use the direct connection.

This works only for the browser where the extension is installed.

To apply this at the system level, we can use pac file and update the system proxy settings to use the pac file.

Conclusion

Tailscale provides app connector feature to route specific apps through the exit node, but it is needs publicly reachable IPs & Linux based OS for now.

Setting up SOCKS proxy & using a browser extension or PAC file is much easy & straight forward solution to route specific domains through Tailscale exit node.

MacBook - Natural Scrolling for Mouse

Problem

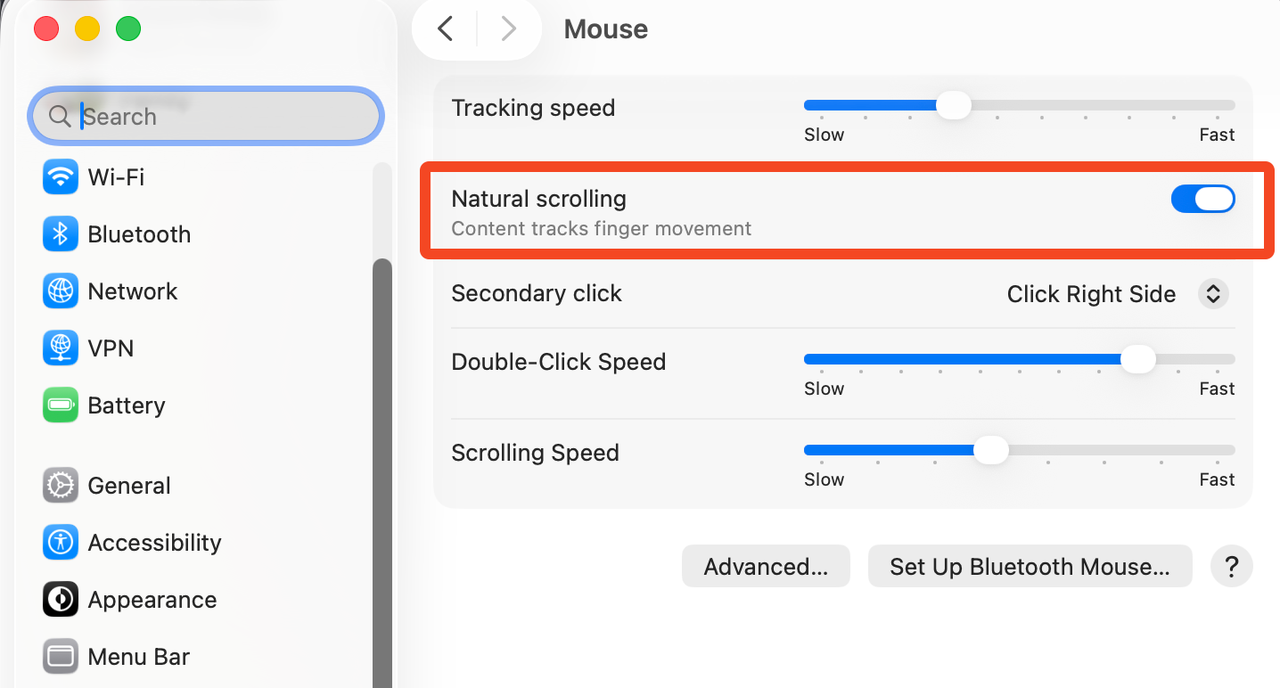
If we connect a mouse to macOS, the scrolling direction changes to "unnatural" for the mouse. This is because macOS has a single setting for natural scrolling that applies to both trackpad and mouse.

macos mouse settings

Solution

To have natural scrolling for both trackpad and mouse, we can use third-party tools like UnnaturalScrollWheels.

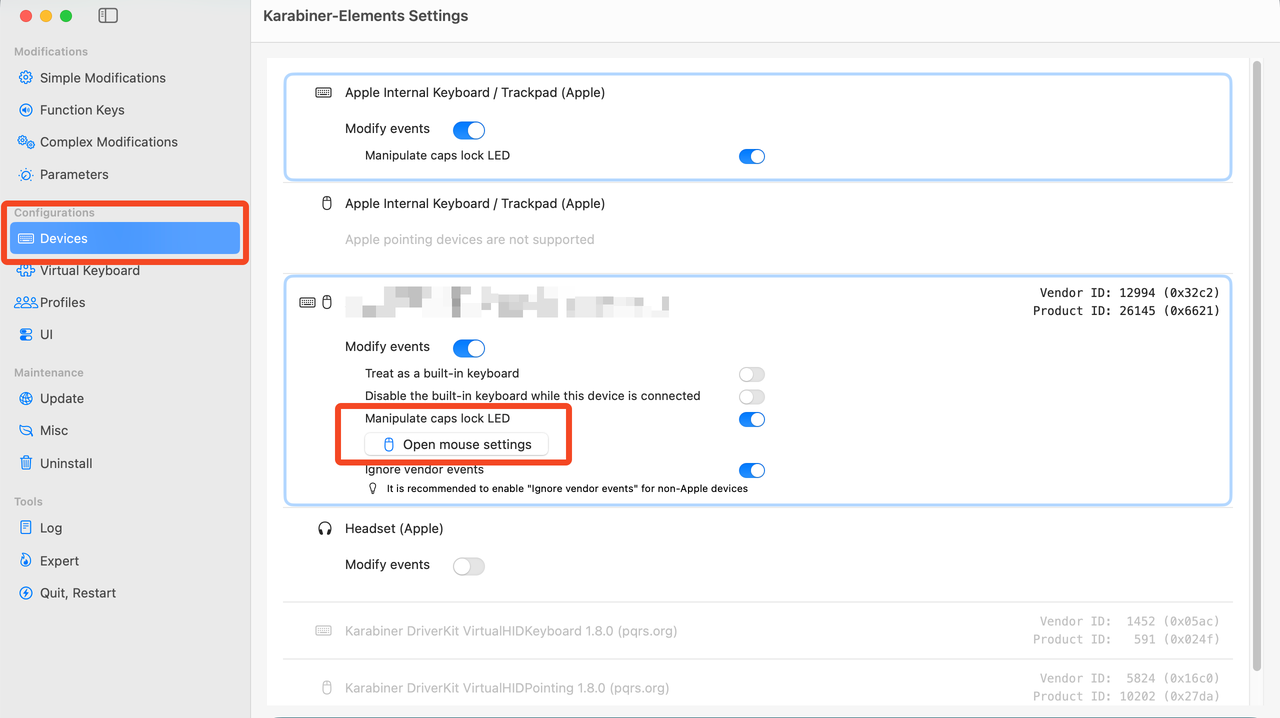
If we already use Karabiner-Elements, we can use it to set natural scrolling for mouse separately.

Open Karabiner-Elements and go to the "Devices" tab, select your mouse, and click on "Open mouse settings".

Karabiner-Elements Devices Tab

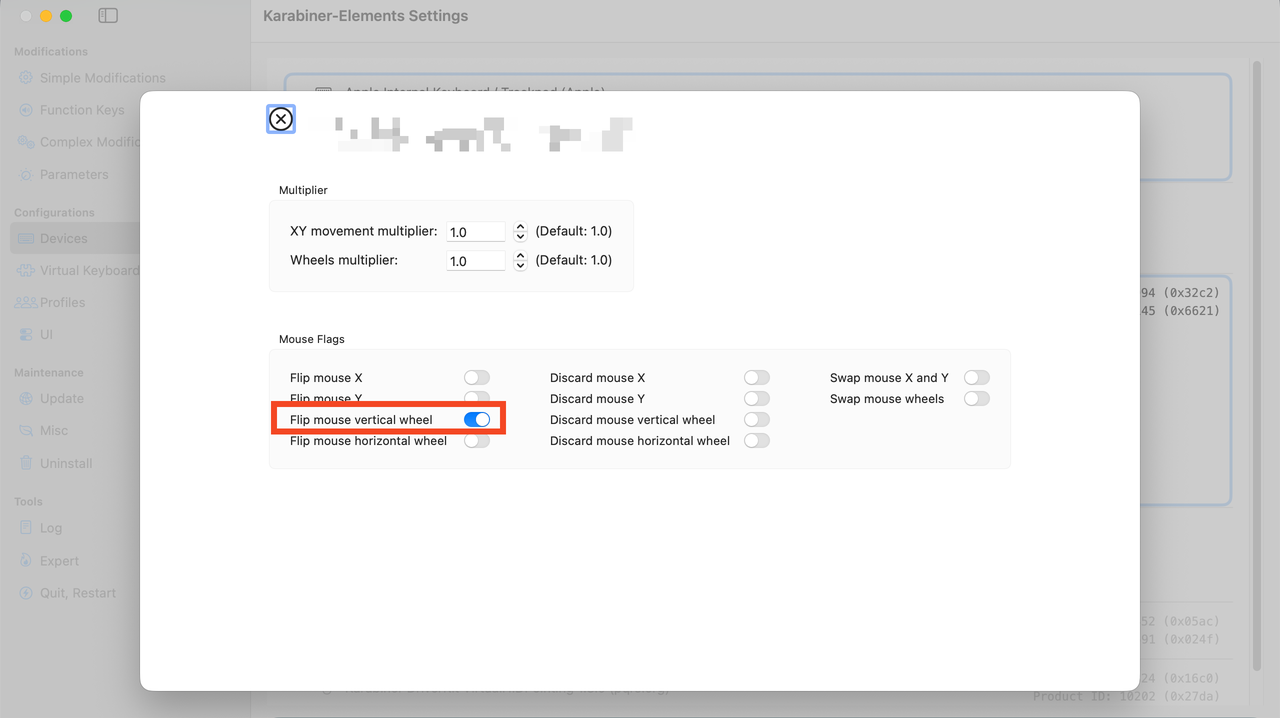
In the mouse settings, check the "Flip mouse vertical wheel" option.

Karabiner-Elements Devices Tab

Now, both trackpad and mouse will have natural scrolling.

Mutual Funds - Behind the scenes

As investors, we buy mutual funds from fund houses, platforms, or from distributors. But have you ever wondered what happens behind the scenes? How do these funds operate, and what processes are involved in managing them? In this post, we'll explore the behind-the-scenes operations of mutual funds.

Structure of a Mutual Fund

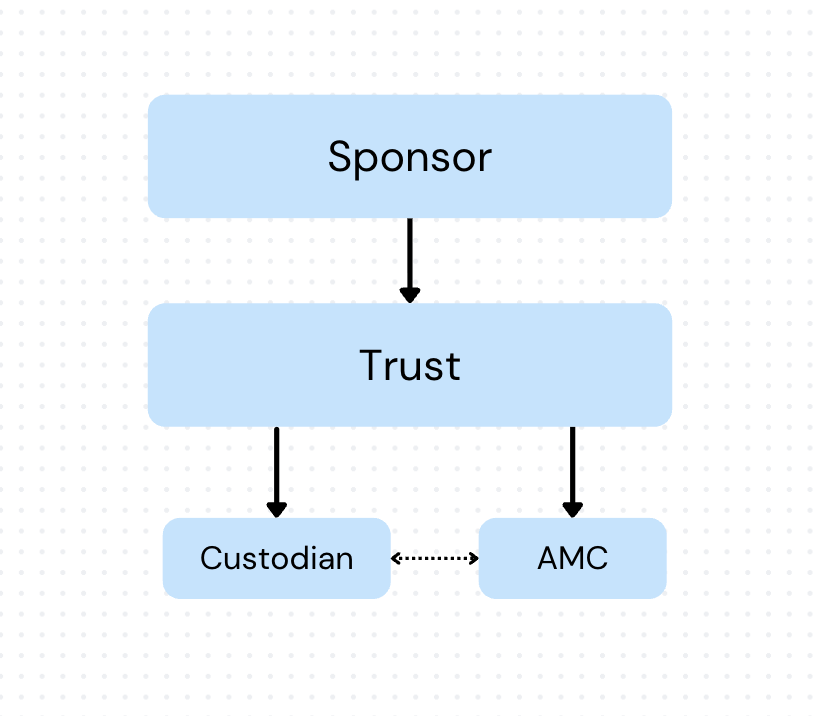
Mutual Fund Structure

In India, mutual funds have 3-tier structure consisting of the Sponsor, the Trust & the Asset Management Company (AMC).

  • The sponsor establishes the mutual fund and is responsible for its operations.

  • The trust & trustees are responsible for safeguarding investor interests, supervising the AMC's operations, and ensuring compliance with regulations. Custodians are appointed to hold the securities of the mutual fund and ensure their safekeeping.

  • AMC is the core entity responsible for the day-to-day management of the mutual fund.

The legal seperation of Trust & AMC ensures that the interests of investors are protected, and the fund's assets are managed independently.

All AMCs are registered with the Securities and Exchange Board of India (SEBI) and the list is available on the SEBI website.

We can look at SBI MF details from AMFI to understand the structure better.

Mutual Fund Structure

Mutual Fund Transactions

Mutual Fund Transactions

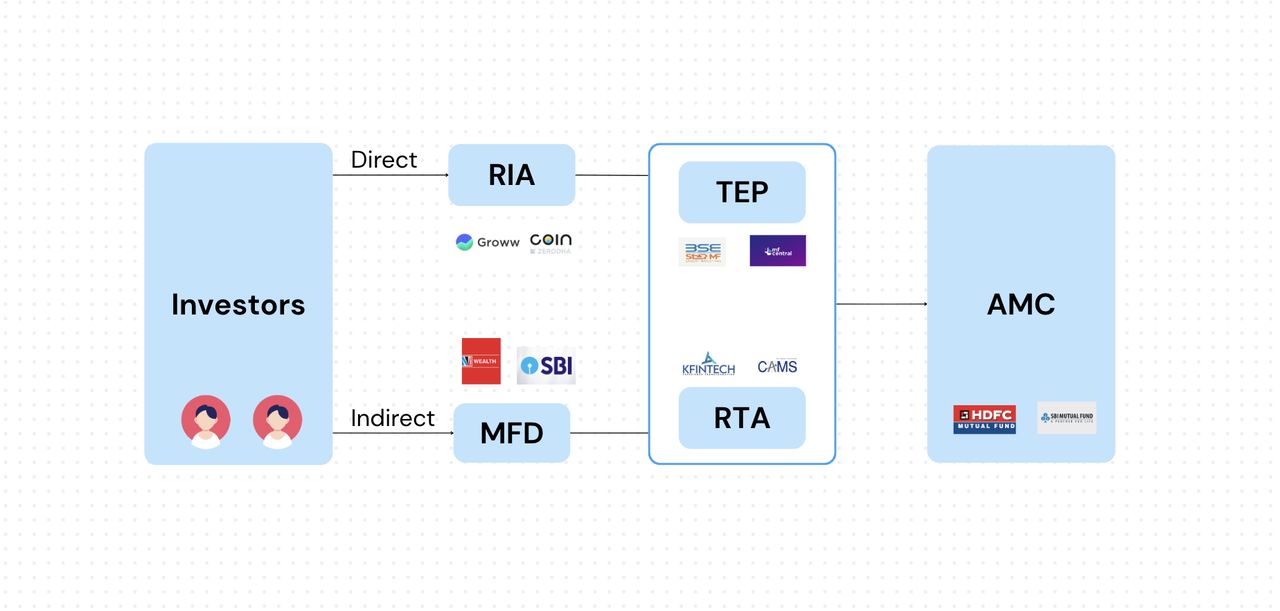
RIA: Investors can use RIA (Registered Investment Advisor) platforms like Groww, Zerodha Coin, to invest in direct mutual funds.

MFD Alternatively, they can also buy regular mutual funds through distributors like NJWealth, PhonePhe etc.

TEP: To process these transactions, Trading & Execution Platforms like BSE Star MF, NSE MFSS, etc are available. These platforms facilitate the buying and selling of mutual fund units, ensuring that transactions are executed efficiently and accurately.

RTA: RTA(Registrar and Transfer Agent) plays a crucial role in maintaining investor records, processing transactions, and ensuring compliance with regulatory requirements.

Investors can also buy mutual funds directly from the fund house's website or through their mobile app.

These mutual funds can be stored in Demat account or in physical form as account statements. It depends on the platform or fund house you choose to invest with.

Conclusion

This post provided a brief overview of the behind-the-scenes operations of mutual funds in India.

Setup Raspberry Pi without Monitor & Keyboard

Requirements

  • Raspberry Pi (any model)
  • MicroSD card (8GB or larger)
  • Power supply

Setup

Download & install Raspberry Pi Imager from here.

![Raspberry Pi Imager]

After installation, connect SD Card to Computer, and start installation process.

In the config step, setup WiFi credentials and enable ssh server as well.

![Raspberry Pi Imager]

Once the installation is complete, insert the SD card into the Raspberry Pi and power it on.

Find the IP Address

You can find the IP address of your Raspberry Pi by checking your router's connected devices list or using a network scanning tool like nmap or arp.

arp -an

# or using nmap
nmap -sn

Once you have the IP address, you can SSH into the Raspberry Pi.

ssh pi@<IP_ADDRESS>

Conclusion

When we don't have a monitor and/or keyboard, this process allows us to set up a Raspberry Pi headlessly. This is particularly useful for projects where the Pi will be used as a server or in a remote location.