Why I Use CyanogenMod?

When listening to music, to switch tracks I want to use volume buttons. For this I have to use Pocket Skip Track app. CyanogenMod has inbuilt support for that.

To interact with mobile from computer over wifi, wifi adb is required. CyanogenMod provides an option to enable this in Developer Options.

To put mobile in recovery mode, Gravity Box is required. This should be used only after installing Xposed framework. CyanogenMod has Advanced reboot which provides option to put phone in recovery mode.

Battery icon in status bar is very small. Having a text percentage indicator will be more useful. For this battery percentage is required. CyanogenMod has inbuilt circle/text indicators.

Auto brighness stopped working after I have rooted Moto G4 plus. I had to use twilight for auto brighness adjustment. With CyanogenMod, it is working fine. It also has a night mode option.

With stock android, auto rotate won't work in all directions. Set orientation app is required for that. CyanogenMod has inbuilt support for that.

To adapt mobile display to the time of the day, flux app is required on stock android. CyanogenMod has inbuilt option for this.

To get superuser permissions, I have to root stock android. CyanogenMod comes with root permissions. To run adb as root on stock android, adbd insecure app is required. CyanogenMod works without it.

Stock android also doesn't provide any options to customize status bar. CyanogenMod has several options to customize it.

There are several other things where CyanogenMod excels when compared to stock android like themes, privacy guard e.t.c. However, CyanogenMod comes with a lot of inbuilt features(batteries included) and that is the main reason for me to use it.

Remove Clock From LockScreen/StatusBar On Android

I have been living without time from a few years and it is a bliss. I have removed time from my laptop. For android mobile, I couldn't find a reliable way to remove time and I used to change timezone to a random zone. With Xposed framework we can remove clock from lock screen and status bar.

Before proceeding, make sure your phone is rooted and Xposed framework is installed.

Remove Clock From LockScreen

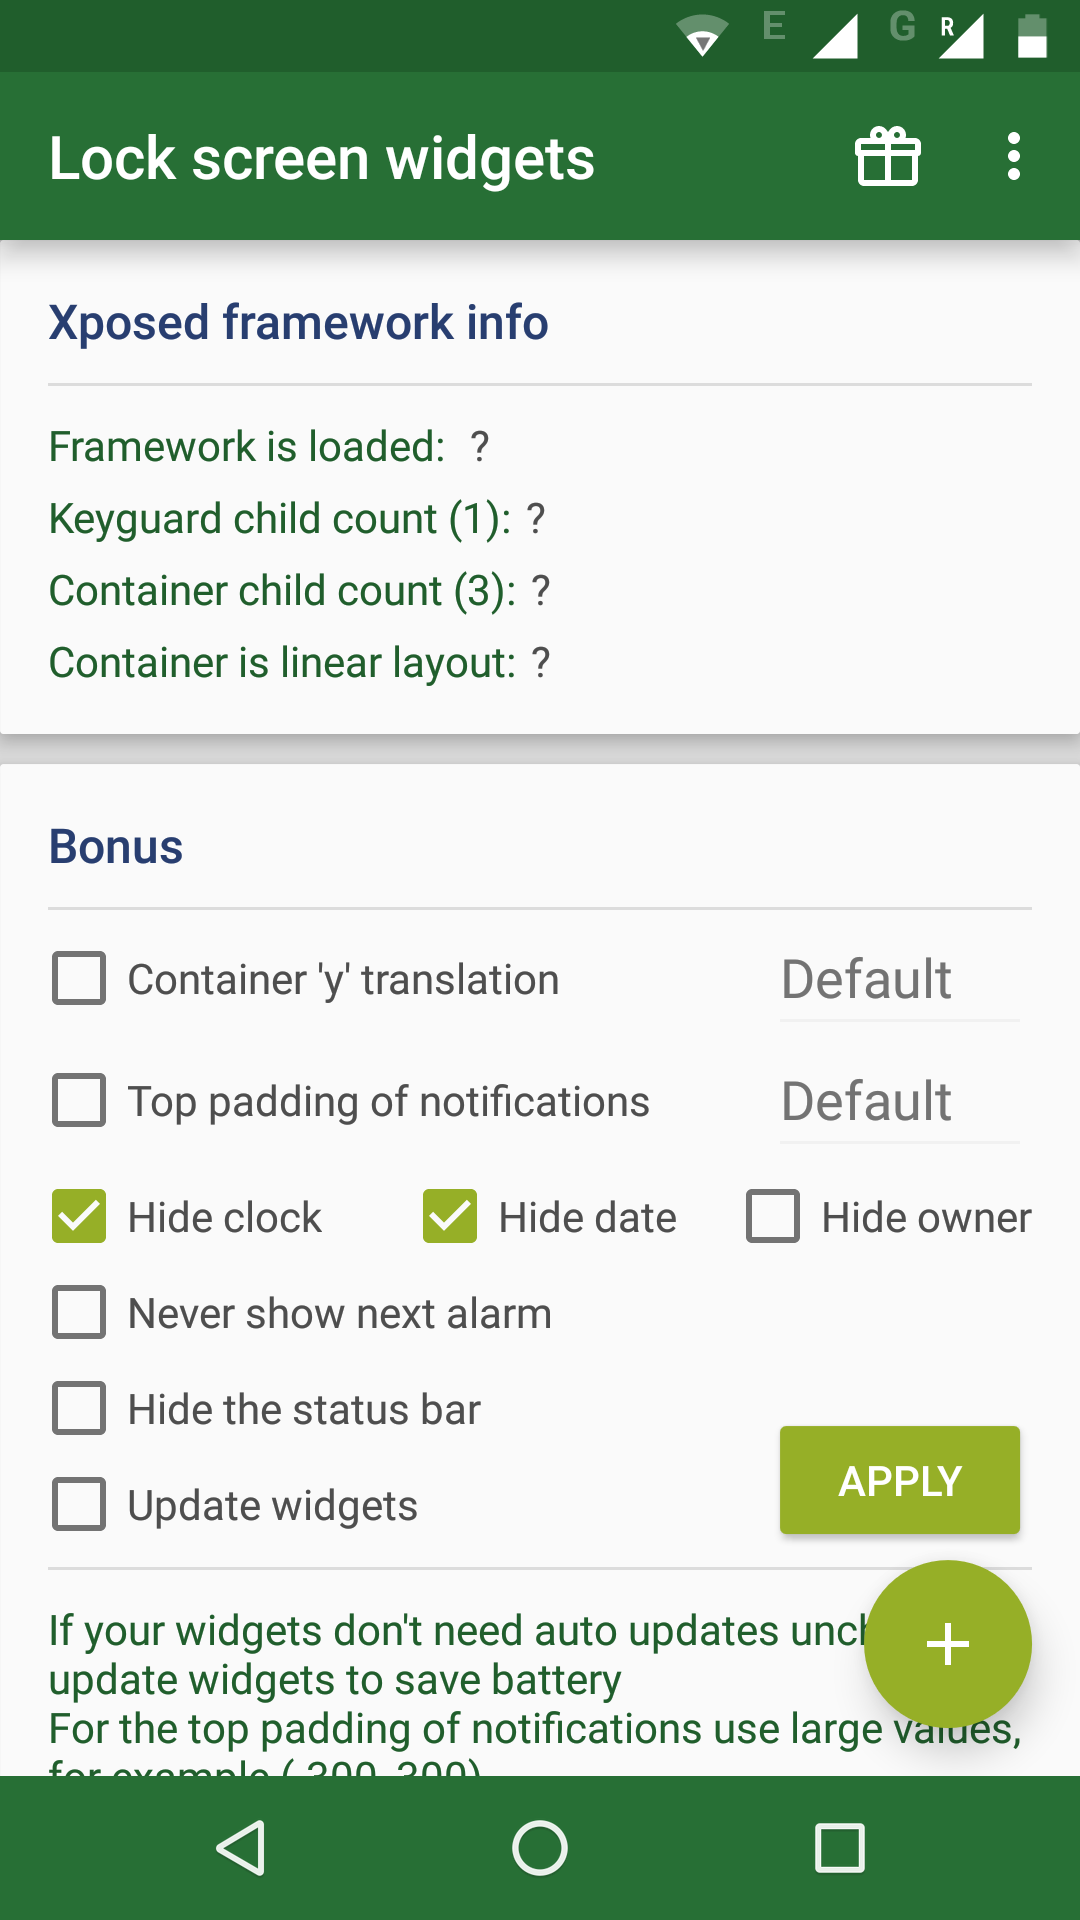
To remove clock from lockscreen, download Lock screen widgets module and activate it.

If you open it, it has an option to hide date and time.

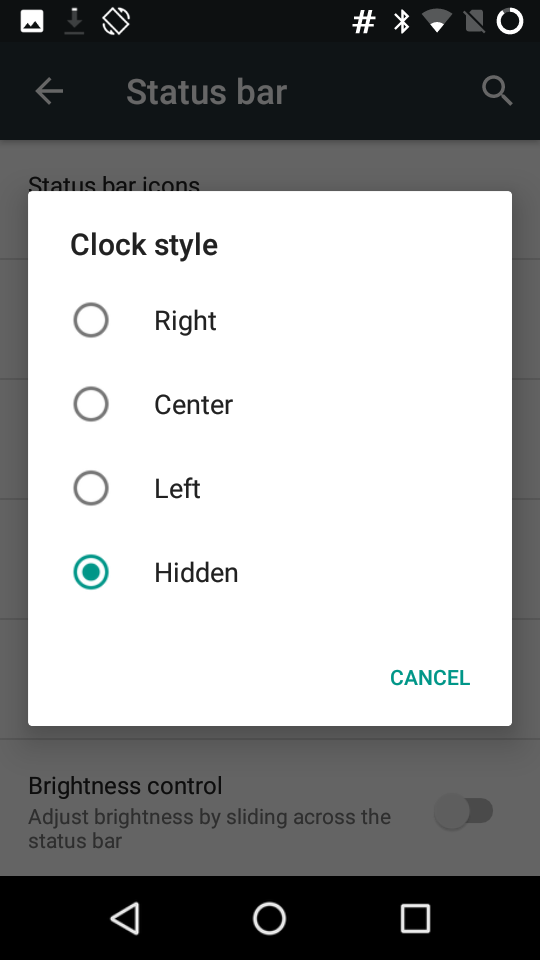
Remove Time From StatusBar

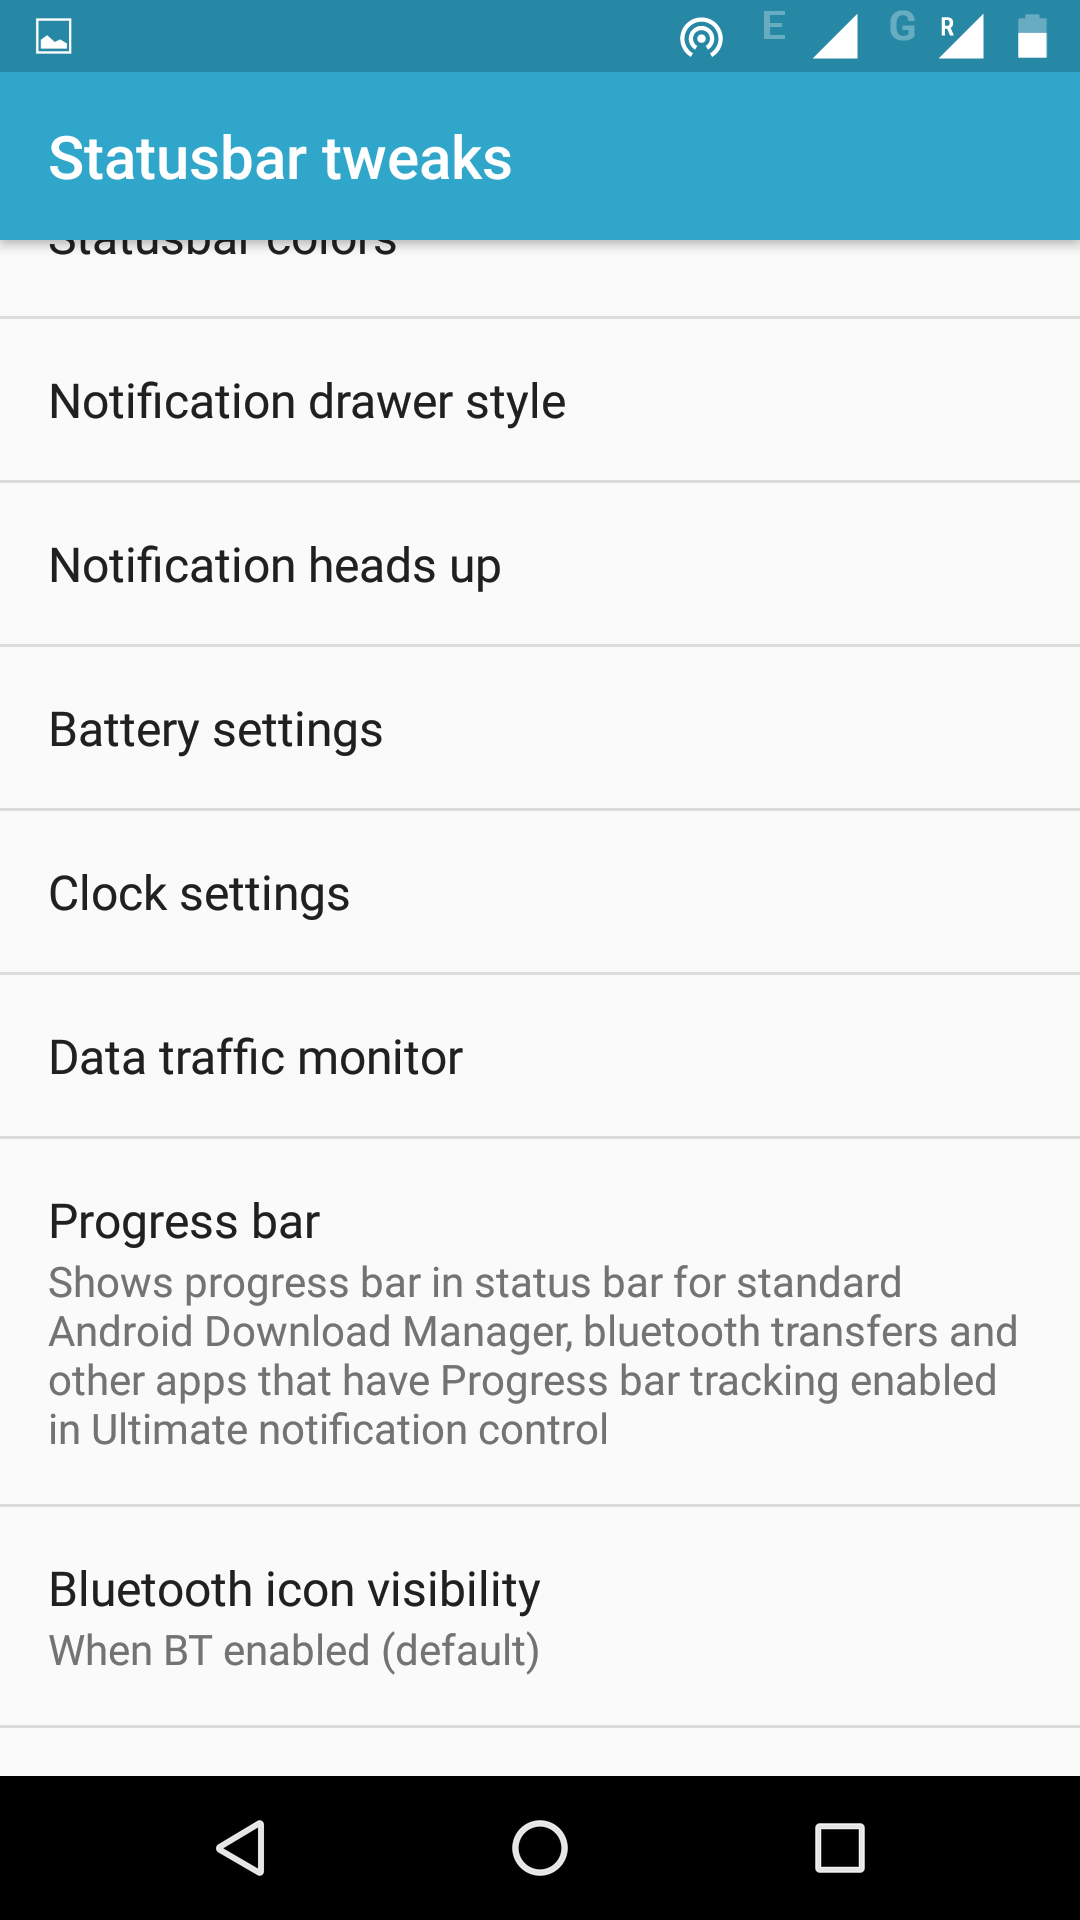
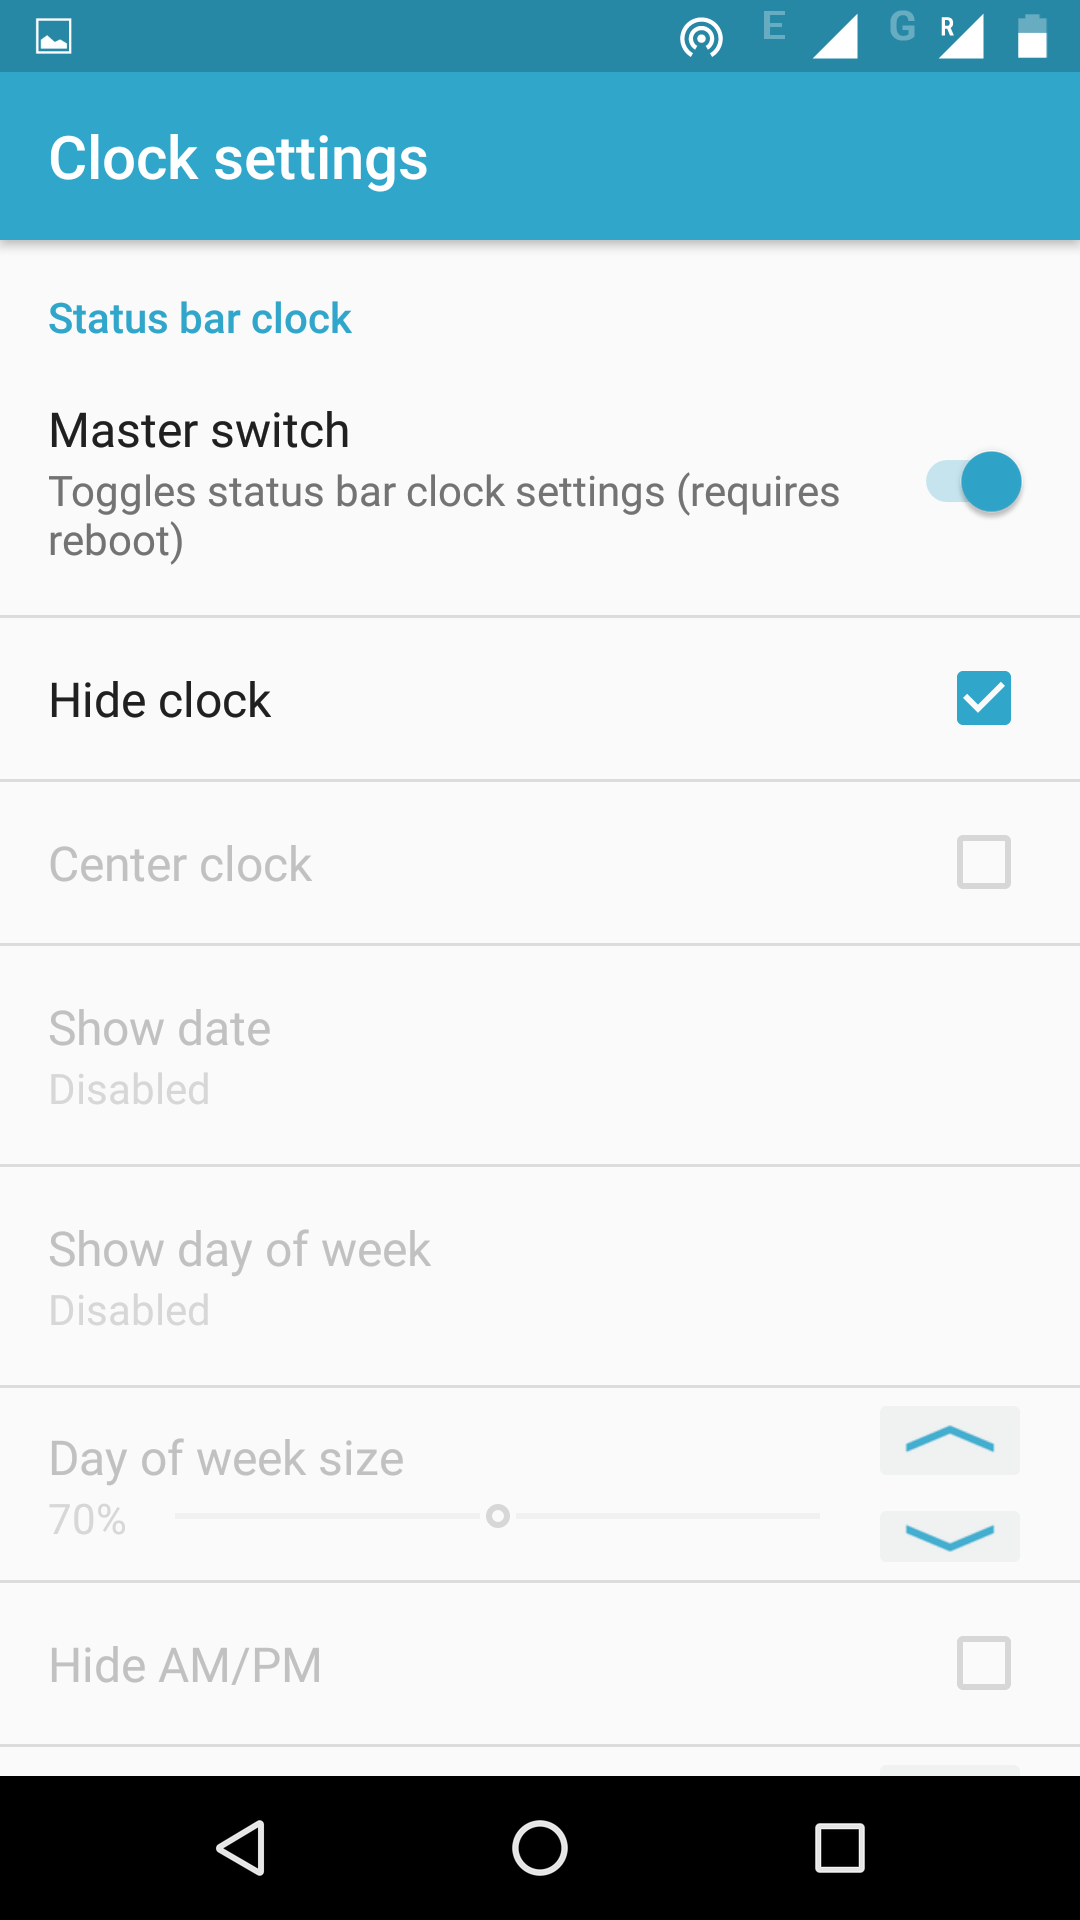
To remove clock from status bar, you have to install GravityBox. Open GravityBox and goto statusbar settings

If you are already using CyanogenMod, there is an option to hide time in settings.

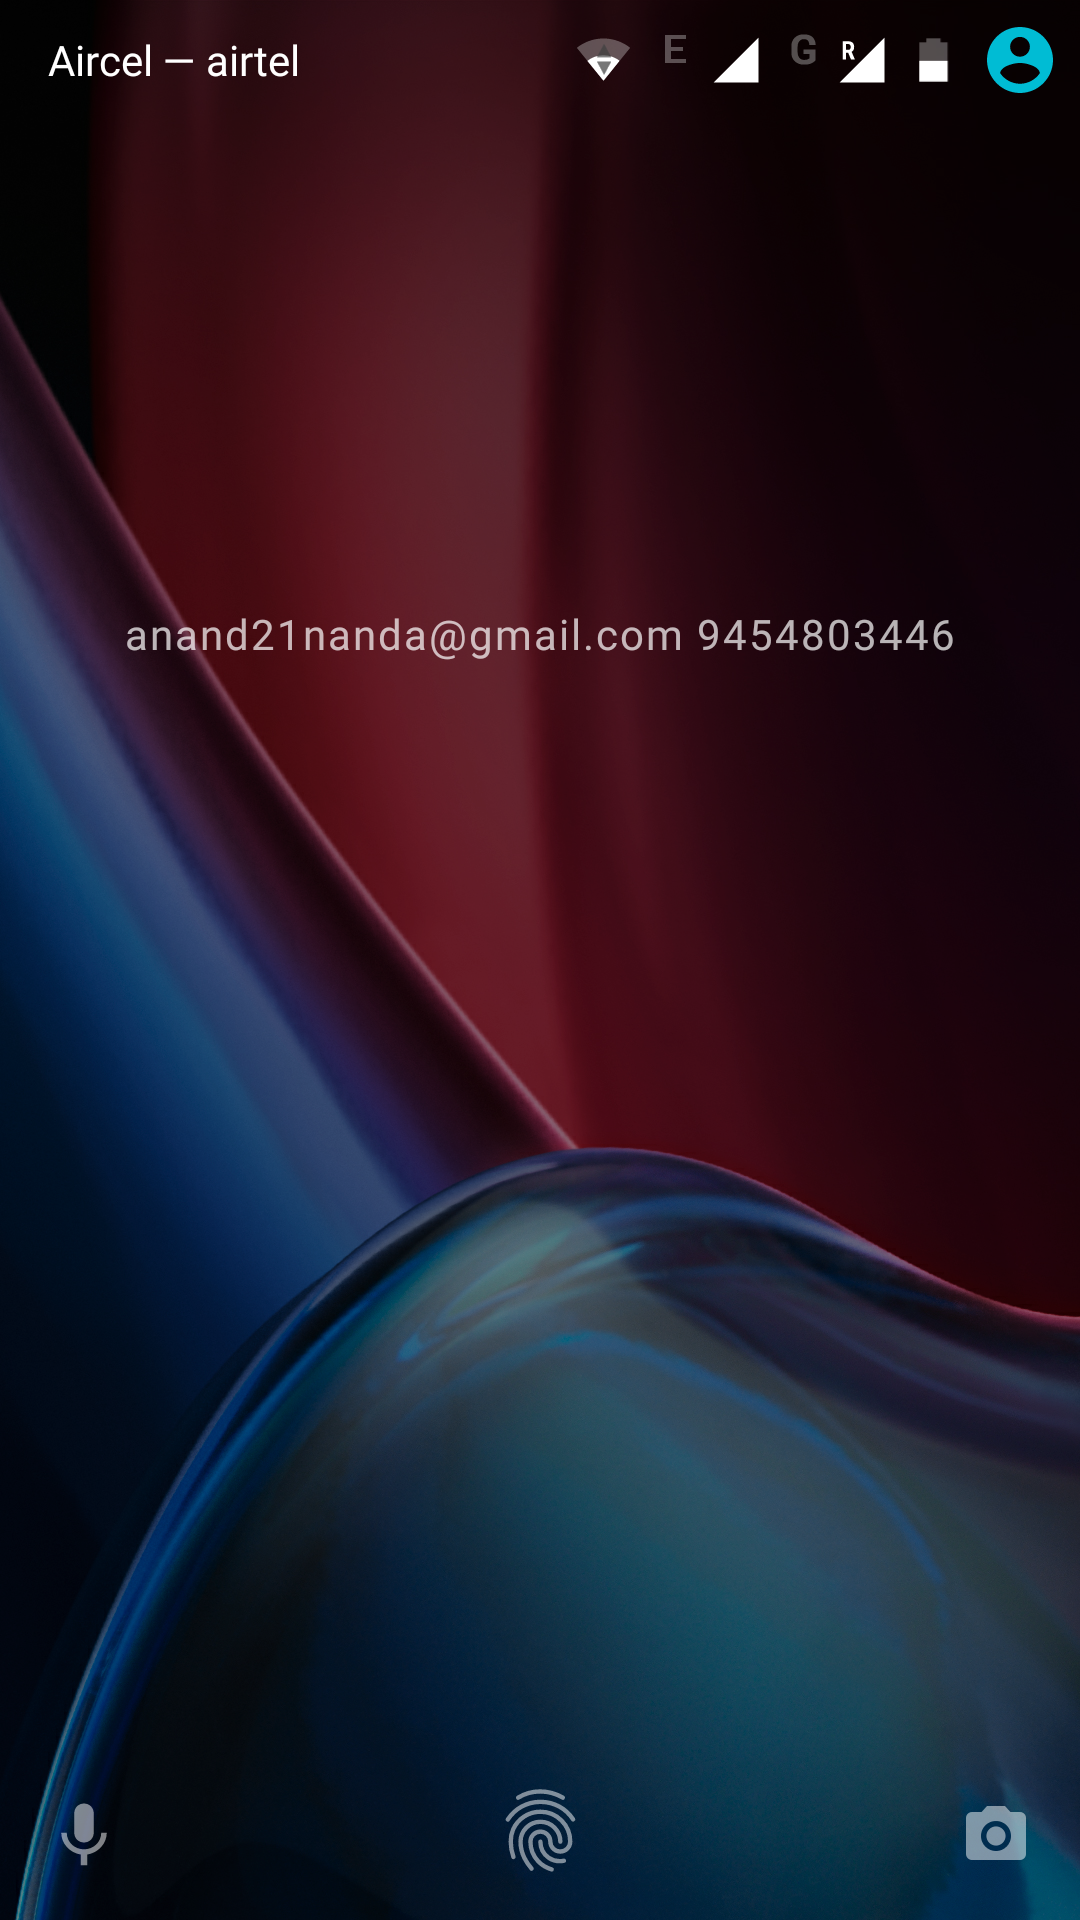
Once you do this, you will have a neat lockscreen without any time on it.

Detecting USB Events In Ubuntu With Python

udev is responsible for managing devices on Linux. It provides udevadm, a CLI utility to monitor and control devices.

If we run udevadm monitor on terminal and connect a USB drive or hard disk or a mobile via USB to your computer, it will show that kernel has detected the device and it will send a signal to udev about it.

→ udevadm monitor
monitor will print the received events for:
UDEV - the event which udev sends out after rule processing
KERNEL - the kernel uevent

KERNEL[4336.899091] add      /devices/pci0000:00/0000:00:14.0/usb1/1-2 (usb)
KERNEL[4336.899774] add      /devices/pci0000:00/0000:00:14.0/usb1/1-2/1-2:1.0 (usb)
KERNEL[4336.902553] add      /devices/pci0000:00/0000:00:14.0/usb1/1-2/1-2:1.1 (usb)
UDEV  [4336.911201] add      /devices/pci0000:00/0000:00:14.0/usb1/1-2 (usb)
UDEV  [4336.936453] add      /devices/pci0000:00/0000:00:14.0/usb1/1-2/1-2:1.1 (usb)
UDEV  [4337.947174] add      /devices/pci0000:00/0000:00:14.0/usb1/1-2/1-2:1.0 (usb)

Pyudev, a third party package provides python bindings for udev. It can be installed with pip install pyudev.

With this we can create a simple monitor to detect USB events.

import pyudev

context = pyudev.Context()
monitor = pyudev.Monitor.from_netlink(context)
monitor.filter_by(subsystem='usb')

for device in iter(monitor.poll, None):
    if device.action == 'add':
        print('{} connected'.format(device))
        # do something

Save this to a file say monitor.py and run it with python monitor.py and connect a mobile or pendrive and it will show something like this.

Device('/sys/devices/pci0000:00/0000:00:14.0/usb1/1-6/1-6:1.0') connected
Device('/sys/devices/pci0000:00/0000:00:14.0/usb1/1-1/1-1:1.0') connected

Here we are just detecting add event. Similary we can detect other events like delete.

This is useful for automatically running shell scripts once the device gets plugged or unplugged.

Migrate From Blogger To Static Site (Nikola)

Long back I have started this blog on blogger platform. Now I choose to migrate to a static because of limitations of blogger.

Blogger has a simple editor in browser to write posts in html. With static site, you can write post in your editor in markdown and keep them in version control system like git.

Jekyll, Pelican, Lektor were my initial choices for static site generators. Unfortunately, they didn't had any useful plugins for smooth migration of data from blogger. Then I stumbled across import_blogger plugin of Nikola and it is able to migrate text content, images without any issues. So, I decided to use Nikola.

Nikola has great documentation and setup was simpler. I used import_blogger plugin and imported all the data. All the posts and pages were working well with exact same urls.

Blogger tags all posts of particular label under /search/label/foo. I have used these urls in some posts. Nikola shows posts under /categories/foo.html.

This is where nikola REDIRECTIONS come in handy. Using this, a list of from & to urls can be mapped. I wrote a simple function for redirections and then enabled STRIP_INDEXES which removes trailing .html.

labels = ['python', 'emacs', 'zen', 'django', 'chrome']
LABEL_REDIRECTIONS = []

for label in labels:
    LABEL_REDIRECTIONS.append((
        '/search/label/{}/index.html'.format(label),
        '/categories/{}'.format(label),
    ))

Since I stripped .html from urls, old urls broke. So I generated a list of old urls and wrote another function to redirect them to new urls.

Nikola has few builtin themes. I wanted something minimalistic and so I rolled out custom theme which you are seeing right now.

Thanks to Puneeth Chaganti, Chris Warrick, Roberto Alsina for helping me with migration.

emblem-mode for Emacs

Emblem.js is a ember friendly templating engine used as an alternative for handlebars.js.

Emblem.js doesn't have any official plugins for emacs. However they recommend to use slim plugins as they are similar.

slim-mode is available on melpa. To install it, run

M-x install-package slim-mode

After installing it, activate slim-mode by running M-x slim-mode.

Instead of activating manually, auto-mode-alist can be used to set major modes that needs to activated for files with specific extension. To activate slim-mode for emblem files which will be ending with .em or .emblem, use

(add-to-list 'auto-mode-alist '("\\.\\(em\\|emblem\\)" . slim-mode))

By adding this line to emacs configuration file, slim-mode gets activated for emblem.js files.

Auto Completion For Custom Search Engines In Chrome

If we have to search for a video on YouTube or a product on Amazon, we will open up that site first and then we will search for it.
Chrome-custom-search-autocompletion1
To avoid this, Chrome allows us to search using custom search engines without visiting the site first. In chrome search settings, we can assign a single letter to a custom search engine.
Chrome-custom-search-autocompletion1
Now if we go to browser, type y and hit Tab, it prompts for YouTube search instead of default search.
Chrome-custom-search-autocompletion1
This is handy. But the major problem with this approach is there won't be autocompletion in chrome address bar.
This is where vimium comes into picture. Vimium provides auto completion for custom search engines.
You can install it from chrome webstore. Once it is installed, go to Vimium options and add youtube search to custom search engines.

y: http://www.youtube.com/results?search_query=%s Youtube
Also add a custom key map for this search.

map y Vomnibar.activateInNewTab keyword=y
If we just press y, it open youtube custom search with autocompletion.
Chrome-custom-search-autocompletion1
Now in every page, we have autocompletion for custom search engines.

Concurrent Downloads - Bash Vs Python

I just found one more free telugu book Graded readings in modern literary Telugu by Golla Narayanaswami Reddy and Dan M Matson in Digital South Asia Library.
Unfortunately they didn't provide it as an ebook but as a set of 221 tif images.
I wrote a simple for loop in shell which downloaded all images one by one using wget.
      $ base_url="http://dsal.uchicago.edu"
$ url="$base_url/digbooks/images/PL4775.R4_1967/PL4775.R4_1967_%03g.gif"
$ time -p sh -c 'for i in $(seq -f $url 1 221); do; wget $i; done;'
I took 375 seconds for that. This was too slow. So I tried to download them parallelly using xargs.
      $ time echo $(seq -f $url 1 221) | xargs -n 1 -P 36 wget
My laptop has a quad core processor. So I tried with 20, 24, 28, 32 process at a time.
With wget+xargs, the best timing is 13 seconds (CPU: 15%, Process: 28).
Again I tried downloading them parallelly but with GNU parallel.
      $ time seq -f $url 1 221 | parallel -j36 wget {}
With wget+parallel, the best timing is 12 seconds (CPU: 48%, Process: 24).
Here is cpu consumption and time taken at each step.
paralle_python_bash2
Once I have done with bash, I decided to try the same things with Python and see how it goes.
I wrote a simple script using requests to download images.
                    import shutil
import sys
from concurrent import futures

import requests


def download_image(url):
r = requests.get(url)
file_name = url.split('/')[-1]
with open(file_name, 'wb') as fh:
fh.write(r.content)


base_url = 'http://dsal.uchicago.edu'
book_url = base_url + '/digbooks/images/PL4775.R4_1967/PL4775.R4_1967_{}.gif'
urls = [book_url.format(str(i).zfill(3)) for i in range(1, 221)]

def download_serially():
for url in urls:
download_image(url)

download_serially()
This took 244 seconds.
To download images parallelly, I have used Threadpoolexecutor from concurrent module.
                    def download_parallely():
workers = int(sys.argv[1])

with futures.ThreadPoolExecutor(max_workers=workers) as executor:
result = executor.map(download_image, urls)

download_parallely()
I used previous script but just added one more function which queues tasks. Then I have executed the script with several options.
      $ time python down.py 28
Threadpoolexecutor documentation uses 5 times number of processors as max_workers by default. I tried same options which I have used for bash. Here is the overall comparision.
With requests+ThreadPoolExecutor, the best timing is 12 seconds (CPU: 36%, Process: 28).
Here is the overall comparision.
paralle_python_bash
For a simple concurrent download, xargs+wget seems to be the best option.

Emacs - Browsing Projects With Etags

A tag is a reference to a sub unit in a program. A tag references syntactic elements like functions, classes e.t.c. A tags table consists of list of tag names and their positions in corresponding files.

Creating Tags Table

A tags table can be generated by etags program. If you are using Ubuntu machine, you can install it with
sudo apt-get install exuberant-ctags
Now, you can generate tags for a file with
etags input_file
Depending on the project, we can also generate tags for a particular type. For example, we can generate tags for all python files using
find . -name '*.py' -exec etags -a {} \;

Browsing Tags

This tag tables enables you to jump to definition of any tag. You can place cursor on a tag and pressM-.(find-tag) which takes you to definition of that tag. If you want to go back to previous location, you can use M-*(pop-tag -mark). There are several functions which help to navigate tags.

Tips

ctags-update is a third party package which automatically updates TAGS file when new files are created.
In addition to them, helm provides a function called helm-semantic which shows all available tags in the current file. This works without TAGS file. Helm also has helm-etags-select which provides helm interface to select tags.
If you are working with a python projects, you can use elpy which navigates tags (using Jedi in the backend) without any TAGS file.

Django Tips & Tricks #6 - Make Deleting Easy In Admin

Lets say we have a model as shown in some project.
from django.db import models

class Resource(models.Model):
"""
Model to hold resources for books.
"""
book = models.ForeignKey('Book')
book_type = models.IntegerField()
url = models.URLField()
This model can be registered in admin as follows.
from django.contrib import admin

from . import models

class ResourceAdmin(admin.ModelAdmin):
list_display = ('book', 'book_type', 'url')


admin.site.register(models.Resource, ResourceAdmin)
This will generate a nice admin interface to modify the data.
django-admin-delete
Now if we want to delete a record, we need to follow these steps.
  • First, we have to select that record
  • Next, we have to click on the action dropdown
  • Next, we have to select delete action
  • Next, we have to click Go button.
  • In the next page we have to confirm that we have to delete.
Just to delete a single record, we have to click 5 times. That's too many clicks for a single action.
To simplify the process, we can have simple delete button for the objects as shown. This can be achieved by writing a function which will insert delete button for every record.
from django.contrib import admin

from . import models


class ResourceAdmin(admin.ModelAdmin):
def delete(self, obj):
return '<input type="button" value="Delete" onclick="location.href=\'%s/delete/\'" />'.format(obj.pk)

delete.allow_tags = True
delete.short_description = 'Delete object'

list_display = ('book', 'book_type', 'url', 'delete')


admin.site.register(models.Book)
Now we have an admin with delete button for the records.
django-admin-delete
To delete an object, just click on delete button and then confirm to delete it. Now, we are deleting objects with just 2 clicks.

Read more django tips.
Read more posts about django.

Auto Convert & Upload Books To Kindle

I have ebooks in various formats like pdf, epub, mobi e.t.c. If I want to read books in laptop, I could use ebook reader like Calibre which can open supports most of the formats.
If I have to read them on Kindle paperwhite, it becomes a problem as it supports only few formats. So whenever I get an ebook, I have to convert it to mobi format and send it to kindle.
I can connect kindle to laptop via USB cable and I can copy books. I can also send books to kindle via email.
I found an IFTTT recipe, to automate all this process. I just need to create a folder to store all the books in dropbox. Then use IFTTT recipe to link dropbox folder which has books and gmail to send books to kindle email.
Now when I move required books into dropbox folder in my laptop, they will automatically appear in my kinde.