How To Auto Reload Celery Workers In Development?

We can pass --autoreload option when starting celery worker. This will restart worker when codebase changes.

celery worker -l info -A foo --autoreload

Unfortunately, it doesn't work as expected and it is deprecated.

During development, we will keep on changing the code base. Manually restarting celery worker everytime is a tedious process. It would be handy if workers can be auto reloaded whenever there is a change in the codebase.

Watchdog provides Python API and shell utilities to monitor file system events. We can install it with

pip install watchdog

Watchdog provides watchmedo a shell utilitiy to perform actions based on file events. It has auto-restart subcommand to start a long-running subprocess and restart it. So, celery workers can be auto restarted using this.

watchmedo auto-restart -- celery worker -l info -A foo

By default it will watch for all files in current directory. These can be changed by passing corresponding parameters.

watchmedo auto-restart -d . -p '*.py' -- celery worker -l info -A foo

If you are using django and don't want to depend on watchdog, there is a simple trick to achieve this. Django has autoreload utility which is used by runserver to restart WSGI server when code changes.

The same functionality can be used to reload celery workers. Create a seperate management command called celery. Write a function to kill existing worker and start new worker. Now hook this function to autoreload as follows.

import shlex
import subprocess

from django.core.management.base import BaseCommand
from django.utils import autoreload


def restart_celery():
    cmd = 'pkill -9 celery'
    subprocess.call(shlex.split(cmd))
    cmd = 'celery worker -l info -A foo'
    subprocess.call(shlex.split(cmd))


class Command(BaseCommand):

    def handle(self, *args, **options):
        print('Starting celery worker with autoreload...')
        autoreload.main(restart_celery)

Now you can run celery worker with python manage.py celery which will start a celery worker and autoreload it when codebase changes.
Django Tips & Tricks #7 - Django Auth Plugin For HTTPie

HTTPie is an alternative to curl for interacting with web services from CLI. It provides a simple and intuitive interface and it is handy to send arbitrary HTTP requests while testing/debugging APIs.

When working with web applications that require authentication, using httpie is difficult as authentication mechanism will be different for different applications. httpie has in built support for basic & digest authentication.

To authenticate with Django apps, a user needs to make a GET request to login page. Django sends login form with a CSRF token. User can submit this form with valid credentials and a session will be initiated.

Establish session manually is boring and it gets tedious when working with multiple apps in multiple environments(development, staging, production).

I have written a plugin called httpie-django-auth which automates django authentication. It can be installed with pip

pip install httpie-django-auth

By default, it uses /admin/login to login. If you need to use some other URL for logging, set HTTPIE_DJANGO_AUTH_URL environment variable.

export HTTPIE_DJANGO_AUTH_URL='/accounts/login/'

Now you can send authenticated requests to any URL as

http :8000/profile -A=django --auth='username:password'

Super Charge Your Shell For Python Development

Last month, I gave a lightning talk about supercharging your shell for python development at BangPypers meetup.

This is a detailed blog post on how to setup your laptop for the same.

Autojump

When working on terminal, cd is used to traverse directories.

cd ~/projects/python/django

cd is inefficient to quickly traverse directories which are in different paths and far away from each other.

cd /var/lib/elasticsearch/
cd ~/sandbox/channels/demo

z, a oh-my-zsh plugin is efficient for traversing directories. With z, directory can be changed by typing name of directory.

z junction

Instead of full name, just a substring would do.

z ju

z keeps a score of all visited directories and moves to most frecency(frequent+recent) directory that matches the substring.

To install z, install oh-my-zsh and add z to plugins in .zshrc file.

plugins=(git z)

Aliases

Read this old blog post on how aliases will improve your productivity.

Autoenv

When working on multiple projects, it becomes necessary to use virtualenvs so that multiple versions of same package can be used. In addition to that, it be necessary to set environment variables on a per project basis.

To automate all these things, autoenv provides directory based environments. Whenever user changes directory, it will help to automatically activate environment and set environment variables.

If you have file named .env in a directory, autoenv will automatically source that file whenever user enters into it.

autoenv is a python package. It can be installed with

pip install autoenv

It provides a shell script which needs to sourced.

echo "source `which activate.sh`" >> ~/.bashrc

You can create a .env file like this in project root.

source ~/.virtualenvs/exp/bin/activate
export SECRET_KEY=foobar

Next time, when your enter into that directory, autoenv finds .env file and it will source it automatically.

Autoreload

I have written a sepeate blog post on how to automagically reload imports long time back.

Autoimports

When you copy code and paste it in ipython interpreter, it might fail with ImportError if required modules aren't already imported by the interpreter.

Also when playing with code, having some predefined data would be handy. This avoids populating of data everytime shell starts.

You can write an init script which will do all these things and load it automatically when ipython starts.

Here is a simple init script which I use to auto import modules and data. This file can be auto loaded by specifying it in your config file.

c.InteractiveShellApp.exec_files = [os.path.join(directory, 'ipython_init.py')]

Autocall

When using python interpreter, to call a function, you have to type parenthesis.Typing parenthesis is not ergonomic as you have to move both hands far away from homerow.

IPython provides autocall option to make functions callable without typing parenthesis. This can be activate with %autocall magic.

In [6]: %autocall 1
Automatic calling is: Smart

Now functions can be called without parenthesis.

In [7]: range 5
------> range(5)
Out[7]: range(0, 5)

You can also enable this by default by activating it in ipython config file.

c.InteractiveShellApp.exec_lines = ['%autocall  1']

These are some tips to become more productive with your shell when working on python projects.

Provisioning Laptop(s) With Ansible

Setting up a new laptop manually takes a lot of time and there is a good chance of forgetting tweaks made to configuration files. It is good idea to automate it via a shell script or using configuration management tools like Ansible. It also makes easy to sync configuration across multiple systems.

Why Ansible?

Ansible is lightweight and provides only a thin layer of abstraction. It connects to hosts via ssh and pushes changes. So, there is no need to setup anything on remote hosts.

Writing A Playbook

You should check out Ansible documentation to get familiar with ansible and writing playbooks. Ansible uses yaml format for playbooks and it's human readable. Here is a simple playbook to install redis on ubuntu server.

hosts: all
sudo: True

tasks:
  - name: install redis
    apt: name=redis-server update_cache=yes

Here is a playbook which I use to configure my laptop. As the playbook needs to run locally, just run

ansible-playbook laptop-setup.yml -i localhost, -c local

Bootstrap Script

To automate provisioning, a bootstrap script is required to make sure python, ansible are installed, to download and execute playbook on the system.

sudo apt update --yes
sudo apt install --yes python python-pip

sudo apt install --yes libssl-dev
sudo -H pip install ansible

wget -c https://path/to/playbook.yml

sudo ansible-playbook setup.yml -i localhost, -c local

Now, to provision a laptop, just run the bootstrap script.

sh -c "$(wget https://path/to/bootstrap_script.sh"

You can use a git repo to track changes in playbook and bootstrap script. If you are using multiple laptops, running bootstrap script on them will make sure everything is synced across them.

How BMTC Is Exploiting Crores From Bangalore Citizens?

BMTC (Bengaluru Metropolitan Transport Corporation) is a government agency which operates the public transport bus service in Bangalore, India. It holds monopoly as it is the only choice for public transportation.

Fare Calculation

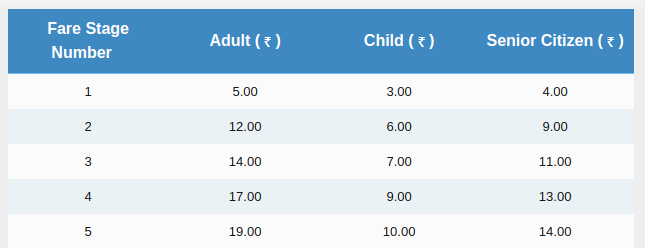
BMTC considers ~2KM distance as a stage and the fares for each stage are as follows.

Let's say, you want to travel from Indira Nagar to BTM Layout, it will cover 5 stages. So, BMTC charges 19₹ for that.

Exploitation?

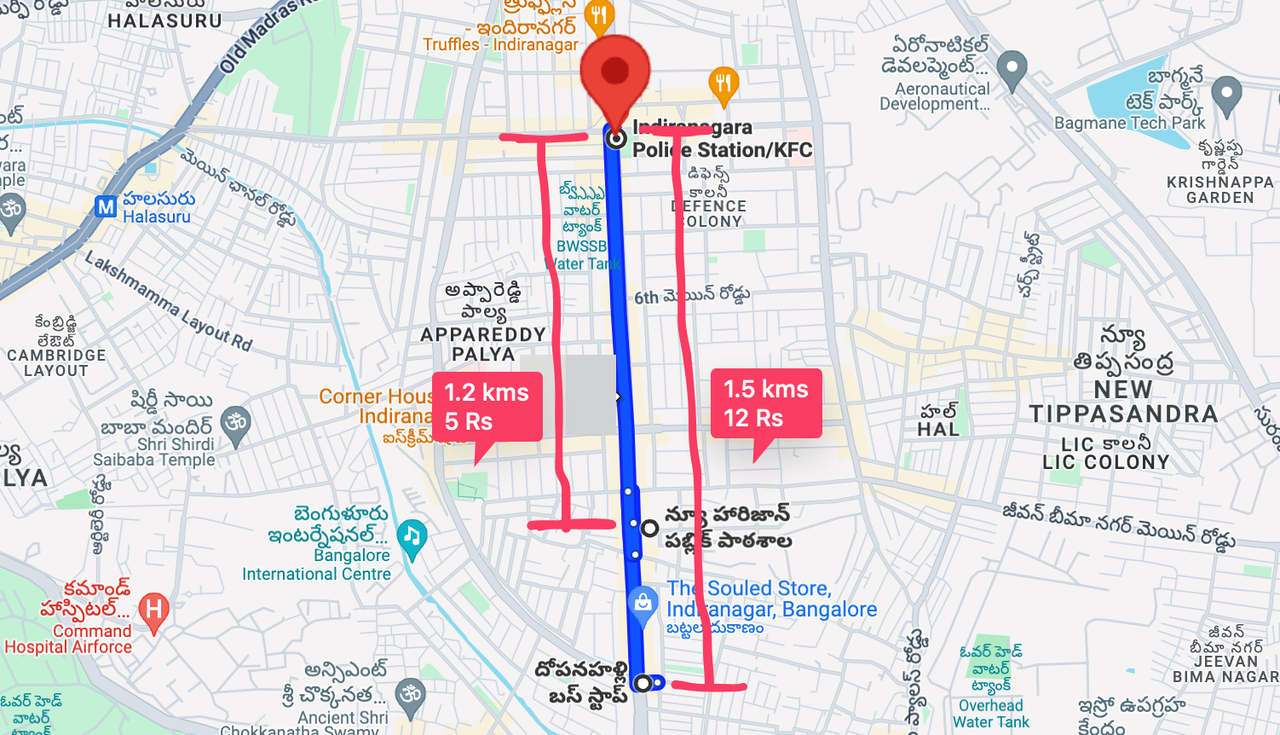
If you travel from Indira Nagar KFC signal to Doopanahalli Arch(1.2KM), which comes under 1 stage, you have to pay 5₹.

On the other hand, if you travel from Indira Nagar KFC signal to Doopanahalli bustop(1.4KM), you have to pay 12₹.

How can BMTC charge 5₹ for the first 1.2KM and 7₹ for the subsequent 0.2KM? If BMTC charges, 5₹ for 1st stage. Then it should charge 5₹ + extra for next stage. But it shouldn't be more than 10₹.

You can just take 1 ticket(5₹) for 1st stage(1.2KM) and one more ticket(5₹) for the next stage(0.2KM). You can just travel 2 stages with 2 tickets for 10₹.

Turnsout BMTC is charging 3₹ extra on every ticket which covers atleast 2 stages. As lakhs of people travel in BMTC buses daily, in a month, this 3₹ turns into crores of rupees.

I am not sure when BMTC has started charging like this. A month back, I sent them an email asking for an explaination of unfair bus tickets and they haven't replied yet.

Update:

After sending this to BMTC officials, they have reduced 2nd stage bus fare by 2 Rs. Thanks to Gopala Kallapura, Krace Kumar & Thegesh GN for supporting the issue.

Refactoring Django With Full Syntax Tree

Django developers decided to drop Python 2 compatability in Django 2.0. There are serveral things that should be refactored/removed.

For example, in Python 2, programmers has to explicitly specify the class & instance when invoking super.

class Foo:
    def __init__(self):
        super(Foo, self).__init__()

In Python 3, super can be invoked without arguments and it will choose right class & instance automatically.

class Foo:
    def __init__(self):
        super().__init__()

For this refactoring, a simple sed search/replace should suffice. But, there are several hacks in codebase where super calls the grandparent instead of the parent. So, sed won't work in such cases. It is hard to refactor them manually and much harder for reviewers as there are 1364 super calls in code base.

→ grep -rI "super(" | wc -l
   1364

So changes has to be scripted. A simple python script to replace super calls by class names will fail to capture classes with on top of them, classes with decorators and nested classes.

To handle all these cases, this python script gets more complicated and there is no guarantee that it can handle all edge cases. So, a better choice is to use syntax trees.

Python has ast module to convert code to AST but it can't convert AST back to code. There are 3rd party packages like astor which can do this.

# this is a comment
def foo():

   print(
    "hello world"
)

Converting above code to AST and then converting back gives this

def foo():
    print('hello world')

Code to AST is a lossy transformation as they cannot preserve empty lines, comments and code formatting.

ast_to_code(code_to_ast(source_code)) != source_code

For lossless transformation, FST(Full Syntax Trees) is needed.

fst_to_code(code_to_fst(source_code)) == source_code

RedBaron package provides FST for given piece of code. With this, just locate super calls, find nearest class node, check class name with super and replace accordingly. With RedBaron, this refactoring can be done in less than 10 lines of code.

RedBaron has good documentation with relveant examples and its API is similar to BeautifulSoup. To write code that modifies code RedBaron seems to be an apt choice.

Thanks to Tim Graham & Aymeric Augustin for reviewing the patch.

Why Blog Posts Are Better Than Scientific Papers?

Titus Brown wrote a blog post on why blog posts are better than scientific papers. Here are few more reasons for that.

Fast

Publishing blog posts is lightning fast(how fast can you type?). You can just publish it with a click after writing. However with scientific papers you have to wait months to get your work published.

Mutability

Blog posts are easy to edit. If you are using a version controlled system like git, any one can easily collaborate. You can also leave comments on (most) blog posts and can have discussion with the author and/or others. Scientific papers once published are hard to change.

No Gatekeepers

To publish blog posts, you can setup your own blog or use services like medium. There are no gatekeepers who says that you can't publish a blog post because they thinks its not worth it.

Organic

Blog posts tend to be casual and organic. You can crack a joke and readers will enjoy it. Scientific papers are formal. You spray some sarcasm and your paper never gets published.

What Is The Meaning Of Life?

The meaning of life is

the condition that distinguishes animals and plants from inorganic matter, including the capacity for growth, reproduction, functional activity, and continual change preceding death.

Source: Oxford Dictionary

Detect & Correct Skew In Images Using Python

When scanning a document, a slight skew gets into the scanned image. If you are using the scanned image to extract information from it, detecting and correcting skew is crucial.

There are several techniques that are used to skew correction.

  • Projection profile method

  • Hough transform

  • Topline method

  • Scanline method

However, projection profile method is the simplest and easiest way to determine skew in documents in the range ±5°. Lets take a part of scanned image and see how to correct skew.

In this method, we will convert image to black (absence of pixel) & white (presence of pixel). Now image is projected vertically to get a histogram of pixels. Now image is rotated at various angles and above process is repeated. Wherver we find maximum diffrence between peaks, that will be the best angle.

import sys

import matplotlib.pyplot as plt
import numpy as np
from PIL import Image as im
from scipy.ndimage import interpolation as inter

input_file = sys.argv[1]

img = im.open(input_file)

# convert to binary
wd, ht = img.size
pix = np.array(img.convert('1').getdata(), np.uint8)
bin_img = 1 - (pix.reshape((ht, wd)) / 255.0)
plt.imshow(bin_img, cmap='gray')
plt.savefig('binary.png')


def find_score(arr, angle):
    data = inter.rotate(arr, angle, reshape=False, order=0)
    hist = np.sum(data, axis=1)
    score = np.sum((hist[1:] - hist[:-1]) ** 2)
    return hist, score


delta = 1
limit = 5
angles = np.arange(-limit, limit+delta, delta)
scores = []
for angle in angles:
    hist, score = find_score(bin_img, angle)
    scores.append(score)

best_score = max(scores)
best_angle = angles[scores.index(best_score)]
print('Best angle: {}'.formate(best_angle))

# correct skew
data = inter.rotate(bin_img, best_angle, reshape=False, order=0)
img = im.fromarray((255 * data).astype("uint8")).convert("RGB")
img.save('skew_corrected.png')

Results:

Original Image


Black & white image


Histogram of image


Scores at various angles


Histogram at 2° (best angle)


Skew corrected image

Here we have done only one iteration to find best angle. To get better accuracy, we can search over at (2 ± 0.5)°. This process can be repeated until we find a suitable level of accuracy.

Why I Use CyanogenMod?

When listening to music, to switch tracks I want to use volume buttons. For this I have to use Pocket Skip Track app. CyanogenMod has inbuilt support for that.

To interact with mobile from computer over wifi, wifi adb is required. CyanogenMod provides an option to enable this in Developer Options.

To put mobile in recovery mode, Gravity Box is required. This should be used only after installing Xposed framework. CyanogenMod has Advanced reboot which provides option to put phone in recovery mode.

Battery icon in status bar is very small. Having a text percentage indicator will be more useful. For this battery percentage is required. CyanogenMod has inbuilt circle/text indicators.

Auto brighness stopped working after I have rooted Moto G4 plus. I had to use twilight for auto brighness adjustment. With CyanogenMod, it is working fine. It also has a night mode option.

With stock android, auto rotate won't work in all directions. Set orientation app is required for that. CyanogenMod has inbuilt support for that.

To adapt mobile display to the time of the day, flux app is required on stock android. CyanogenMod has inbuilt option for this.

To get superuser permissions, I have to root stock android. CyanogenMod comes with root permissions. To run adb as root on stock android, adbd insecure app is required. CyanogenMod works without it.

Stock android also doesn't provide any options to customize status bar. CyanogenMod has several options to customize it.

There are several other things where CyanogenMod excels when compared to stock android like themes, privacy guard e.t.c. However, CyanogenMod comes with a lot of inbuilt features(batteries included) and that is the main reason for me to use it.