Load Testing Celery With Different Brokers

Celery is mainly used to offload work from request/response cycle in web applications and to build pipelines in data processing applications. Lets run a load test on celery to see how well it queues the tasks with various brokers.

Let us take a simple add task and measure queueing time.

import timeit

from celery import Celery

broker = 'memory://'


app = Celery(broker=broker)


@app.task
def add(x, y):
    return x + y


tasks = 1000
start_time = timeit.default_timer()
results = [add.delay(1, 2) for i in range(tasks)]
duration = timeit.default_timer() - start_time
rate = tasks//duration
print("{} tasks/sec".format(str(rate))

On development machine, with AMD A4-5000 CPU, queueing time is as follows

  • memory ---> 400 tasks/sec
  • rabbitmq ---> 300 tasks/sec
  • redis ---> 250 tasks/sec
  • postgres ---> 30 tasks/sec

On production machine, with Intel(R) Xeon(R) CPU E5-2676, queueing time is as follows

  • memory ---> 2000 tasks/sec
  • rabbitmq ---> 1400 tasks/sec
  • redis ---> 1200 tasks/sec
  • postgres ---> 200 tasks/sec

For low/medium traffic webistes and applications, 1000 tasks/second should be fine. For high traffic webistes, there will be multiple servers queueing up the tasks.

Incase if we need to queue the tasks at a higher rate and if we have task arguments before hand, we can chunk the tasks.

tasks = add.chunks(zip(range(1000), range(1000)), 10)

This will divide 1000 tasks into 10 groups of 100 tasks each. As there is no messaging overhead, it can queue any number of tasks in less than a second.

How To Plot Renko Charts With Python?

Renko charts are time independent and are efficient to trade as they eliminate noise. In this article we see how to plot renko charts of any instrument with OHLC data using Python.

To plot renko charts, we can choose a fixed price as brick value or calculate it based on ATR(Average True Range) of the instrument.

There are two types of Renko charts based on which bricks are calculated.

Renko chart - Price movement

First one is based on price movement. In this, we will divide the price movement of current duration by brick size to get the bricks.

Once bricks are obtained, we need to assign the brick colors based on the direction of price movement and then plot rectangles for each available brick.

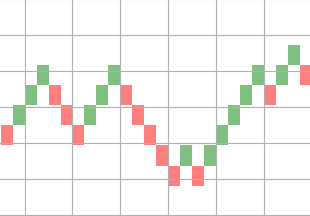
import pandas as pd
from matplotlib.patches import Rectangle
import matplotlib.pyplot as plt


brick_size = 2


def plot_renko(data, brick_size):
    fig = plt.figure(1)
    fig.clf()
    axes = fig.gca()
    y_max = max(data)

    prev_num = 0

    bricks = []

    for delta in data:
        if delta > 0:
            bricks.extend([1]*delta)
        else:
            bricks.extend([-1]*abs(delta))

    for index, number in enumerate(bricks):
        if number == 1:
            facecolor='green'
        else:
            facecolor='red'

        prev_num += number

        renko = Rectangle(
            (index, prev_num * brick_size), 1, brick_size,
            facecolor=facecolor, alpha=0.5
        )
        axes.add_patch(renko)

    plt.show()


df = pd.read_csv(file)

df['cdiff'] = df['close'] - df['close'].shift(1)
df.dropna(inplace=True)
df['bricks'] = df.loc[:, ('cdiff', )] / brick_size

bricks = df[df['bricks'] != 0]['bricks'].values
plot_renko(bricks, brick_size)

Here is a sample renko chart plotted using the above code.

Renko chart - Period close

In this bricks are calculated based on the close price of the instrument. Calculation of bricks is sligtly complex compared to price movement chart. I have created a seperate package called stocktrends which has this calculation.

from stocktrends import Renko

renko = Renko(df)
renko.brick_size = 2
data = renko.get_ohlc_data()
print(data.tail())

This will give OHLC data for the renko chart. Now we can use this values to plot the charts as mentioned above.

Automatic Magnetometer Calibration With Arduino

If we take readings from a 3-axis magnetometers like HMC5883L, AK8963C (used in MPU9250) or LSM303DLHC and plot them, its response should be a sphere with ceter at origin.

In practice, due to the presence of hard and soft iron distortions, the response will be an ellipsiod with its center shifted away from origin. We need to calibrate the magnetometer to nullify the distortions.

First we need to get sample readings of magnetometer in various positions. Depending on the magnetometer, we need to connect it to arduino and take readings by rotating it in 8 shape.

Calibration

Hard iron biases shifts center away from origin. We can eliminate this error by calculating the offsets and shifting the readings.

int mx, my, mz;

int mx_min, my_min, mz_min;
int mx_max, my_max, mz_max;
int mx_offset, my_offset, mz_offset;

int mx_calibrated, my_calibrated, mz_calibrated;

// get min/max values by taking readings
// from magnetometer of your choice

mx_offset = (mx_min + mx_max)/2;
my_offset = (my_min + my_max)/2;
mz_offset = (mz_min + mz_max)/2;

mx_calibrated = mx - mx_offset;
my_calibrated = my - my_offset;
mz_calibrated = mz - mz_offset;

Soft iron biases makes the axial responses uneven which results in ellipsiod shape. An easier way to correct this is to rescale the axial readings to an average value.

int mx_scale, my_scale, mz_scale;

mx_scale = (mx_max - mx_min)/2;
my_scale = (my_max - my_min)/2;
mz_scale = (mz_max - mz_min)/2;

float avg_scale = (mx_scale + my_scale + mz_scale)/3;

mx_calibrated = avg_scale/(mx - mx_offset);
my_calibrated = avg_scale/(my - my_offset);
mz_calibrated = avg_scale/(mz - mz_offset);

We can caclulate these biases once and store them in our code so that we don't need to calibrate it everytime. We can also write an auto update function which will recalibrate offsets & scale for every new reading.

Django Tips & Tricks #9 - Auto Register Models In Admin

Inbuilt admin interface is one the most powerful & popular feature of Django. Once we create the models, we need to register them with admin, so that it can read metadata and populate interface for it.

If the django project has too many models or if it has a legacy database, then adding all those models to admin becomes a tedious task. To automate this process, we can programatically fetch all the models in the project and register them with admin.

from django.apps import apps


models = apps.get_models()

for model in models:
    admin.site.register(model)

This works well if we are just auto registering all the models. However if we try some customisations and try to register them in admin.py files in our apps, there will be conflicts as Django doesn't allow registering the same model twice.

So, we need to make sure this piece of code runs after all admin.py files are loaded and it should ignore models which are already registered. We can safely hook this code in appconfig.

from django.apps import apps, AppConfig
from django.contrib import admin


class CustomApp(AppConfig):
    name = 'foo'

    def ready(self):
        models = apps.get_models()
        for model in models:
            try:
                admin.site.register(model)
            except admin.sites.AlreadyRegistered:
                pass

Now all models will get registed automatically. If we go to a model page in admin, it will just show 1 column like this.

This is not informative for the users who want to see the data. We can create a ListAdminMixin, which will populate list_display with all the fields in the model. We can create a new admin class which will subclass ListAdminMixin & ModelAdmin. We can use this admin class when we are registering the model so that all the fields in the model will show up in the admin.

from django.apps import apps, AppConfig
from django.contrib import admin


class ListAdminMixin(object):
    def __init__(self, model, admin_site):
        self.list_display = [field.name for field in model._meta.fields if field.name != "id"]
        super(ListAdminMixin, self).__init__(model, admin_site)


class CustomApp(AppConfig):
    name = 'foo'

    def ready(self):
        models = apps.get_models()
        for model in models:
            admin_class = type('AdminClass', (ListAdminMixin, admin.ModelAdmin), {})
            try:
                admin.site.register(model, admin_class)
            except admin.sites.AlreadyRegistered:
                pass

Now whenever we create a new model or add a new field to an existing model, it will get reflected in the admin automatically.

How To Install Custom ROMs In Xiamo MiPad?

Mi Pad and other Xiamo devices has Mi UI OS which is a dual boot system. A major problem with this system is it has only ~600 MB of space in 1st partition. Because of this, we cannot install some custom ROMs as they need more space. In this article we will see how to merge both partitions to get more free space and install any custom ROM.

Install TWRP

Dowload latest recovery from twrp.me. Copy it to android device or push it to android using adb.

adb push -p twrp-3.1.1-0-mocha.img /sdcard/

Now put the device into fastboot mode by pressing Volume down & Power button simultanesouly when you switch it on. When in fastboot mode, flash the downloaded recovery file

sudo fastboot flash recovery twrp-3.1.1-0-mocha.img

Now we can go to recovery mode using adb.

adb reboot recovery

Merge partitions

Before installing custom ROM, we need to merge partitions so that we will have enough space to install ROM. If you are familiar with parted command, you can directly merge the partitions from terminal in TWRP recovery.

There is also a script which you can flash to do the partition. You can read this guide on mi forum for more information.

After partition is completed, from TWRP go to Wipe -> Advanced wipe -> Select System -> Click on Repair or change file system. Here it should show that free space in system is more than 1GB.

Install ROM

After partitions are merged, it is straight forward to install any custom ROM. Download a custom ROM like lineage or RR, push it to device and then install it from TWRP. After reboot, you will see the custom ROM booting.

Django Tips & Tricks #8 - Hyperlink Foreignkey Fields In Admin

Consider Book model which has Author as foreignkey.

from django.db import models


class Author(models.Model):
    name = models.CharField(max_length=100)

class Book(models.Model):
    title = models.CharField(max_length=100)
    author = models.ForeignKey(Author)

We can register these models with admin interface as follows.

from django.contrib import admin

from .models import Author, Book

class BookAdmin(admin.ModelAdmin):
    list_display = ('name', 'author', )

admin.site.register(Author)
admin.site.register(Book, BookAdmin)

Once they are registed, admin page shows Book model like this.

While browsing books, we can see name and author. Here, name field is liked to change view of book. But author field is shown as plain text. If we have to modify author name, we have to go back to authors admin page, search for relevant author and then change name.

This becomes tedious if we spend lot of time in admin for tasks like this. Instead, if author field is hyperlinked to its change view, we can directly go to that page.

Django provides an option to access admin views by its URL reversing system. For example, we can get change view of author model in book app using reverse("admin:book_author_change", args=id). Now we can use this url to hyperlink author field in book admin.

from django.contrib import admin
from django.utils.safestring import mark_safe


class BookAdmin(admin.ModelAdmin):
    list_display = ('name', 'author_link', )

    def author_link(self, book):
        url = reverse("admin:book_author_change", args=[book.author.id])
        link = '<a href="%s">%s</a>' % (url, book.author.name)
        return mark_safe(link)
    author_link.short_description = 'Author'

Now in the book admin view, author field will be hyperlinked to its change view and we can visit just by clicking it.

Depending on requirements, we can link any field in django to other fields or add custom fields to improve productivity.

Remove Clock From LockScreen/StatusBar On Android RR

Last year, I wrote a blog post on how to remove clock from lock screen and status bar if xposed is installed on your android device. You can also do this without xposed if you are using RR(Resurrection Remix) as it comes with a lot of inbuilt customization.

Remove Clock From LockScreen

To remove clock from lockscreen, go to Settings -> Configurations -> Lock screen -> Show lock screen lock.

Remove Time From StatusBar

To remove clock from status bar, go to Settings -> Configurations -> Status bar -> System UI tuner -> Time -> Dont show this icon.

Once you do this, you will have a clean lockscreen and statusbar without any date or time them.

Bluetooth Serial Communication Between Linux & Android

Most laptops and smart phones(Android/iPhone) have builtin Bluetooth modules. We can use this bluetooth module to communicate with other devices or with other bluetooth modules like HC-05 or HM-10.

In this article, we will learn how to send data between laptop and android bluetooth.

First, we need to pair with a bluetooth device to send information. From Ubuntu, we can pair to a Bluetooth device from Bluetooth settings. Alternatively, we can also use CLI to do the same.

$ bluetoothctl
[NEW] Controller 24:0A:64:D7:99:AC asus [default]
[NEW] Device 94:E9:79:BB:F8:3A DESKTOP-C4ECO3K
[NEW] Device 88:79:7E:7B:4C:87 athene
[NEW] Device 94:65:2D:8C:2E:10 OnePlus 5
[NEW] Device 98:0C:A5:61:D5:64 Lenovo VIBE K5 Plus
[NEW] Device AC:C3:3A:A0:CE:EF Galaxy J2
[NEW] Device 98:D3:35:71:02:B3 HC-05

[bluetooth]# power on
Changing power on succeeded

[bluetooth]# agent on
Agent registered

[bluetooth]# default-agent
Default agent request successful

[bluetooth]# scan on
Discovery started
[CHG] Controller 24:0A:64:D7:99:AC Discovering: yes
[CHG] Device 94:E9:79:BB:F8:3A RSSI: -88
[CHG] Device 88:79:7E:7B:4C:87 RSSI: -66

[bluetooth]# pair 88:79:7E:7B:4C:87
Attempting to pair with 88:79:7E:7B:4C:87
[CHG] Device 88:79:7E:7B:4C:87 Paired: yes
Pairing successful

To communicate with paired devices, we will use RFCOMM protocol. RFCOMM is just a serial port emulation and provides reliable data tranfer like TCP.

From ubuntu, lets open a port for communication.

$ sudo rfcomm listen /dev/rfcomm0 3

From Android, we have to connect to ubuntu. For this, we can use Roboremo app which supports RFCOMM.

$ sudo rfcomm listen /dev/rfcomm0 3
Waiting for connection on channel 3
Connection from 88:79:7E:7B:4C:87 to /dev/rfcomm0
Press CTRL-C for hangup

Once the connection is established, we can communicate between devices.

In Unix like systems, OS provides a device file as an interface for device driver. To send and read messages from Linux or Mac is as easy as reading and writing to a file.

# to send message to bluetooth
$ echo 'hello from ubuntu' > /dev/rfcomm0

We can see the received messages on Android

We can also send messages from android and read from ubuntu.

# to read messages from bluetooth
$ cat /dev/rfcomm0
hello from android

This way, we can communicate with any bluetooth module using a laptop or a smart phone.

Arduino Programming From Text Editor & Command Line

To program Arduino, we can use Arduino IDE which facilitates writing and uploading code to the board.

If we are using a text editor for programming, it will have lot of customisations which speed up development process. In such case, it is better to use same text editor for arduino programming too.

I use Emacs as IDE and there is arduino mode for emacs which provides syntax highlighting and some useful utilites to write arduino code. We can find such packages for other editors also.

Arduino also provides cli interface to upload code to arduino. To upload code, we need to specify port, board and the code to upload.

In Linux system, to upload a file called foo.ino, we can run

arduino --port /dev/ttyACM0 --board arduino:avr:mega
 \ --upload foo.ino

An alternate way is to use platformio, an opensource tool chain for IoT development.

It can be installed using pip.

pip install platformio

Once it is installed, code can be directly uploaded using ci command.

pio ci --board=megaatmega2560 --project-option="upload_port=/dev/ttyACM0" --project-option="targets=upload" foo.ino

By this we can use text editor to write code and arduino/platformio to upload code to arduino board.

Using LSTM-CTC For Complex Script Recognition

Most Indian languages have strong consonant-vowel structures which combine to give syllables. These syllables are written as one continuous ligature and they require complex text rendering (CTL) for type setting.

Writing OCR (Optical Character Recognition) software for CTL scripts is a challenging task as segmentation is hard. Because of this overall accuracy drops drastically.

A better approach is to use Connectionist Temporal Classification1(CTC) which can identify unsegmented sequence directly as it has a one-to-one correspondence between input samples and output labels.

Here is a sample input and output of an RNN-CTC network which takes an unsegmented sequence and outputs labels.

Open-source OCR software ocorpy uses BLSTM-CTC for text recognition. Tesseract started using the same in its latest(4.0) version.

I have trained a model to recognize Telugu script using Ocropy and the accuracy is ~99% which is far better when compared to OCR software without CTC which are accurate to ~70%.